Full Post vs Summary (Excerpt) in WordPress Archive Pages?

Are you wondering whether you should use an excerpt instead of full posts in your archive pages?

A summary helps provide a quick glimpse to your visitors about your content. Users can read through the short excerpt and decide if they’d like to view the entire blog. However, using the full post may get more eyes on the content because it doesn’t require extra action on the user’s part. But which is better?

In this article, we will compare full post vs summary (excerpt) in your WordPress archive pages.

What is an Excerpt and How to Add It in WordPress?

An excerpt is a short summary of an article that you can display on the archive pages in WordPress. The excerpt also has a link that users can click to read the whole article.

If you have limited space on your WordPress site, then excerpts are great for showing descriptions of your content.

By default, WordPress will use the starting 55 words of a blog post and show it as an excerpt. However, you can also manually add an excerpt.

Adding Excerpts in WordPress Posts

First, you’ll need to add a new post or edit an existing one. Once you’re in the WordPress content editor, you can click the ‘gear’ icon at the top right corner to open the settings panel.

Next, scroll down to the ‘Excerpt’ section and add your text in the ‘Write an excerpt (optional)’ field.

When you’re done, simply publish or update your blog post.

Adding Excerpts in WordPress Pages

If you need to add a summary to a WordPress page, then you’ll notice that there’s no option to add an excerpt. However, you can simply add the following code to your website:

add_post_type_support( ‘page’, ‘excerpt’ );

To add the code, you’ll need to install and activate the WPCode plugin. For more details please see our guide on how to install a WordPress plugin.

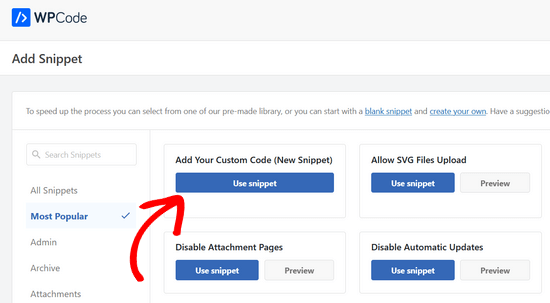
Upon activation, head to Code Snippets » Add Snippet from your WordPress dashboard, and then select the ‘Add Your Custom Code (New Snippet)’ option.

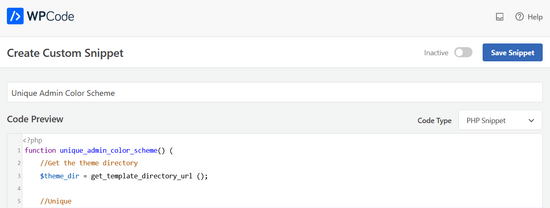
Next, you can enter a name for your code snippet.

After that, simply paste the snippet in the ‘Code Preview’ area and select the ‘PHP Snippet’ from the Code Type dropdown menu.

From here, you can scroll down to the ‘Insertion’ section and select where you’d like to add the snippet on your site.

Next, click on the ‘Location’ dropdown menu and choose the ‘Run Everywhere’ option under ‘PHP Snippets Only.’

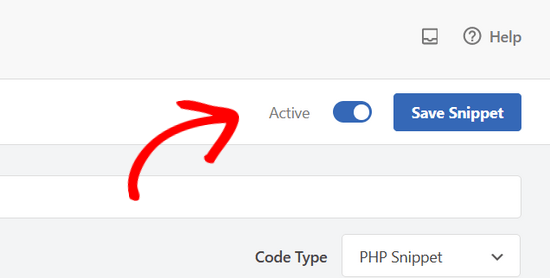
After entering the code, you can click the toggle at the top to activate the snippet and then click the ‘Save Snippet’ button.

This will add an ‘Excerpt’ meta box in the settings panel in your WordPress editor, where you can easily provide a short summary for your page.

Please see our tutorial on how to add excerpts to your pages in WordPress for more information.

That said, let’s see the advantages of using a summary vs a full post in archive pages.

Benefits of Using Summary vs Full Post in Archives

When optimizing your site for a better user experience, choosing between excerpts and full posts in archive pages can play a huge role. You want users to easily browse the website, find what they are looking for, and improve search engine ranking.

With summaries, you can provide an improved user experience. It helps users find the content they want to read. Plus, it keeps your page organized and allows you to display multiple posts on a page. This would be very difficult if you show full posts in archives.

That said, here’s a closer look at why we recommend using summary (excerpts) vs full posts on your WordPress site’s archive pages.

1. Improves Page Load Time

Did you know Google now uses your site speed as a ranking factor? The search engine will rank fast-loading websites higher than the ones that take a lot of time to load fully.

By using excerpts on your archive pages, you significantly improve the page load time.

Imagine an archive page that shows 10 posts per page. If each of those 10 pages is 500+ words long with 5 images each, then your user has a lot to scroll through. The page will also load slower than normal.

By using excerpts, you can significantly improve the user experience.

Here’s a preview of how a short summary appears on WPBeginner when you view the archive pages.

Users can load and browse through our category, tags, date, and other archive pages quickly and easily. As for search engines, you will see a boost in rankings for archive pages and improvement in WordPress SEO with faster page load times.

2. Prevents Duplicate Content

By showing excerpts on your archive pages, you can prevent being flagged for duplicate content in search engines.

For example, WordPress by default has category, tags, date, and author archives. Publishing full posts in archives will make each article appear at full length on several different pages on your site.

Even though search engines are quite smart in finding canonical URLs for each post, they can still flag the site for duplicate content which will affect your search engine rankings.

3. Increases Pageviews and Reduces Bounce rate

Using summaries or excerpts can reduce the bounce rate and increase pageviews. Users can click through to the full post in order to read the entire article.

If you just have full posts displayed in the archive pages, then people will not see any other elements that are on the blog page itself, such as a popular posts widget inside the post or page content.

By displaying the full post, users might just leave your site after looking at a single page instead of clicking around.

A summary makes your archive page more engaging and allows your readers to see find more content easily.

Disadvantages of Using Summary vs Full Post in Archives

1. Short Excerpts Provide Poor User Experience

If you don’t set an excerpt for blog posts, then WordPress will automatically create a summary using the first 55 words in the article. This is too short, and sometimes your sentences will be cut in half, resulting in a poor user experience.

You can always change the excerpt length in a WordPress theme, but that doesn’t fix the problem entirely.

One solution is to write a custom excerpt in the content editor before publication. Another solution is to write short, catchy introductions that will most likely make the user interested and can easily work as excerpts.

2. Hidden Content

Some users prefer to read everything on one page rather than having to go to a different page to read the entire article. This is useful if you have short blog posts that don’t contain many images.

These users are likely to stay on your site longer, even if they don’t click on any other pages, which is also a metric that Google uses to determine search engine rankings.

Should You Use Full Post or Summary in Archive Pages?

If your articles are short and do not contain a lot of images, then you can get away with displaying full posts on your archive pages.

However, in most cases, we always recommend using a summary or excerpts for your archive pages. Most WordPress themes come with a built-in option that allows you to choose between full posts vs excerpts from the settings.

Excerpts provide a better user experience and make your site look clean and organized. You can boost user engagement, increase pageviews, and show multiple articles on your archive pages.

We hope that this article answered the question of whether you should use a full post or summary in your WordPress archive pages. You may also want to see our guide on how to move a WordPress from HTTP to HTTPS and WooCommerce made simple.

If you liked this article, then please subscribe to our YouTube Channel for WordPress video tutorials. You can also find us on Twitter and Facebook.

The post Full Post vs Summary (Excerpt) in WordPress Archive Pages? first appeared on WPBeginner.

How to Easily Change the Font Size in WordPress

Do you want to change the font size in your WordPress posts or pages?

Sometimes you may want to make a line or a paragraph larger, or you might want to increase the font size on the entire page.

In this article, we’ll show you how to easily change the font size in WordPress posts and themes.

How to change font size in WordPress

Video Tutorial

If you’d prefer written instructions, just keep reading.

Method 1: Using Paragraph Headings

Using headings in your content is a great way to grab user attention with a larger-size font. In most WordPress themes, headings are in a larger font than regular body text. They allow you to break your posts and pages into sections.

Headings are great for SEO as well. Search engines give proper headings more weight than normal paragraph text.

How to add a heading in the default WordPress block editor

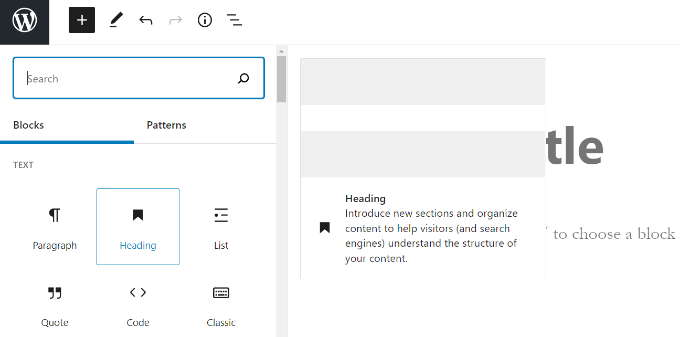
You can add a heading to your posts or pages by simply adding the ‘Heading’ block. You can search for it or find it in the ‘Text’ section in the WordPress block editor.

Add a heading block

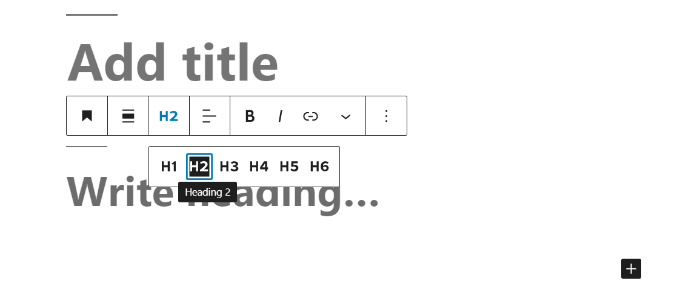
The block will default to Heading 2. Normally, it makes sense to stick with Heading 2 for your subheadings. If you want to change this, then you can simply click on the ‘H2’ drop-down to select a different size.

Change heading from h2

Alternatively, you can change this in the block settings on the right-hand side of the screen. You can also change the heading’s color there as well.

How to add a heading in the older Classic Editor

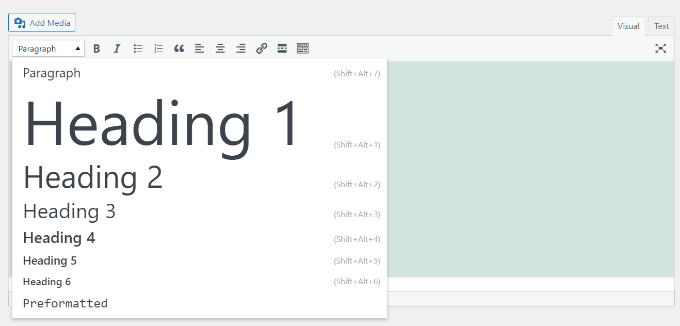
If you are still using the older classic editor in WordPress, then you can add headings using the ‘Paragraph’ drop-down.

Just highlight the text that you want to turn into a heading, click the ‘Paragraph’ drop-down, and select your heading size.

Choose heading in classic editor

The sizes and colors of the different Heading styles are controlled by your theme’s stylesheet (style.css).

If you’re using a premium WordPress theme, then you may have the option to change these settings under Appearance » Customize.

Method 2: Changing the Size of the Text in the Block Editor

What if you want to have a paragraph or even your whole post in a larger font? You can do this easily using the default WordPress block editor.

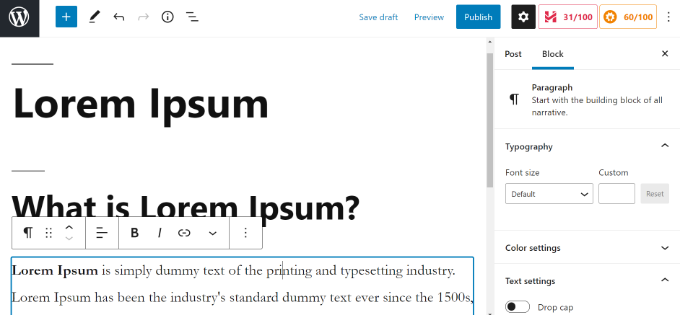
Just click on any paragraph block, then select the font size under ‘Typography’ on the right-hand side.

Typography settings

You can select from the drop-down, which covers Small, Normal, Medium, Large, and Huge. If you change your mind, then just click the ‘Reset’ button to set your paragraph back to the default text.

There’s also a ‘Custom’ option where you can simply type in the pixel size that you’d like. If you want, you can also set a large Drop Cap to appear at the start of your paragraph.

These options aren’t available in the older classic editor for WordPress. If you want to use them, then think about making the switch. Our tutorial on how to use the new WordPress block editor will help you.

If you are determined to stick with the classic editor, then this next option is for you.

Method 3: Change Font Size Using Advanced Editor Tools

Advanced Editor Tools, previously known as TinyMCE Advanced, is a WordPress plugin that gives you more control over font sizes and text formatting, as well as a range of other features.

This is particularly useful with the older classic editor, but it also works with the block editor. It adds a new block called “Classic Paragraph” that has all the formatting controls.

To use it, you’ll first need to install and activate the Advanced Editor Tools plugin. If you’re not sure how to do that, check out our step by step guide on how to install a WordPress plugin.

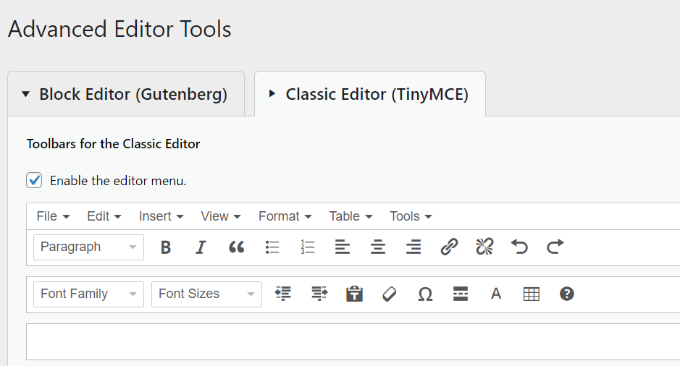
Next, go to Settings » Advanced Editor Tool (TinyMCE Advanced) to configure the editor settings. This is where you can set up the buttons you want to use in the TinyMCE Advanced toolbar.

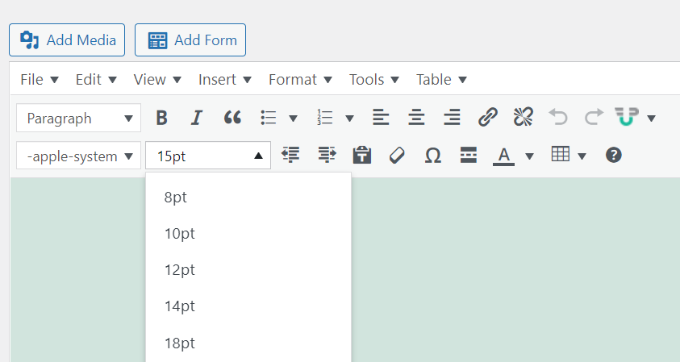
If you’re using it with the Classic editor, then you should see that TinyMCE has the ‘Font Size’ drop-down enabled by default in the second row of icons.

You can move it to the first row by dragging it upwards if you want.

Advanced editor tools classic editor font size

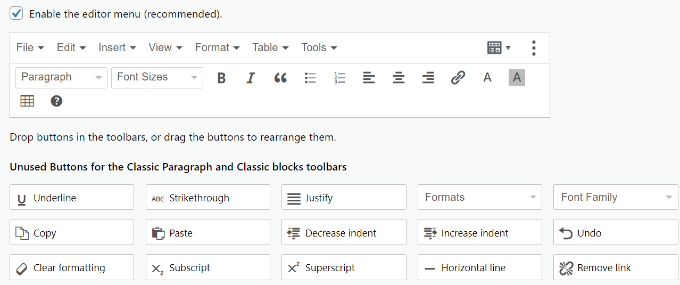
If you’re using the block editor, then you’ll need to scroll down the screen and add the Font Sizes drop-down to the toolbar by dragging and dropping it.

Add font size to toolbar

Make sure you click ‘Save Changes’ at the bottom of the screen.

To see the button in action, create a new post or edit an existing one.

In the block editor, you’ll now have the option to add a ‘Classic Paragraph’ block. It will have the Advanced controls, like this:

Advanced editor tools classic editor font size

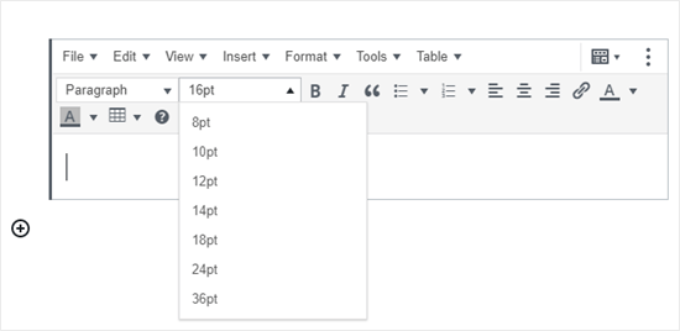
In the classic editor, you’ll see the toolbars with a font size drop-down:

Change font in classic editor

You can select any font size from the drop-down.

Note: this doesn’t give you as many options as the WordPress block editor, and you can’t type in your own font size.

Method 4: Change Site-Wide Font Size Using CSS

If you are changing font sizes every time you edit a post, then you may want to make it easier by changing it permanently in your theme.

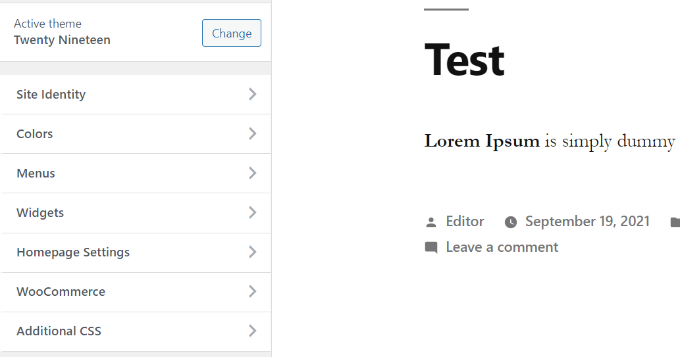
The good news is that you can change the default paragraph size across your whole site. The best way to do this is by using the Theme Customizer under Appearance » Customize.

Some WordPress themes may come with an option for you to change the font size. If you can find this option, then you can use it without writing CSS code.

However, if your theme does not have that feature, then you can add custom CSS to add your own font size rules.

Simply click on the ‘Additional CSS’ option in the theme customizer. This is where you can store all your custom CSS code.

Add additional CSS

Now under the additional CSS text box, simply add your CSS code. In this example, we are changing the font size to ’16px’, you can choose a different font size.

 p { font-size:16px; }

You’ll immediately see the changes on the preview on the right-hand side of the screen. If you’re happy with the font size, click the ‘Publish’ button at the top of your screen to make it live.

Note: Your custom CSS will only be applied to the theme you’re using. If you later choose to switch to a different WordPress theme, you’ll need to copy and paste it into the Customizer again.

The above code only applies to paragraph text. What if you wanted to change the font size of all h2 sub-headings?

Simply modify the above code to target the h2 element in your theme like this:

 h2 { font-size:32px; }

You can do the same thing with other headings as well by simply changing h2 to h3, h4, or h5.

We hope this article helped you learn how to easily change the font size in WordPress. You may also want to see our guide on how to use custom fonts in WordPress or our list of the best drag & drop WordPress page builder plugins.

If you liked this article, then please subscribe to our YouTube Channel for WordPress video tutorials. You can also find us on Twitter and Facebook.

How to Change the Admin Color Scheme in WordPress (Quick & Easy)

Do you want to change the admin color scheme in WordPress?

Changing the color scheme of the WordPress admin lets you create a custom dashboard for you and your team. The color scheme can match the design of your brand, or just feature your favorite colors.

In this article, we’ll show you how to change the admin color scheme in WordPress easily.

How to change the admin color scheme in WordPress

Why Change the Admin Color Scheme in WordPress?

If you’re not a fan of the default admin color scheme in WordPress, then you can easily change the color scheme to something you like.

You can also change the color scheme to match the design of your WordPress theme, or even add a dark mode feature.

This can be useful if you have a membership site or online store where users can log in to your site, and want your website and admin dashboard to offer a similar experience.

You could also use a different admin color scheme for your staging site to more easily tell it apart from your live site.

That being said, let’s show you a few different ways you can change the admin color scheme in WordPress. You can use the quick links below to jump straight to the method you want to use.

How to Change the Admin Color Scheme with WordPress Default Settings

WordPress has a built in feature that lets you choose from a few predetermined color palettes for your WordPress admin dashboard.

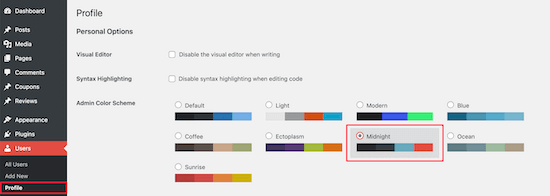
To change the admin color scheme, simply login to your WordPress admin dashboard, and then navigate to Users » Profile.

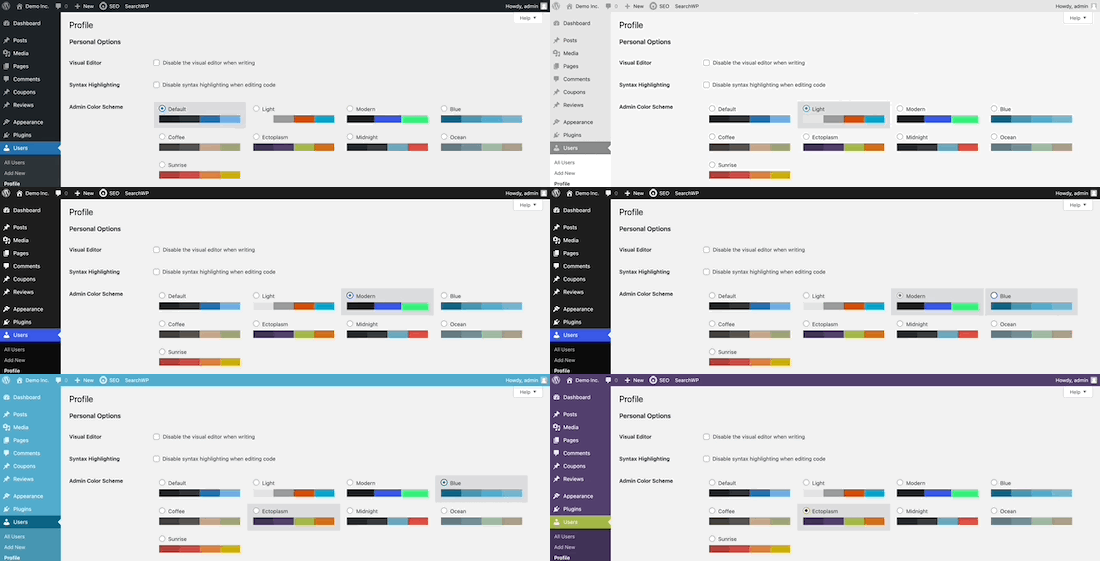
After that, select the new color scheme in the ‘Admin Color Scheme’ section by clicking the radio button.

Select new admin color scheme

There are 9 different color schemes to choose from.

As you click different options, the color scheme will automatically change.

Admin color scheme change example

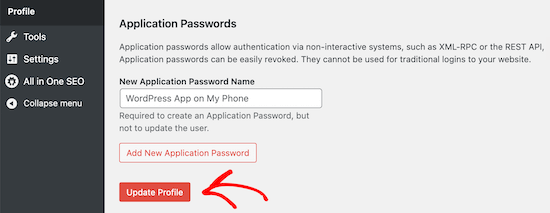
Once you’ve selected a color scheme you like, you need to scroll down to the bottom of the page and click the ‘Update Profile’ button.

Save new admin color scheme

You can also control the admin color scheme for other registered users on your WordPress website.

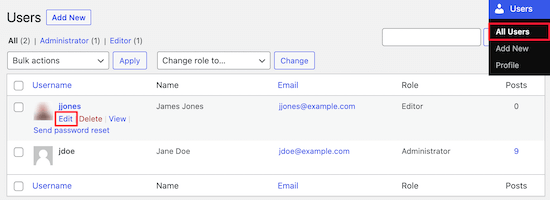
To do this, go to Users » All Users, and then hover over the user and click the ‘Edit’ button.

Edit user color scheme

Then, simply follow the same process as above to change the admin color scheme for that user.

Once you’re finished, make sure to click the ‘Update Profile’ button at the bottom of the page.

How to Create Custom Admin Color Schemes in WordPress

If you want even more color choices for your admin dashboard, then you can create custom color schemes and upload them to your WordPress blog.

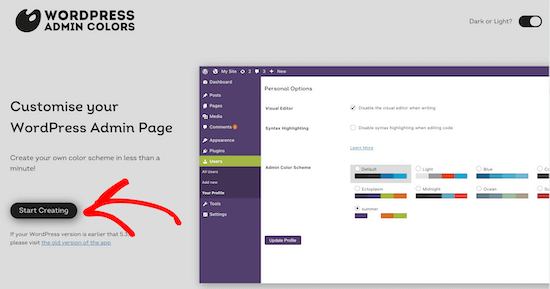
To do this, go to the free WordPress Admin Colors website and click the ’Start Creating’ button.

Click start creating button

Then, enter a name into the ‘Color Scheme Name’ box.

This name will show up in your WordPress admin panel as a new color option.

Enter color scheme name

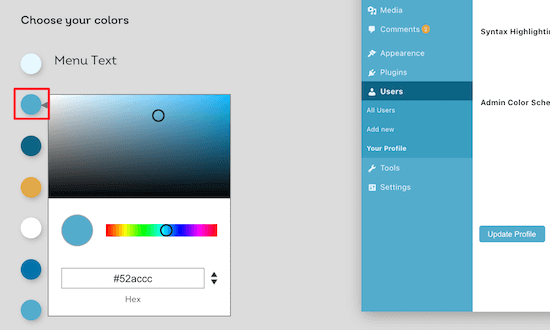
After that, you can fully customize your color scheme by clicking the color options in the ‘Choose your colors’ section.

To change one of the existing colors, click the color and choose your new color from the popup. You can click anywhere on the color picker, or enter a hex code for a specific color.

Click to customize colors

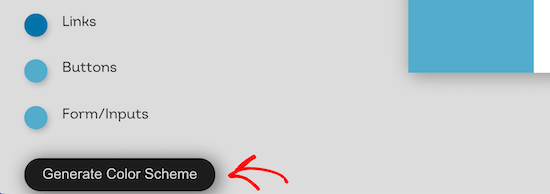
Once you’re finished customizing your color scheme, click the ‘Generate Color Scheme’ button at the bottom of the page.

This will create the color scheme code that you need to add to WordPress.

Click to generate color scheme

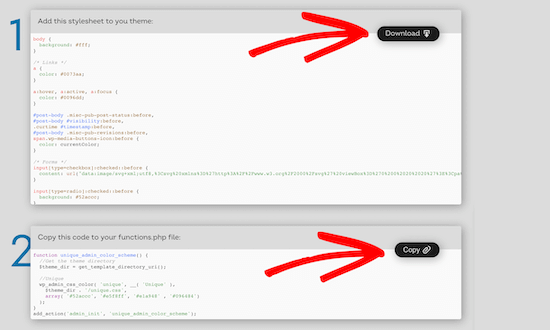
On the next page there will be two different code files.

You need to download the CSS file and copy the code snippet and paste it into your favorite text editor. We will be adding these to your WordPress files.

Download CSS and copy PHP code

If you haven’t done this before, then check out our guide on how to copy and paste code in WordPress.

You can add the code snippet to your functions.php file or by using a code snippets plugin.

For this tutorial, we’ll use the code snippets plugin WPCode. It’s the easiest and most beginner-friendly method of adding code snippets to your WordPress site.

First, you need to install the free WPCode plugin. For more details, see our beginner’s guide on how to install a WordPress plugin.

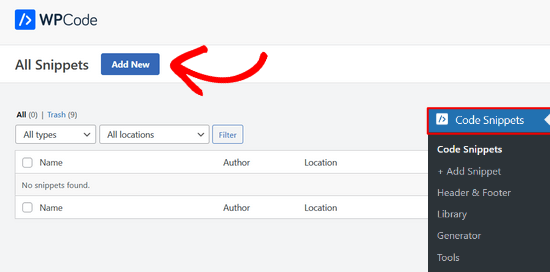
Upon activation, you’ll have a new menu item labeled ‘Code Snippets’ in your WordPress admin bar. Clicking on it will show you a list of the code snippets you have saved on your site.

Since you’ve just installed the plugin, your list will be empty.

Go ahead and click on the ‘Add New’ button to add your code snippet in WordPress.

Click the Add New Button to Add Your First Custom Code Snippet in WordPress

Next, you’ll see the ‘Add Snippet’ page.

Navigate to the ‘Add Your Custom Code (New Snippet)’ option and click on the ‘Use snippet’ button.

Add your new custom code snippet in WPCode

Then, give your code snippet a name. This can be anything to help you remember the purpose of your code.

Now you can paste the snippet you copied above into the ‘Code’ box. You also need to select the ‘Code Type’ from the dropdown list on the right.

Name and add new code snippet

Next, you need to select the insertion method for your code snippet.

You can leave it on the ‘Auto Insert’ method, so it will automatically insert and execute the code snippet in the proper place.

Pick the insertion method for your custom code snippet

After that, toggle the switch from ‘Inactive’ to ‘Active’ and then click the ‘Save Snippet’ button in the top-right corner of the screen.

This will save the code and activate the new admin color scheme.

Save and activate your custom code snippet

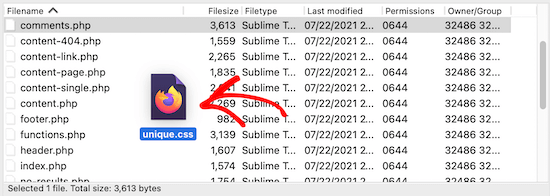
Now you need to upload the CSS stylesheet you downloaded earlier to your theme directory in your WordPress hosting account.

To do this, you can use an FTP client, or the file manager option in your WordPress hosting control panel.

If you haven’t used FTP before, then you might want to check out our guide on how to use FTP to upload files to WordPress.

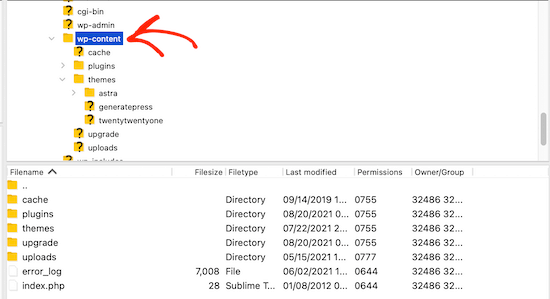
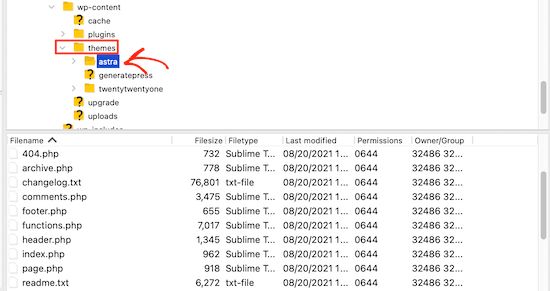
First, you need to connect to your website using an FTP client, or the file manager in cPanel. Once you’re connected, you need to navigate to the /wp-content folder.

Select wp-content folder FTP

Inside the wp-content folder, you will see a folder called themes. This is where WordPress stores all the themes your website uses or has used in the past.

You need to click on the themes folder, and then open up the folder for the theme you’re using.

Open themes folder and select theme

Then, upload the display.css file that you downloaded.

Your CSS file will have the name that you chose earlier.

Upload new CSS file

Note: If you change WordPress themes, then you will need to upload the CSS file to your new theme folder.

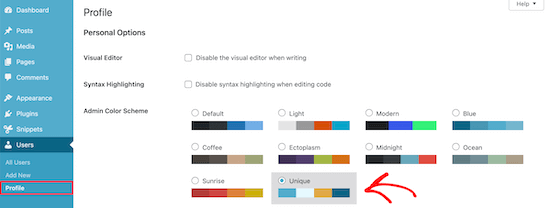
After that, navigate to Users » Your Profile.

Then, you can select the new color scheme you just created.

Select custom color scheme

If you want to use this color scheme, then make sure to click the ‘Update Profile’ button at the bottom of the page.

How to Control the Default Admin Color Scheme for New Users

When a new user creates an account, they’ll have the option to customize their color scheme. But, you may want to control the default admin color scheme or prevent users from changing the color scheme altogether.

The easiest way to do this is by using the free plugin Force Admin Color Scheme.

First, you need to install and activate the plugin. For more details, see our step by step guide on how to install a WordPress plugin.

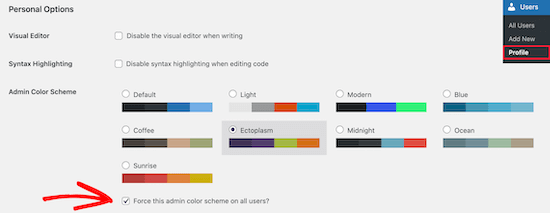
Upon activation, navigate to Users » Profile and then select your admin color and click the ‘Force this admin color scheme on all users’ checkbox.

Check force admin color scheme checkbox

After that, click the ‘Update Profile’ button at the bottom of the page.

Now the default admin color scheme will be the same for all new and existing users on your site.

The plugin also disables the admin color scheme selector for all of your users. The only users who can change this color are those with admin access.

We hope this article helped you learn how to change the admin color scheme in WordPress. You may also want to see our expert picks on the best WordPress landing page plugins and our guide on how to choose the best domain name registrar.

If you liked this article, then please subscribe to our YouTube Channel for WordPress video tutorials. You can also find us on Twitter and Facebook.

How to Buy a Domain Name That is Taken (9 Pro Tips)

Do you want to buy a domain name that’s already been taken?

Buying a domain name that is already taken can be expensive and may go wrong if you are not being careful.

In this article, we’ll explain how to buy a taken domain and give you some insider tips and proven strategies to get a good deal.

Tips on buying a taken domain name

Note: Unlike other guides on the internet, this resource is based on our actual collective experience of buying premium domains. We have spent anywhere from few hundred to few million dollars in buying premium domains and established website businesses.

The Basics of Buying a Domain Name That’s Already Taken

All websites need a domain name. It is your website’s address on the internet. See our beginner’s guide on how domain names work if you’re not 100% sure what a domain name is.

You can register a new domain name for around $10 – $15 from top domain registrars. Alternatively, you can even get a free domain name when you sign up with hosting companies like Bluehost, Dreamhost, etc.

But what if the domain name you want is already taken?

In that case, you have two options: come up with a different name or buy the one you want from its current owner.
Buying a taken domain name from someone who’s already registered it could be a great move for your business.

However, it’s important to beware of risks and scams so you don’t waste time or money.

That’s why we have put together these tips on how to buy a taken domain as safely as possible.

What to Consider Before Buying a Domain Name

One key question to ask yourself is whether you want to purchase a domain name alone or an established website.

Buying a website, if it’s one that has a consistent track record of making money, can be a great shortcut.

It lets you get a money-making business straight away rather than having to build one from scratch.

However, it’s going to be way more expensive to buy a website than just a domain name. You’ll also have more risks and legal liabilities to consider.

How to Actually Buy a Taken Domain Name

There are two main routes to buying domain names that are already taken:

  • Privately approaching the domain name’s owner and agreeing on the sale
  • Look for the name in domain marketplaces.

The first method avoids involving a third party in the sale, and you may be able to persuade the owner towards more favorable pricing.

If the domain name already has a website with a contact form, then you can use that to reach out to the site owner.
Alternatively, you can search for it using the Domain WHOIS tool. You may be able to get the contact details of the owner from the domain details there.

The second method is to look for the name using online domain marketplaces. This is where many domain owners go to sell their domain names.

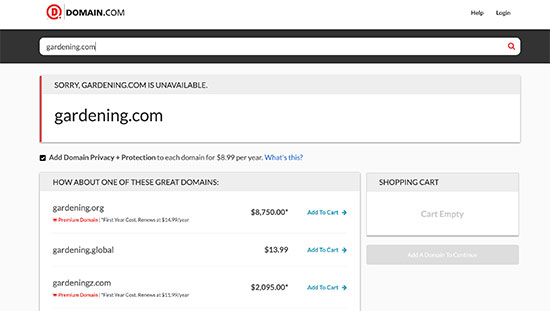
We recommend using Domain.com. It is one of the best places to register a domain name or buy a domain name for sale.

Simply search for the domain name you are looking for to see if it is available for sale.

Domain.com search

Domain names that are already taken may be highlighted as premium domain name with a higher price. If you find the domain name listed there, then you can add it to the cart and proceed to payment.

You can try multiple domain marketplaces like Sedo, Flippa, etc to see if the domain is listed for sale there.

If the domain name is not listed anywhere, then it is probably not available for sale. You can still try the first method of approaching the owner with your offer.

That being said, let’s take a look at tips on making sure you buy your domain name safely.

Tip 1. Avoid Using a Different Extension Instead

Domain name extensions

If you find that your domain name is taken when using a .com, then you might be tempted to use a different domain extension like .net or .org.

However, this can cause problems as people may forget your domain name and type in .com or .org.

You may even face legal issues if the .com owner argues that you’re trying to infringe on their brand name. This is particularly the case if they’ve registered it as a trademark.

We cover more on why you need a .com domain in our article on how to choose the best domain name.

Tip 2. Check the Domain Name isn’t a Registered Trademark

Trademark and copyright

If the domain name is a registered trademark of an existing business, then you could end up having to take your website offline completely in the future.

It’s well worth doing a quick search of the US trademark database to check whether your domain name is already being used by another company. You may also want to check local databases too.

Even a domain name that uses a trademark within it could be a problem. For instance, you can’t use the word “WordPress” in your domain name.

Tip 3. Don’t Get Too Emotionally Attached

Starting a new online business idea is exciting. Since your domain name plays a crucial role, it’s easy to get emotionally attached to a specific name.

However, you need to be smart and rational about all financial investment decisions, including this one.

We recommend keeping your options open and looking around for multiple domain names, or at least giving them serious consideration.

This will help you in negotiation, so you can get the best deal without overpaying for your domain name.

Remember, the cost of premium domain names can vary from few hundred dollars to a few hundred thousand dollars.

Having options make sure that you don’t end up paying a huge sum of money for a domain name that’s really not any better than something else that was 1/10th of the price.

Tip 4. Check if a Website Has Ever Been Built There

Viewing the website history of a domain name using the WayBack machine

Make sure that you check website history using the Wayback Machine. It is possible that the domain name may have been used by someone else.

It is alright if the domain name has been used before, but you want to make sure that it wasn’t used for malicious, spammy, or illegal activities.

This may harm your business’ reputation and may even cause legal issues in the future. If there’s a Google penalty on the domain, then that could take a lot of work and resources to wipe out.

WayBack Machine is also a smart way of finding domain owner information as well.

Tip 5. Figure Out What the Domain is Worth

Domain valuation

Domain name pricing is tricky. If you’re new to buying domains, then you might wonder whether the price you’re being quoted is a bargain, a rip-off, or something in between.

Well, the truth is that there is no standard regulation for premium domain name pricing. Sellers independently decide the price, and it’s up to you as a buyer to decide if it’s worth the investment.

Premium domain names can range from few hundred dollars to a few hundred thousand dollars. Some rare premium domain names even go into the million dollar range.

If you’re new, then you can use a tool like EstiBot to get a general idea of what the domain may be worth.

Disclaimer: Automatic domain name evaluations aren’t necessarily very accurate, but they do show similar domain sales data which is helpful.

If the domain is priced too high (and it often will be), then you’ll need to be prepared to haggle. Don’t start by offering the maximum you’d be willing to consider. Instead, start at a lower price with the expectation that you’ll likely end up meeting halfway.

Keep in mind that there’s a limit to how low the seller will go. Don’t expect someone to accept $500 if they originally asked for $20,000.

However, just because someone asked for $20,000 doesn’t mean you need to meet them half way either. We’ve often secured $20k domain deals in the $3k – $6k range.

Tip 6. Know Exactly What You’re Buying

Evaluate details

Make sure you know exactly what you’re going to be getting. Is it just the domain name you’re buying? Or are you buying a website too? If you’re buying the website, then does this include all the content?

Established websites may well use lots of different plugins and tools that the owner has licenses for. It’s unlikely that these licenses will be transferred over to you along with the sale, so you’ll need to be prepared to purchase them for yourself.

You’ll also want to be clear on whether you’re receiving assets like the website’s email list data.

If the domain name or website is a large purchase, then you should definitely have a lawyer draw up a contract for you. Consult someone who’s an expert in IP (Intellectual Property) law.

Even if you’re making a small purchase, be sure to get crucial details in writing at the very least.

Bonus: ask if the owner has access to existing social media accounts for the domain name, so you can get that as part of the deal.

Tip 7. Make Sure You’re Buying From the Domain’s Owner

Scam

Imagine this. You hand over your money for a domain name, only to find that the domain has been stolen. You never see your money again, and you’re not the legal owner of the domain either.

It’s a nightmare scenario, but unfortunately, it can happen. A good initial check is to use a tool such as DNS Trails to see whether there have been any recent changes to the DNS records. If you see something odd, then ask for an explanation.

If all your contact with the domain name owner has been through email, it’s well worth getting a phone number, so you actually talk to them. Email accounts can be hacked and email addresses can be faked.

Tip 8. Use Escrow to Transfer the Money

Escrow

You might be nervous about buying a domain name, particularly for a significant sum. What if the seller takes your money and doesn’t hand over the domain name?

The best solution is to use a site like Escrow.com. You give your money to the site, and they hold it securely until you confirm you’ve received the domain name. At that point, they hand the money to the seller.

Escrow.com has been used for the purchase of some hugely famous domain names, including Twitter.com, Gmail.com, WordPress.com and more. Note that you will need to pay a fee to Escrow.com.

Important: Don’t take a shortcut here and try to save on Escrow fees. We always use Escrow for domain purchases unless the domain owner is willing to transfer the domain to us before receiving payments. Trust us, it’s not worth the risk!

Tip 9. Consider Backordering a Domain You Want

Every day, thousands of domain names get expired and are not renewed or registered. A lot of businesses fail to take off or the domain owners lose interest.

In some cases, the owner might simply forget to re-register the domain.

You don’t have to watch the domain name to see when it’s about to expire. Instead, there are plenty of services that will monitor the domain name on your behalf. They’ll automatically try to register it the moment it’s available.

You can use Network Solutions or GoDaddy for domain backorders. There are plenty of other sites that offer a similar service too.

The problem with back-ordering is that it may not work at all. The domain owner may renew their domain name, or someone else may have placed a backorder before you which will be given priority.

Final Thoughts + Alternative Strategies

Buying a domain name that’s already taken is not easy, and the process can take anywhere from few days to a few months. And if the owner doesn’t want to sell, then it can even take years to convince them.

This is why we always recommend having few options when you’re searching for domains. You can use a domain name generator like Nameboy to come up with ideas.

Alternatively, you can also try our brand new AI powered business name generator tool.

Here are some clever tips that can also help you come up with alternatives:

  • Add a verb to your keyword – for example: getpocket.com, getcloudapp.com, and tryinteract.com
  • Extend your brand with a keyword – for example: invisionapp.com, gogoair.com, etc. Remember Tesla didn’t own tesla.com, so they started with TeslaMotors.com. Buffer didn’t own buffer.com, so they used bufferapp.com in the beginning.
  • Use abbreviations – for example: wpbeginner.com, wpforms.com, etc.
  • Use a catch phrase or adjective – for example: optinmonster.com, trustpulse.com, monsterinsights.com, etc.

We hope this article helped you learn how to buy a domain name that’s taken. You may also want to see our guide on proven ways to make money online, and our comparison of the best website builder platforms.

If you liked this article, then please subscribe to our YouTube Channel for WordPress video tutorials. You can also find us on Twitter and Facebook.

How to Automatically Post to Facebook From WordPress

Do you want your blog posts to be automatically posted to Facebook from your WordPress site?

Facebook is one of the largest social media sites in the world with more than 2 billion active users. Sharing your blog posts there will help increase pageviews and drive traffic to your site.

In this article, we’ll show you how to automatically post to Facebook whenever you publish a new WordPress blog post.

How to Automatically Post to Facebook From WordPress

Why Automatically Share WordPress Posts on Facebook?

The easiest way to build a following and staying in touch with your users is by building an email list. Still, you can’t ignore the huge userbase of social media websites like Facebook.

As the largest social media website, Facebook has more than 2 billion active users. This global audience can become a big source of traffic for your WordPress website.

You will need to engage with users on Facebook to build a strong following. This means answering comments, sharing content, and posting regular updates on Facebook.

This can become overwhelming, so we’ve put together a complete social media cheat sheet for WordPress to help you get started.

With that being said, let’s have a look at how to easily post to Facebook when you publish a new post in WordPress.

Video Tutorial

Subscribe to WPBeginner

If you’d prefer written instructions, just keep reading.

Automatically Post to Facebook from WordPress Using Uncanny Automator

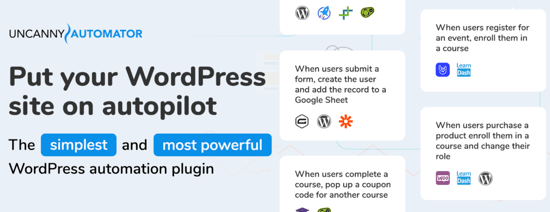
Uncanny Automator is the best WordPress automation plugin that helps create automated workflows without writing any code.

It connects with 50+ plugins and thousands of apps, including Facebook, Google Drive, Slack, Asana, Twitter, Instagram, and more.

Uncanny Automator

A free version is available and gives you 1,000 free credits to use with Facebook. Once you have used those credits you’ll need a Pro account or higher to continue posting automatically to Facebook.

The first thing you need to do is install and activate the Uncanny Automator plugin. For more details, see our step by step guide on how to install a WordPress plugin.

Upon activation, you will also be asked to install the free version of Uncanny Automator. This light version of the plugin is limited in features but is used as the base for the Pro version.

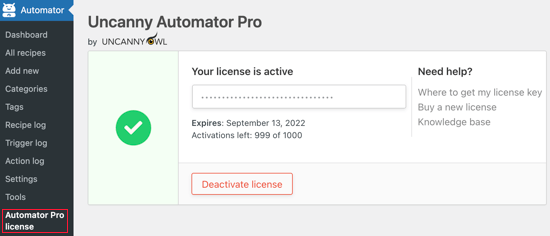
Next, you need to navigate to the Automator » License Activation page to enter your license key. You can find this information under your account on the Uncanny Automator website.

Uncanny Automator License Key

Connecting Your Facebook Page to Uncanny Automator

Before you can start to create a Facebook automation, you’ll need to connect your Facebook page to Uncanny Automator.

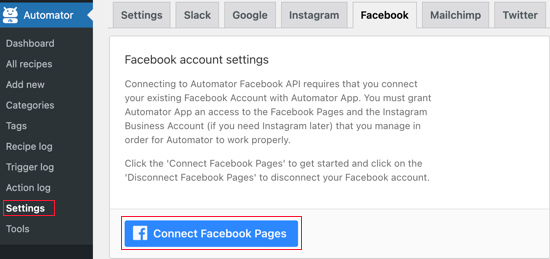
To do that, navigate to Automator » Settings and click on the Facebook tab. Once there, you’ll need to click the Connect Facebook Pages button.

Click the Connect Facebook Pages Button

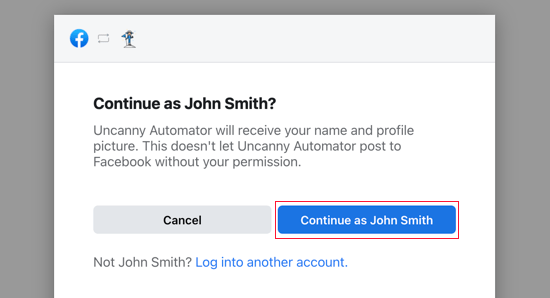
After you click this button, a popup will appear where you can log in to your Facebook account.

Once you log in you will be asked if you want to continue and let Uncanny Automator receive your name and profile picture. You’ll need to click the ‘Continue as’ button.

Click the Continue Button

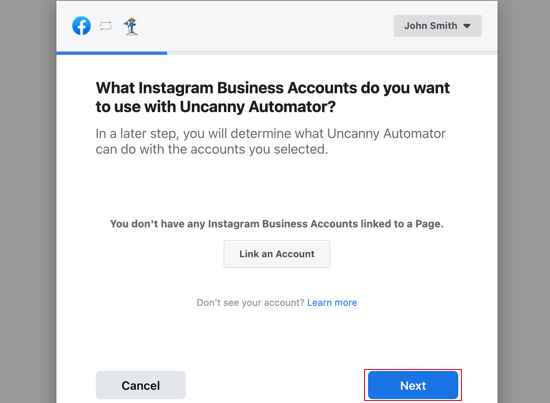
Next, you’ll be asked whether you want to use an Instagram business account with Uncanny Automator. You might like to do that if you plan to create automated workflows with Instagram, too.

For this tutorial, we’ll just click the Next button.

You Can Connect Uncanny Automator to an Instragram Business Account

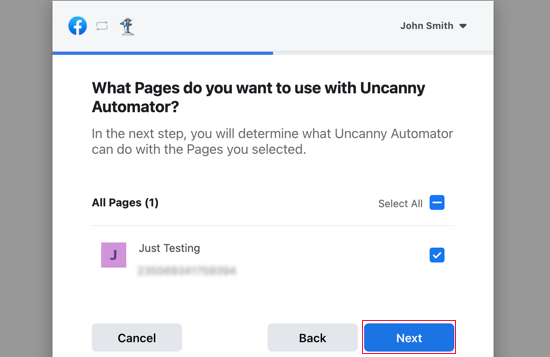
You’ll then be shown a list of your Facebook pages. You need to select the one you wish to post to and then click the Next button.

Select the Page You Wish to Post To

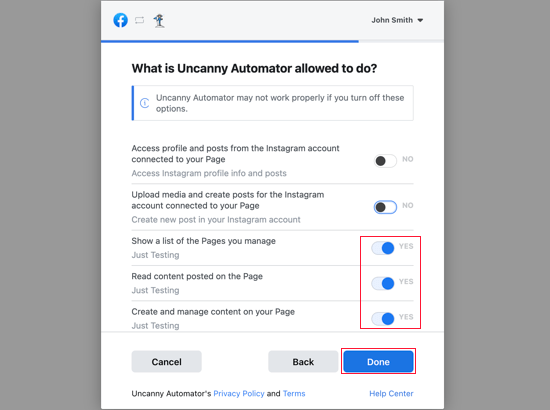
Having done that, you’ll be asked to give Uncanny Automator permission to do certain things with your Instagram account and Facebook page.

You need to answer Yes to the options regarding the Facebook page, and then you should click the Done button.

Give Uncanny Automator Permission

You should answer Yes to the Instagram options as well if you plan to create Instagram automations using Uncanny Automator.

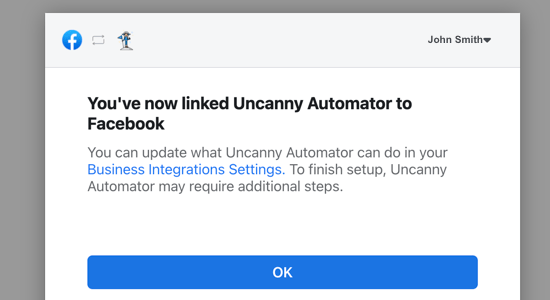
Uncanny Automator is now linked to Facebook and you should click the OK button to finish the setup.

Uncanny Automator Is Now Linked to Facebook

Automatically Posting to Facebook from Uncanny Automator

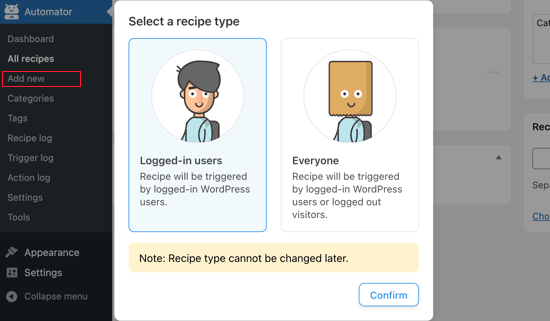
Now we’re ready to create an automated workflow to post to Facebook. Uncanny Automator calls these ‘Recipes’. Simply navigate to the Automator » Add new page to create your first recipe.

You’ll be asked to select whether you want to create a ‘Logged-in’ recipe or an ‘Everyone’; recipe. You should select ‘Logged-in users’ and then click the Confirm button.

Select 'Logged-in Users'

You can now start to build your first Uncanny Automator recipe.

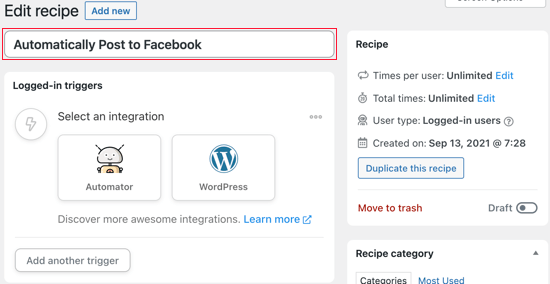
First, you’ll need to add a title. We’ll call the recipe ‘Automatically Post to Facebook’ and type this in the title field.

Add a Title

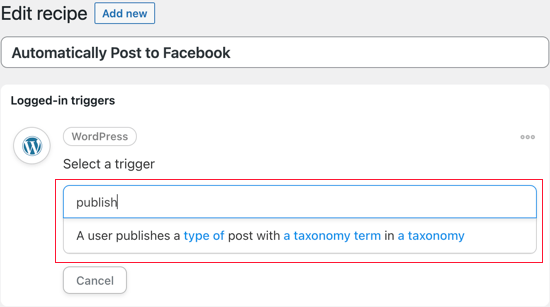
Next, you need to define the condition that will trigger the action. We want to post to Facebook whenever a WordPress post is published. So you’ll need to click the WordPress icon under ‘Select an integration’.

You’ll now see a list of WordPress triggers. You should search for ‘publish’ and choose the trigger called ‘A user publishes a type of post with a taxonomy term in a taxonomy‘.

You'll See a List of WordPress Triggers

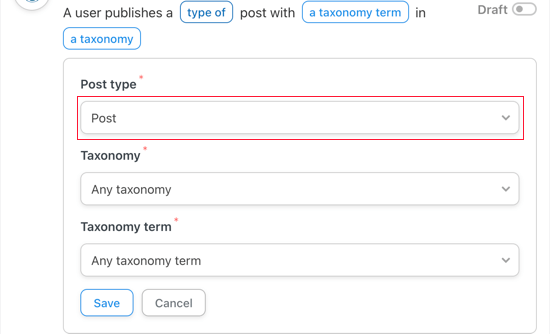
For this tutorial, we want to post to Facebook when we publish a blog post, not a page. So we’ll change the post type to Post and leave the other settings unchanged. Don’t forget to save your settings by clicking the Save button.

Change the Post Type to 'Post'

If you only want certain types of content to be posted on Facebook, then you can choose a single category or tag by selecting the appropriate options from the Taxonomy and Taxonomy term drop downs.

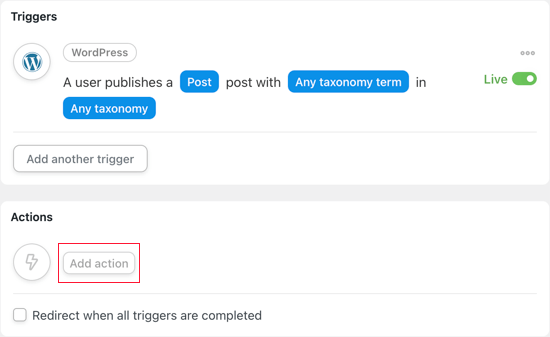
Next, you’ll need to choose the action that will happen each time a post is published. Start by clicking the ‘Add action’ button.

Click the Add Action Button

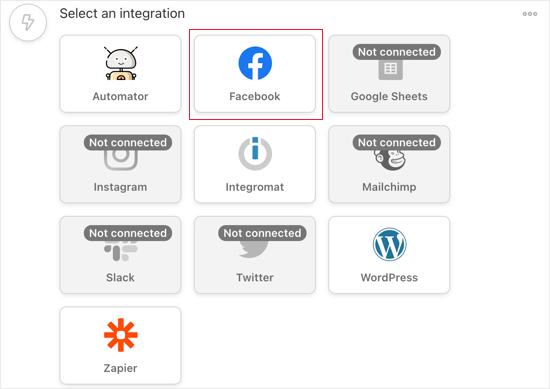
You should now see the list of integrated services that Uncanny Automator supports. Simply click the Facebook button.

Click the Facebook Button

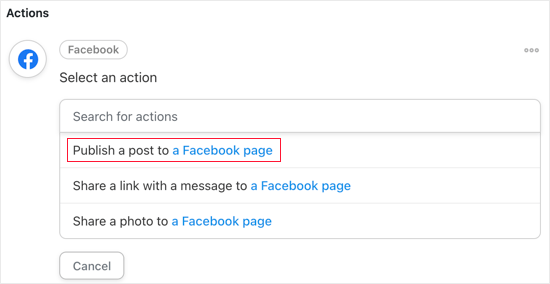
You’ll now see a list of Facebook actions. You should select the option that says ‘Publish a post to a Facebook page’.

Select the Option that Says 'Publish a Post to a Facebook Page

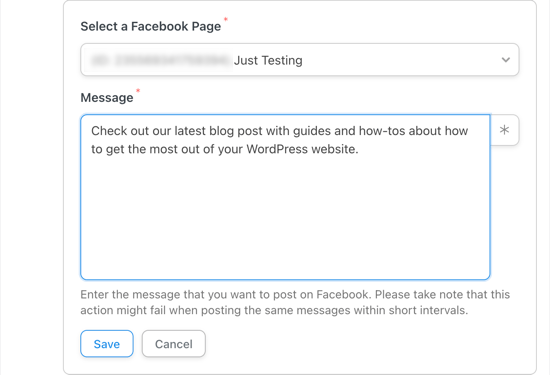
If you have connected to more than one Facebook page, then you’ll need to select the one you wish to post to.

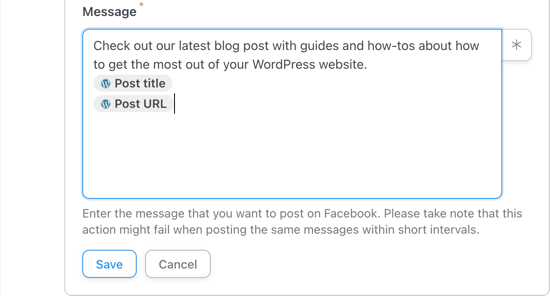
After that, you should type the message in the Message text box that you wish to be published to your Facebook page with each post.

Select the Facebook Page You Wish to Post To

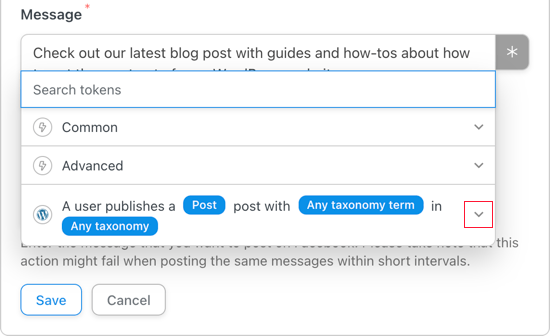
Next, you need to add the post title and URL to the message. You need to press the Enter key to start a new line, and then you should click the asterisk button at the right of the Message text box.

Click the Asterisk Icon

Now you need to click the down arrow icon next to ‘A user publishes a Post’ to access the fields that add information about the post that has been published.

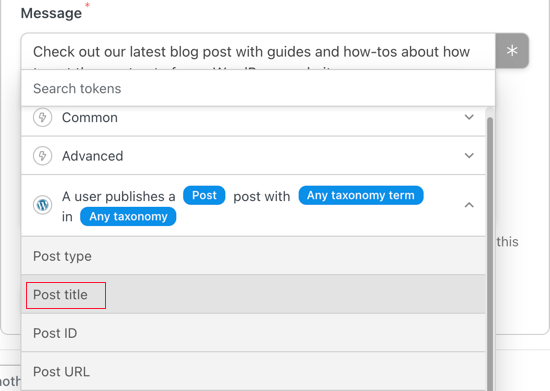
The available tokens include the post type and title, the post URL and content, and more. You should click on ‘Post title’ to insert it into the message.

Click Post Title to Insert It into the Message

Follow the same steps to add the post URL to a line of its own. The message should now look like the screenshot below, and you can customize it to suit your own WordPress site and Facebook page.

Completed Message

Don’t forget to click the Save button to store your action.

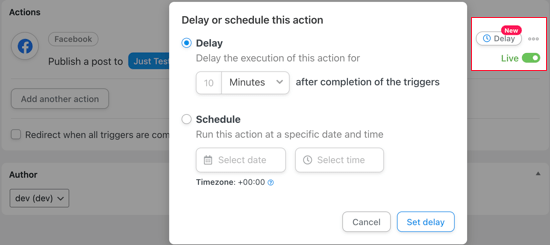
If you like, you can set add a delay before Uncanny Automator posts to Facebook. That way you can schedule the post for when your social media audience is most active.

You need to hover your mouse above the Live switch on the right until a Delay button appears. Once you click it you’ll be able to choose whether the action will be triggered after a time delay or on a specific date and time.

Trigger After a Time Delay or on a Specific Date and Time

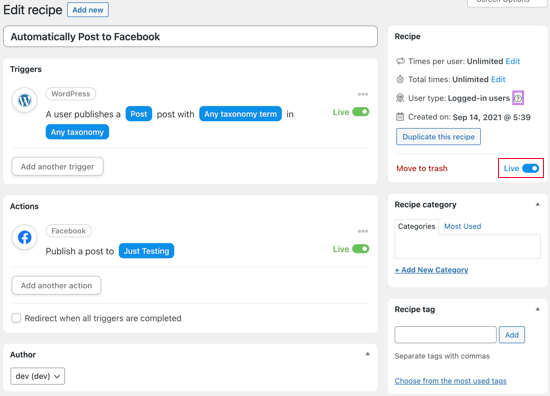
Now your recipe is complete but inactive. The trigger and action have been set, but won’t be activated when you publish a new post. To change that, you need to switch the toggle button from Draft to Live.

Switch the Toggle Button from Draft to Live

Now that your recipe is live, the next time you publish a post on your WordPress website, a message will also be posted to your Facebook page.

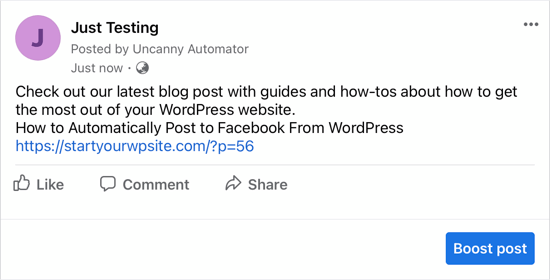
To test this, we published a new blog post on our test site, and this is how the post appeared on our Facebook page.

This Is How the Post Appeared on Our Facebook Page

If you see that the right thumbnail image isn’t appearing, then you can see our guide on how to fix the incorrect Facebook thumbnail issue in WordPress.

We hope this tutorial helped you learn how to automatically post to Facebook from WordPress.

You may also want to learn how to create an email newsletter the right way, or check out our list of must have plugins to grow your site.

If you liked this article, then please subscribe to our YouTube Channel for WordPress video tutorials. You can also find us on Twitter and Facebook.