How to Add a New Post in WordPress and Utilize all Features

Are you trying to create a new post in WordPress? Do you want to learn about all the WordPress post features you see on your screen?

While some may think that adding a new WordPress post is quite self-explanatory, many beginners find the interface a bit overwhelming.

Not to mention, sometimes even the more savvy users are surprised to find the hidden gems on the post edit screen.

In this beginner’s guide, we will walk you through all the features on the add new post screen, and how you can utilize them to create better content.
How to add a new blog post in WordPress

We have divided this guide into three sections to help you easily find what you’re looking for:

Ready, let’s get started.

Creating a New Post in WordPress Using The Default Editor

In December 2018, WordPress introduced a new modern block-based editor also known as Gutenberg. It is clean and simple, but don’t let the looks deceive you.

Behind its clean interface, there are tons of powerful features neatly tucked away. We’ll explain all of them and help you unlock its true potential.

Adding Title and Content Blocks

The WordPress block editor comes with a clean writing interface. At the top, you will enter your post’s title.
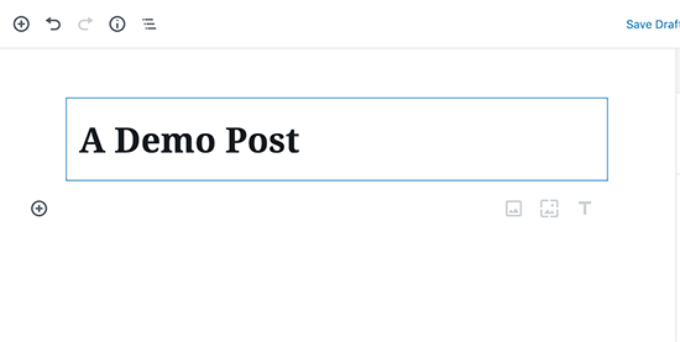
Add a title for your post

To add content, you need to add a block. There are multiple add block buttons on the screen that you can click to select and add a block.
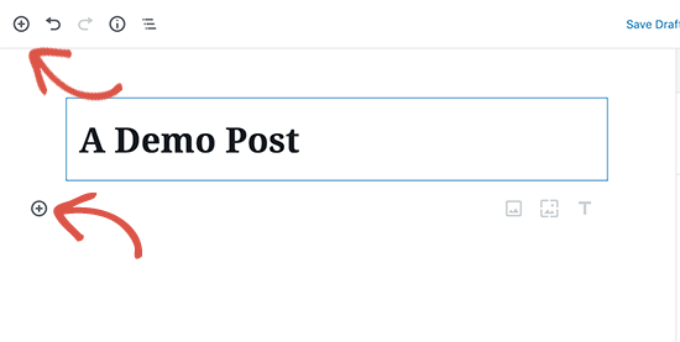
Add block buttons

If you don’t want to use a mouse to click on the button, then you can use a keyboard shortcut by typing / to search and add a block.

Select a block while writing

All content elements are wrapped in a block. WordPress comes with blocks for all the common content items including paragraphs, columns, images, galleries, embeds, shortcodes, widgets, and more.

Some WordPress plugins may also add their own blocks to add other features like contact forms, SEO, etc (more on this later in the article).

Adding Images, Videos, & Other Media

You can add images by simply adding the image block and then upload or select the image you want to add.
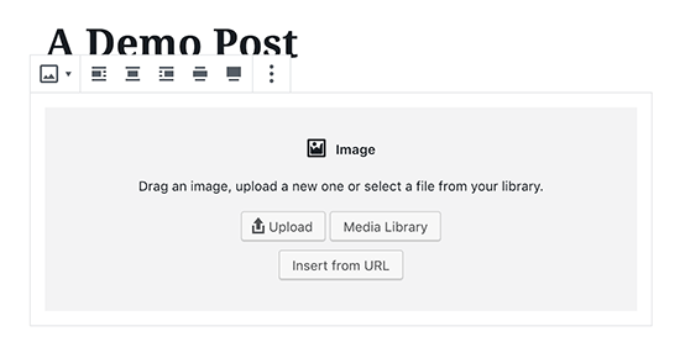
Add an image block

If you want to text and image next to each other, then you can use the ‘Media & Text’ block. This block helps you wrap text around the image in WordPress.
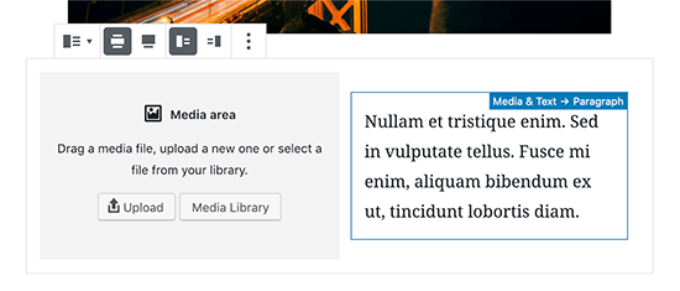
Media and text block

WordPress editor also comes with a Gallery block that you can use to display images in rows and columns with a grid layout.

Simply add the Gallery block and then upload or select the images from your WordPress media library.
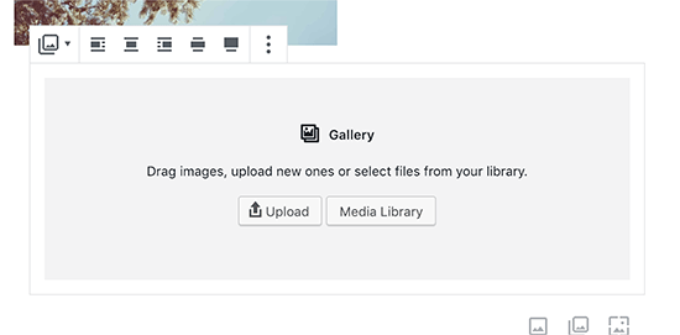
Adding image gallery

While the gallery block is powerful, you may need other advanced gallery features like albums, image sorting, etc. In that case, we recommend using one of these WordPress gallery plugins.

Want to embed a video in your content? No problem.

The default WordPress editor comes with embed blocks for all popular providers.
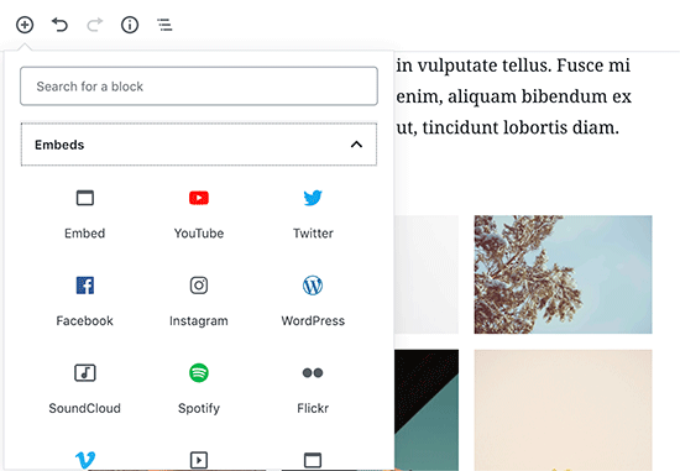
Add embed blocks

You can also just copy and paste the video URL to a paragraph block, and WordPress will automatically convert it into a video embed block.

Embedding a YouTube video

While you use the video block to upload videos directly to your website, we recommend against that because it will slow down your website and can even crash your WordPress hosting server.

Instead, we recommend uploading your videos on a service like YouTube or Vimeo, and then embed it in your WordPress posts.

For more details, see our guide on why you should never upload videos to your WordPress site.

Adding Categories and Tags

WordPress allows you to sort your posts into categories and tags. These taxonomies help you organize your content into sections and topics.

They also help with SEO and make it easier for your users to find the content they are looking for.

The categories and tags meta boxes are located in the right-hand column, under the Document settings.

Adding categories and tags

Adding Featured Image

A featured image (also known as post thumbnail) is the main article image that represents the content. They’re prominently displayed on your website on single posts, blog archive pages, as well as on the homepage of news, magazine, and blog websites.

Almost all WordPress themes support the featured image functionality. You will find the option to add a featured image to your post in the right column under the Document settings.
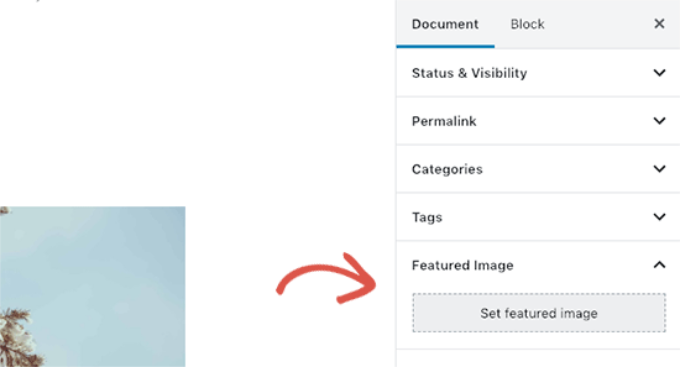
Adding a featured image in blog post

Simply click on the ‘Set featured image’ button and then select or upload the image you want to be used as the featured image.

It’s important that you don’t confuse featured images with cover images which is a new feature. See our article on cover image vs featured image for more details.

Adding Excerpts (Article Summary)

Excerpts are the summary of a blog post or article. Most WordPress themes can automatically generate the excerpt from the first few lines of your post.

However, this automatic excerpt may not always be meaningful or catchy. In that case, you may want to manually add an excerpt.

You can do so by adding it in the excerpt box located under the document settings column on the right.

Add an excerpt to your post

Changing Post URL Slug or Permalink

By default, WordPress uses SEO-friendly URLs for your blog posts. It automatically uses your post’s title as the permalink.

However, some users may want to change it to be more SEO and user-friendly. There are two ways to do that.

You can click on the post title, and you’ll notice the option to change the permalink above the title field. Alternatively, you can change it from the Permalink tab under the document settings column.
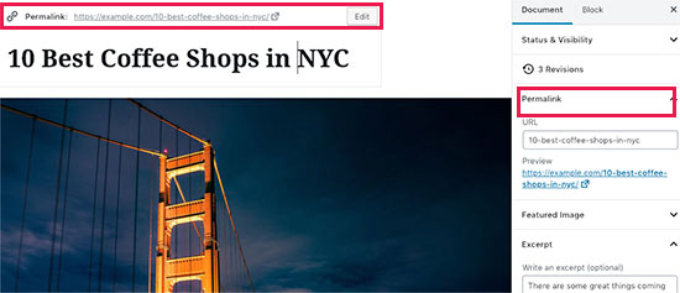
Changing a posts slug or permalink

Changing Author

If you run a multi-author WordPress site, then you can also change a post’s author and assign it to a different author on your website.

You will find the option to change author under the ‘Status and Visibility’ tab in the right column.

Change post author

Turn Comments On / Off

WordPress comes with a built-in commenting system that allows users to leave comments on your post. You can turn off comments for individual posts from the Discussion tab under the Document tab.
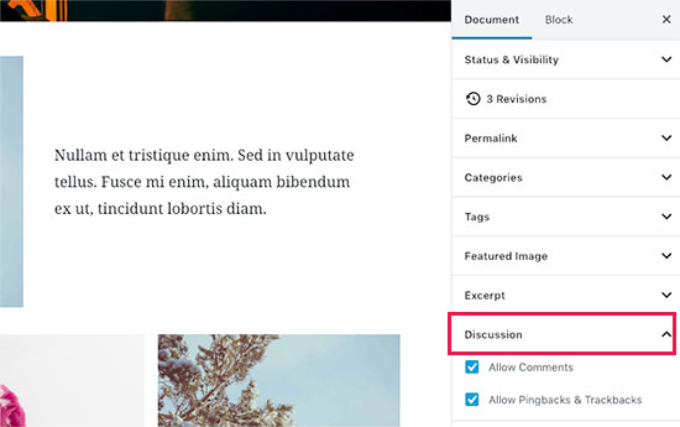
Turn off comments

You’ll also see the option to allow pingbacks and trackbacks. These allow you and other blogs to notify each other when they link to an article.

However, it is mostly used for spam, so we recommend completely disabling pingbacks and trackbacks.

Options Added by WordPress Plugins

Most popular WordPress plugins will also add their own options to the post edit screen. Some will be available as blocks while others will be available as meta boxes.

For example, WPForms, the best WordPress contact form plugin adds a block to insert contact forms in your posts and pages.
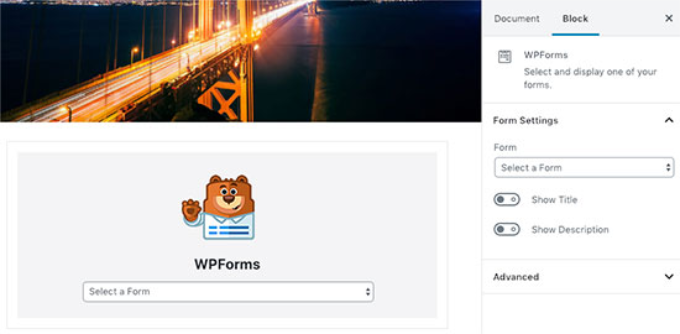
WPForms block in WordPress

Another great example would be All in One SEO (AIOSEO). They add a meta box below the editor for SEO settings and another one in the top toolbar.

You read our full guide on how to setup All in One SEO for WordPress for more details.
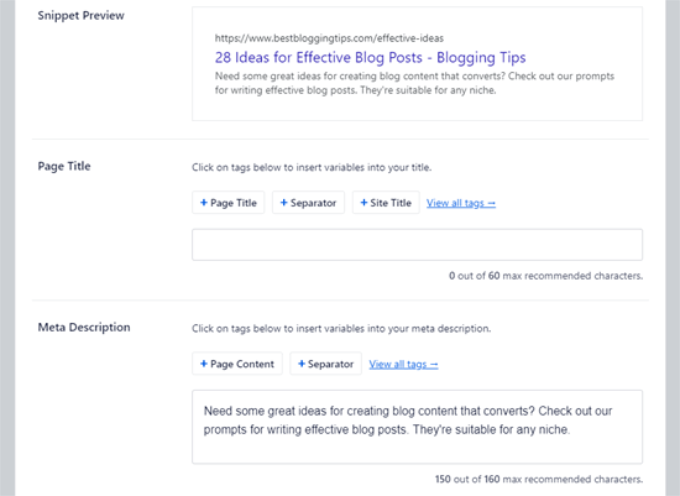
Enter AIOSEO settings

Publishing Options

The default WordPress edit screen is divided into two columns. The left column is where you write content, and the right column has all post settings including publishing options.

Let’s take a look at publishing options in the right column.
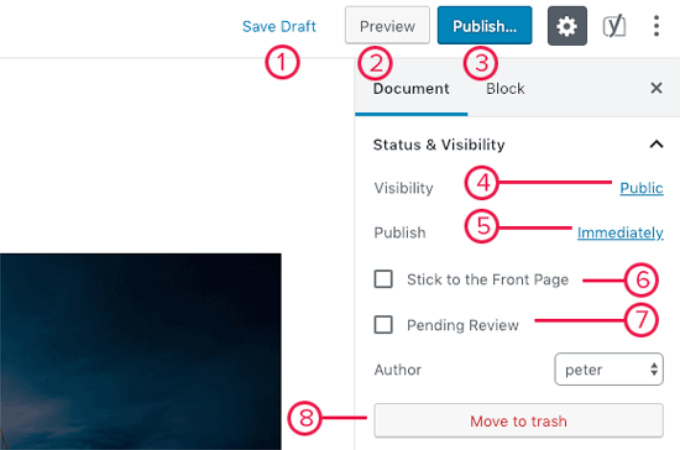
Publish options in WordPress post

1. Save draft link allows you to quickly save changes you made to a WordPress post. The editor will also automatically save your changes as you write.

2. The preview button will open a live preview of your post or page in a new browser tab.

3. Once you are done editing your post, you can click on the Publish button to make your post go live.

4. WordPress gives you a few options to control the visibility of your post. The default option is ‘Public’ but clicking on it will show you options to make a post private or password protected.
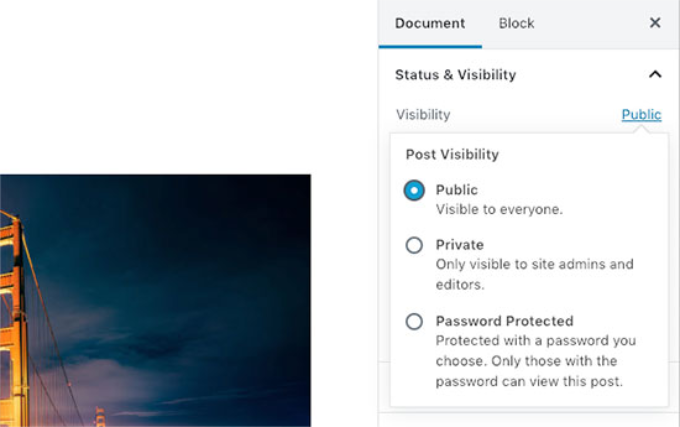
Post visibility options

5. WordPress also allows you to control when a post is published. The default option is to publish immediately, but you can also schedule your posts to publish later or even select a past date.
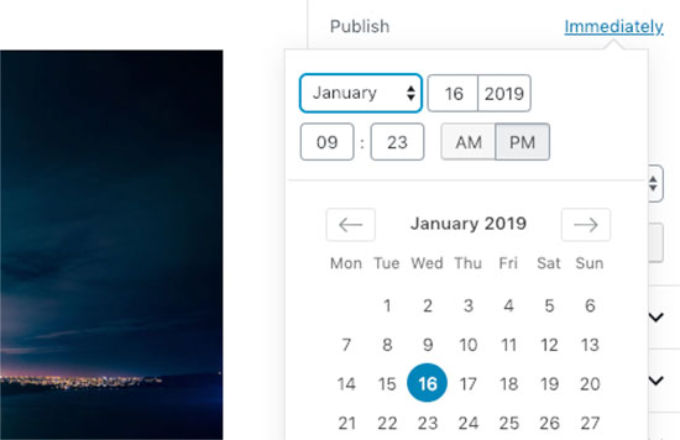
Post publish date and time

6. Checking the box next to ‘Stick to front page’ will make a post sticky or featured. This makes the specific post appear on top of other posts.

7. Pending review option will add a custom status next to your post as ‘Pending review’. This feature is particularly helpful on multi-author blogs where contributors can just save posts and not publish them.

8. If you want to delete a post, then you can click on the ‘Move to trash’ button. WordPress will send the post to the trash. Deleted posts will remain in the trash folder for up to 30 days. After that, they will be deleted permanently.

Edit Screen Options

WordPress allows you to show and hide panels from the edit screen. You can do so by clicking on the three-dot menu at the top-right corner of the screen and then clicking on the ‘Options’ button.
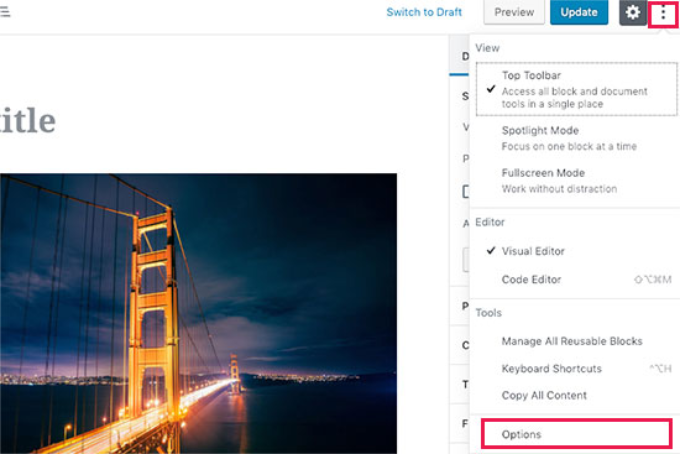
Screen options

This will bring up a popup where you can check or uncheck the panels.
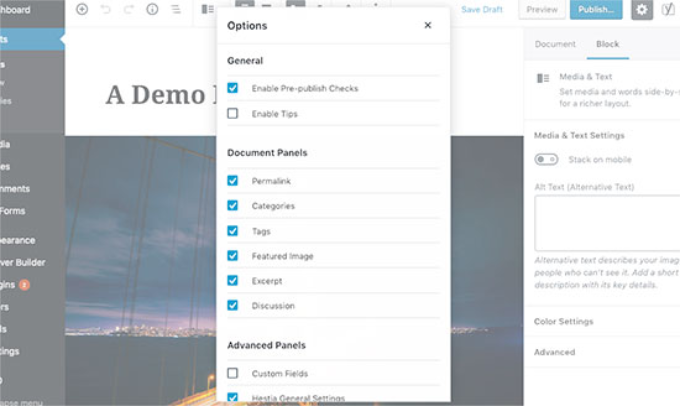
Show or hide options for post edit screen

Other Post Edit Screen Options

There are many other options on the post edit screen. Most of them are related to the appearance of the post edit screen and the editor itself.

Let’s explore them.

When you click on the three-dot menu icon at the top right corner of the screen, you will see options to move block toolbar to the top, spotlight mode, fullscreen mode, switch between visual editor or code editor, manage reusable blocks, and keyboard shortcuts.
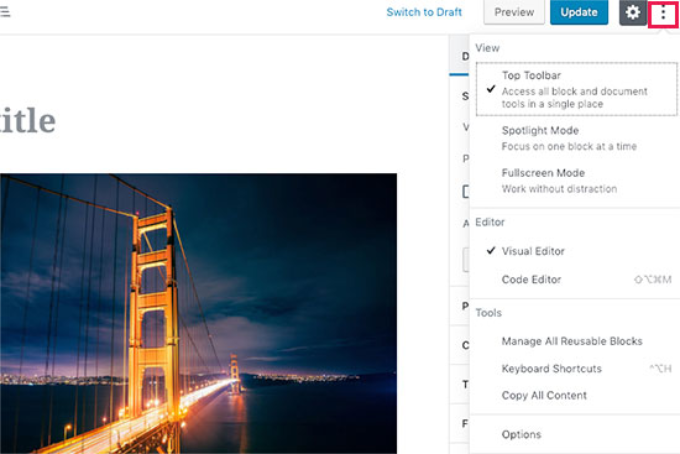
Editor settings

Next to it, you will see a button with the gear icon. Clicking on it will show/hide the right document and block settings column.
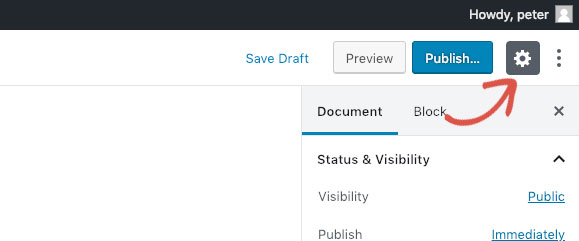
Hide settings column

On the top-left corner of the screen, there are a few more buttons. First, from the right, you will see the block navigation button which allows you to quickly jump to a block in your post.

Block navigation

Next, you will see the information icon. Clicking on it will show you post stats like the number of words, paragraphs, headings, and blocks.
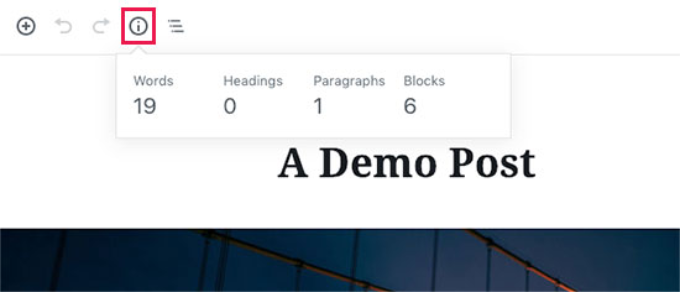
Post stats

After that, you have Undo and Redo buttons which allow you to undo changes you made to your posts before saving or publishing them.

Undo and redo buttons

Finally, you have the add block button which allows you to insert blocks to the post editor.

The default WordPress editor is quite powerful.

We encourage you to explore it on your own when writing blog posts and pay attention to the individual block settings. Each block has different settings, and you’ll discover a lot of neat tricks there.

Creating a New Post in WordPress Using The Classic Editor

If you are still using the old classic WordPress editor, then this section is for you.

The classic editor will be supported until the end of 2021, and we strongly recommend all users to create a plan for switching to the new WordPress editor.

Title and Content Boxes

In the classic editor, title and content boxes are the most noticeable areas on the Add New Post screen (see the screenshot below).
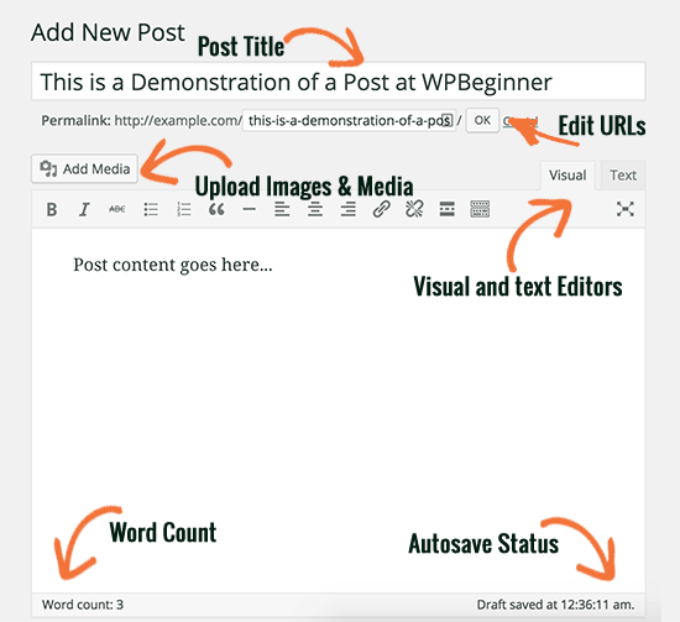
Titles and content box in classic editor

Yours might look slightly different depending on whether you are using the visual or the text editor.

You can switch between visual and a text editor while writing a post, but we do not recommend switching as this could mess up your post’s formatting.

Visual Editor is a beginner-friendly text editor with formatting buttons and a nice visual layout for the content area. On the other hand, the text editor is a plain text editor where you can actually see the HTML or write your own.

The first text area on the top is where you add the post title. If you are using SEO Friendly URL structure, then WordPress will auto-generate the post URL based on your title. You can edit the URL by clicking on the edit button.

The content area is where you will write your post. You can use the formatting options from the toolbar or use one of the many keyboard shortcuts available which will speed up your writing process.

If you are using the visual editor, then you may want to take a look at these tips for mastering the WordPress visual editor.

In the footer area of the content editor, WordPress will show you the word count for your post. This is especially useful if you’re writing a guest post or an article that needs to meet a certain number of words.

As you write, WordPress will automatically save a draft of your post. This autosave is stored in your WordPress database temporarily.

As soon as you save your draft or write more content, WordPress cleans up your autosave temporary draft and replaces it with a new one. This process ensures that you do not lose your content due to an internet connection or hardware failure. See our guide on how to undo changes in WordPress with post revisions.

The post editor shows your current draft and autosave status in the footer next to the word count.

Add Images and Media

Between the title and content fields, there is a large Add Media button. You will need to click on it when you want to upload an image or any other media to your WordPress post. This will launch the media uploader in a popup window.
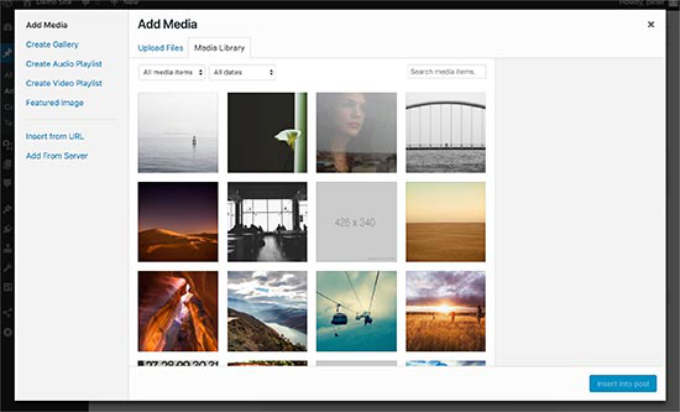
Media uploader popup classic editor

Simply click on the select files button to upload images or any other media to your WordPress site. You can also create image galleries from uploaded files.

WordPress comes with some basic image editing tools. See our tutorial on how to edit, flip, rotate, and crop images in WordPress.

Publishing Options

The WordPress post edit screen is divided into two columns. The column on your left contains the post title and content editor. On your right-hand side, you have different meta boxes to configure post settings.

The top meta box in this column is labeled Publish. This is where all the publishing options for your posts are managed.
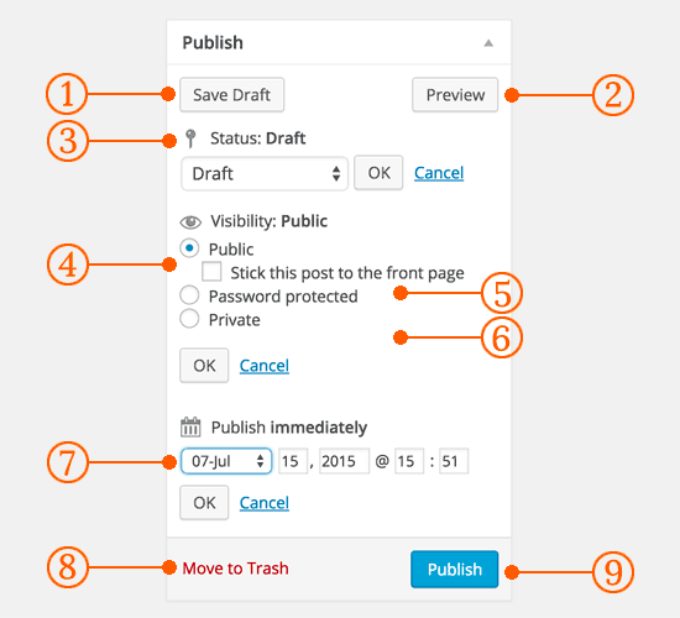
Post publish options

1. Save Draft button stores a draft of the post or page that you are working on. WordPress also auto-saves your posts as you write them.

2. Preview button shows a live preview of your post. You can use it to see how your post will look after publishing.

3. Status allows you to set a status for your post. WordPress automatically handles post status for drafts and published posts. Unless you are using a plugin to add custom statuses, you don’t need to worry about this option.

4. Click on the Edit link next to visibility to expand it. The first option under visibility will allow you to make your post sticky on front-page. Sticky posts in WordPress are like featured content that are displayed on top of all other posts.

5. The next option allows you to password protect a post in WordPress.

6. The third option under visibility is labeled private. This allows you to privately publish a post on your WordPress site. The private posts will be visible to users who have the editing privileges on your site.

7. Click on the edit link next to Publish, and WordPress will display the time and date options. You can use this option to schedule posts or create back dated post in WordPress.

8. Move to trash allows you to delete a WordPress post. Deleted posts live under trash, and you can restore them if you need to for up to 30 days.

9. Finally, the publish button makes your WordPress post public. Remember if you scheduled a post, then it will appear on your site on the scheduled date and time.

Adding Categories and Tags

You can sort your posts into categories and tags. The categories and tags meta boxes usually appear in the right-hand column below publish meta box.
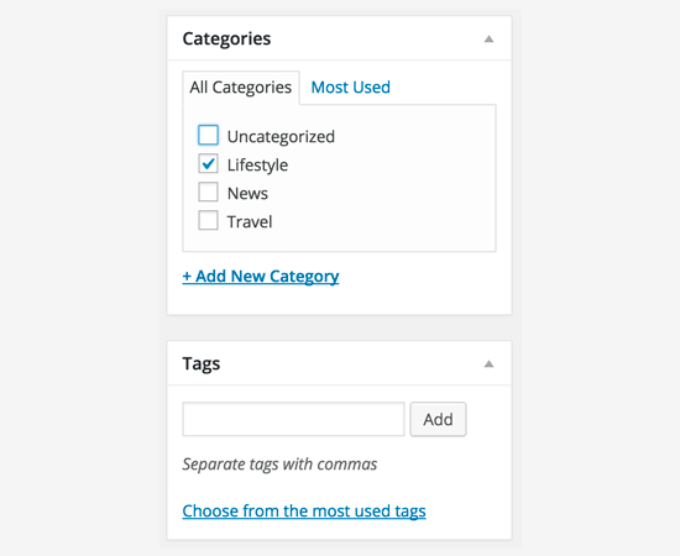
Categories and tags in classic editor

Categories and tags help you organize your content in a meaningful and browsable format.

Not only does it help users easily find your content, but it also boosts your site’s SEO. See our guide on the difference between categories and tags and how to use them to sort your content.

Featured Image (Post Thumbnails)

Most WordPress themes support featured images or post thumbnails for articles. Usually, it is the last box in the right column on your post edit screen.

Featured image in classic editor

Simply click on the set featured image link, and it will bring up the media uploader popup. You can select an image from your previous uploads or upload a new image from your computer.

For more detailed instructions, see our guide on how to add featured image or post thumbnails in WordPress.

Screen Options

Some of the options on the post edit screen are hidden by default to present a cleaner and simpler editing experience. These options are not commonly used by beginners. However, you may need them later.

Simply click on the Screen Options button on the top right corner of the page. This will show a menu with checkboxes next to option names.

Screen options in classic editor

As you can see some of the options will already be checked. For the others, you can display them by clicking on the checkbox next to an option name, and it will appear on your post edit page.

Let’s take a look at some of these options and what they do.

Excerpts

Checking this box adds a meta box below your content editor. You can use this box to add a short summary or excerpt for your post.
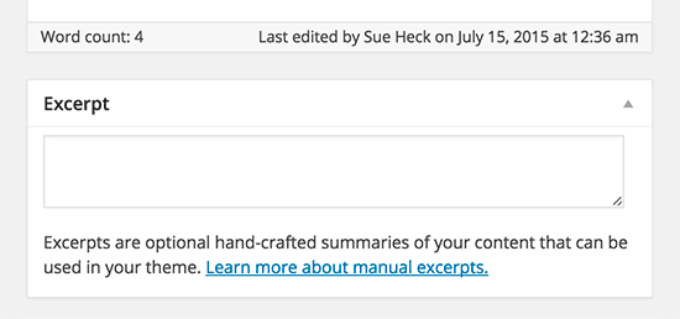
Adding post excerpt in classic editor

Ideally, you should display a summary or excerpt for your posts on your site’s front page and archives. Full content should only be displayed on the post’s single page.

Learn more about this in our guide full post vs summary (excerpt) in your WordPress archive pages.

Send Trackbacks

Send Trackbacks option allows you to notify other blog owners that you have linked to their content.
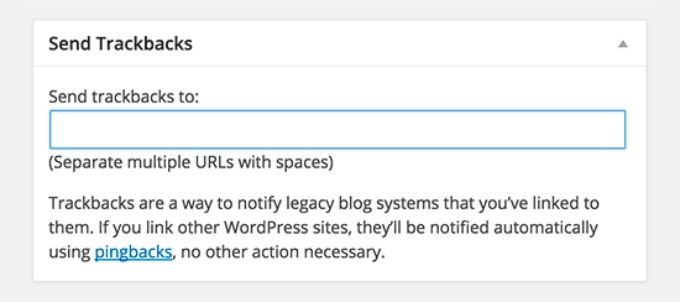
Trackbacks in classic editor

If the other blog owner is running WordPress, then you don’t need to send them trackbacks. Your WordPress site will automatically send them a ping when you publish the post.

Trackback feature is misused by spammers so much that many site owners simply disable them. We have an article on dealing with trackback spam in WordPress.

Custom Fields

This option will display a user interface for custom fields below your post editor. You can use it to manually enter custom information in your posts. See our WordPress custom fields 101 guide for beginners to learn more.
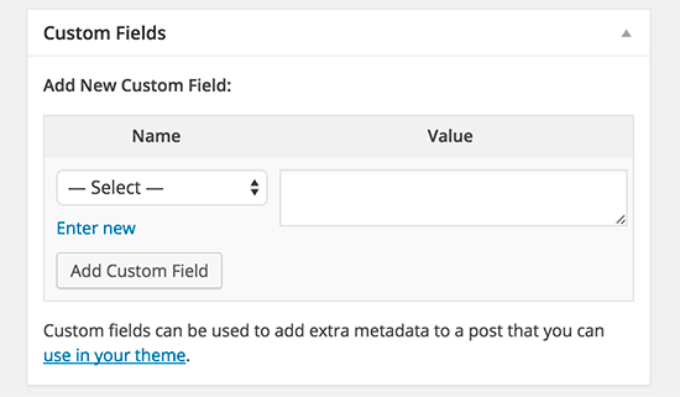
Custom fields in classic editor

Discussion

While comments are a great way to engage your audience, sometimes you may not want to have comments on a specific post or a page.

The discussion option displays a meta box below the post editor to turn on/off comments and pingbacks for your post.

Post comments

Since pages are supposed to be like static pages, most users want to turn off comments on them. You can do so by editing each page, or you can see this tutorial to turn off/disable comments on WordPress pages.

Once your WordPress site gets some reputation, you will start getting an increase of comment spam. Instead of turning off comments, you may want to try these tips and tools to combat comment spam in WordPress.

Slug

A slug is a cleaner title that can be used in URLs.

http://example.com/2015/07/this-is-post-slug

WordPress automatically generates a post slug and displays it as the post URL just below the post title. You can edit the URL slug by clicking on the edit link below the post title.

You can also enable the slug option from the Screen Options and edit your post slug there.

Editing post slug in classic editor

Author

WordPress will automatically assign you as the post author when you create a post.

However, sometimes you may want to show another user on your WordPress site as the author. Enabling the author checkbox allows you to do that from the post edit screen.

Classic editor author change

Bonus Tips for Creating Better Blog Posts

The reason why WordPress is the most popular blogging platform is because it comes with a great set of tools right out of the box to help you create new content.

However, there are many other tools and tips that you can use to improve your blog content.

The first tip we offer to everyone who’s just starting a blog is consistency. Make sure that you regularly publish blog posts. You can plan an editorial calendar and then stick to it.

We recommend starting with 1 – 2 posts a week and then gradually increasing your pace.

Often new users struggle with finding post ideas for their blog. Here is a massive list of blog post ideas that you can use to get started.

You’ll also need to learn how to promote your posts and keep track of things. Our team has picked the best content marketing tools that will help you grow your blog.

Lastly, you can optimize your website for search engines like Google. This is where AIOSEO comes in handy, as it helps with search engine optimization (SEO) without any technical knowledge. You can rank for different keywords and drive organic traffic to your blog.

Often users ask us what’s the difference between posts vs pages, and which one is better for SEO? The simple answer is that it depends. Posts are timely content organized in a reverse chronological order which is why they’re called blog posts.

Pages on the other hand are static content such as your about page, contact page, etc. The process of adding a new post or page in WordPress is exactly the same.

For more details, see our guide on post vs pages in WordPress.

We hope this article helped you learn how to add a new post in WordPress like a pro. You may also want to see our essential WordPress SEO guide for and the best email marketing services for small businesses.

If you liked this article, then please subscribe to our YouTube Channel for WordPress video tutorials. You can also find us on Twitter and Facebook.

How to Add a Background Image in WordPress (6 Easy Ways)

Do you want to add a background image to your WordPress site?

Background images can make your website look more engaging and vibrant.

In this article, we will show you how to easily add a background image to your WordPress site.

How to add a background image in WordPress

Why Add a WordPress Background Image?

Adding an image to your WordPress website can make it more attractive to visitors. You can quickly grab users’ attention and engage them with your content.

It also allows you to personalize your website design according to your brand. For example, you can upload subtle photos of your products or brand mascot in the background.

Additionally, you can also add a YouTube video as full background or an image slideshow that will bring your content to life.

However, we do suggest selecting background images that are not distracting or make it hard to read the content on your WordPress blog. A background should enhance the user experience and help deliver your message to visitors.

It’s also important to choose a background image that’s mobile friendly and won’t impact your website speed. Otherwise, it will hurt your WordPress SEO.

That said, let’s look at different ways you can add a WordPress background image. We’ll cover multiple methods including the use of the WordPress theme customizer, full site editor, a plugin, theme builder, and more.

Simply click a link below to jump ahead to your preferred section:

Method 1. Add a Background Image Using Your WordPress Theme Customizer

Most popular WordPress themes come with custom background support. This feature allows you to easily set a background image, and we recommend this method if your theme supports it.

However, if your customizer menu option is missing, then your theme may have full site editing enabled. In the next section, we’ll cover how to use the full site editor to change your background image.

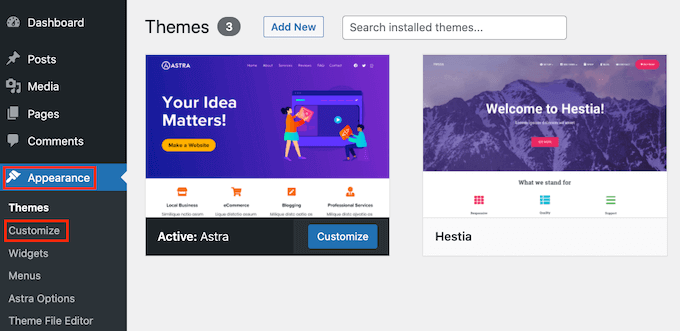
To use the Customizer, you need to visit the Appearance » Customize page in your WordPress admin. This will launch the WordPress theme customizer where you can change different theme settings while viewing a live preview of your website.

The WordPress theme customizer

An important thing to remember is that the options you see will vary based on the WordPress theme you’re using. For this tutorial, we are using the Astra theme.

If you’re using a different theme, then you may need to look up that theme’s documentation or contact the theme developer to find out how to add a background image if you can’t find it in the customizer.

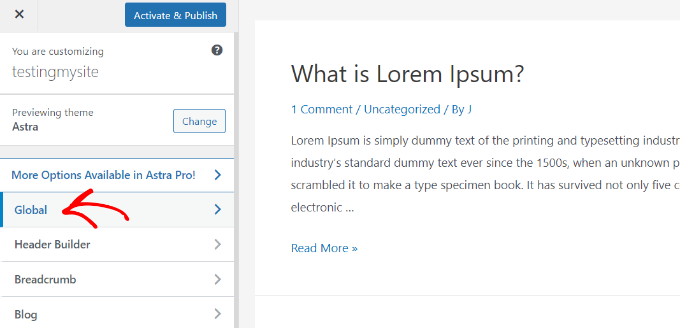
In the Astra theme’s customizer options, you need to click on ‘Global’ in the panel to the left.

Go to global settings in Astra

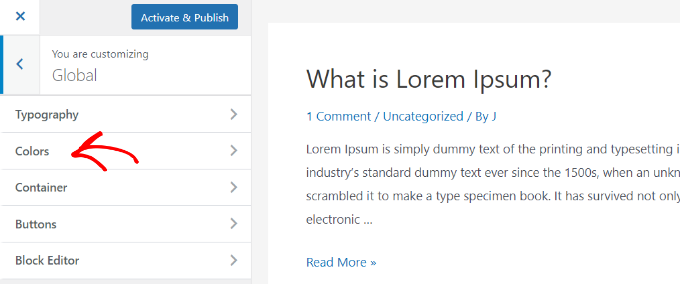
After that, you’ll see different Global options to customize your Astra theme.

Go ahead and click into the ‘Colors’ section.

Click on colors options

Here, you can change the theme colors, including the background color. You can also customize your links, body text, headings, borders, and more.

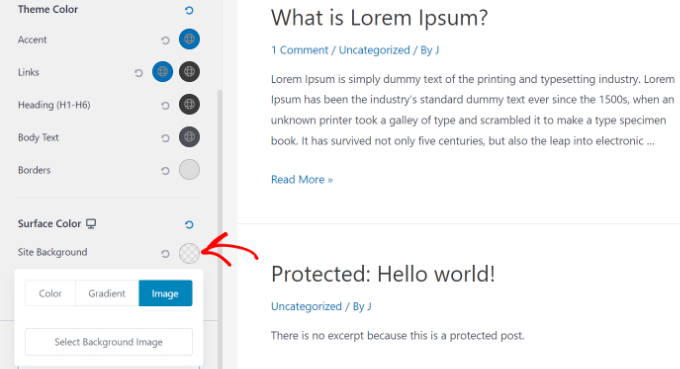
To add a background image, scroll down to the ‘Surface Color’ section. Then you can click on the ‘Site Background’ option and switch to the ‘Image’ tab.

Select a background image

After that, simply click the ‘Select Background Image’ button.

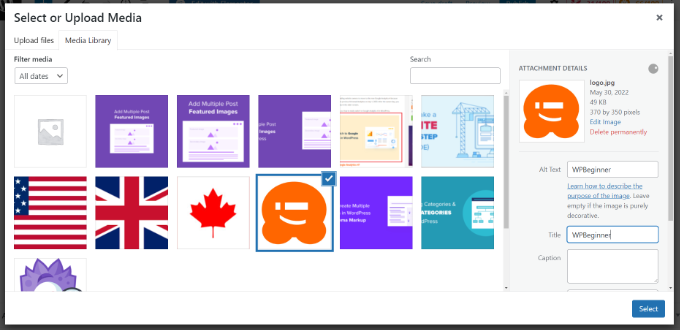
This will bring up the WordPress media library, where you can upload an image from your computer or select one you have previously uploaded.

Upload media to WordPress

After you have chosen the image for your background, you need to click on the ‘Select’ button.

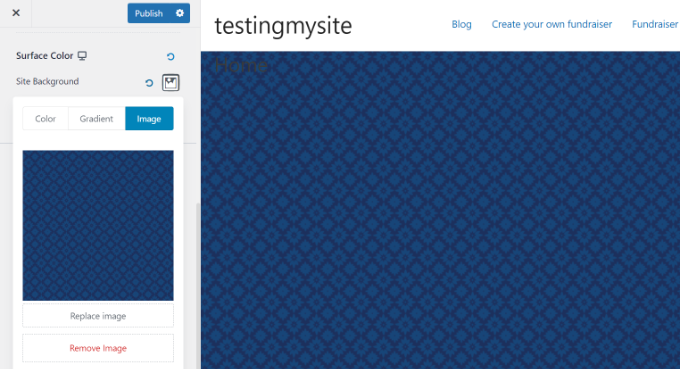
This will close the media popup, and you will see a preview of your selected background image in the theme customizer.

Save your background image

Don’t forget to click on the ‘Publish’ button at the top to store your settings.

That’s all. You have successfully added a background image to your WordPress site. Go ahead and visit your website to see it in action.

Method 2. Add a Custom Background Image Using Full Site Editor

If you’re using a block-based WordPress theme, then you can add a custom background image using the full site editor (FSE).

The full site editor allows you to edit your website design using blocks. It is just like editing a blog post or page using the WordPress block editor.

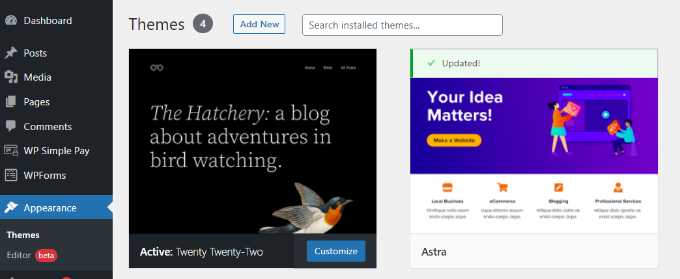
For this tutorial, we’ll use the default Twenty Twenty-Two theme. To launch the full site editor, simply go to Appearance » Editor from your WordPress dashboard.

Go to full site editor

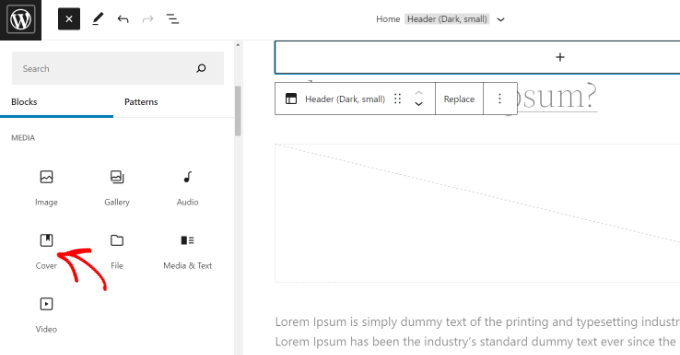
Once you’re in the full site editor, you’ll need to add a Cover block to your template to upload a background image.

Simply click the ‘+’ sign at the top and add a Cover block.

Add a cover block to theme template

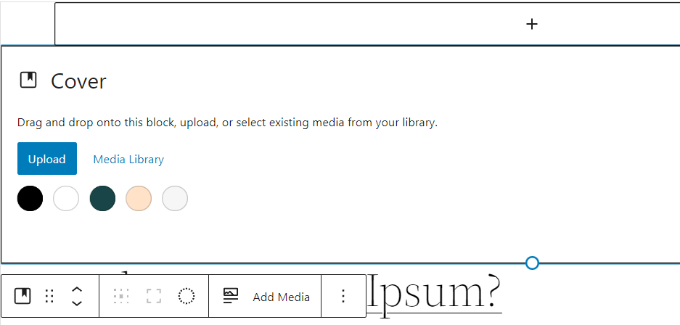
Go ahead and click ‘Upload’ or ‘Media Library’ button in the Cover block to add a background image to the block.

This will open the WordPress media uploader popup.

Upload your image to cover block

You can choose an image that you’d like to use as the website background.

When you have chosen the image, simply click on the ‘Select’ button.

Upload media to WordPress

Once the image is added to the Cover block, the next step is to set it as the background of the page.

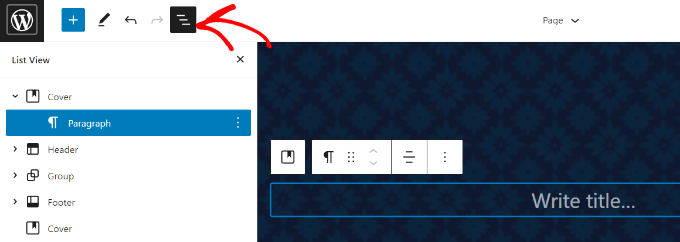
To do so, click on the List View icon at the top (icon with 3 dashes) to open an outline view of theme elements, such as the site header and footer.

Open list view in FSE

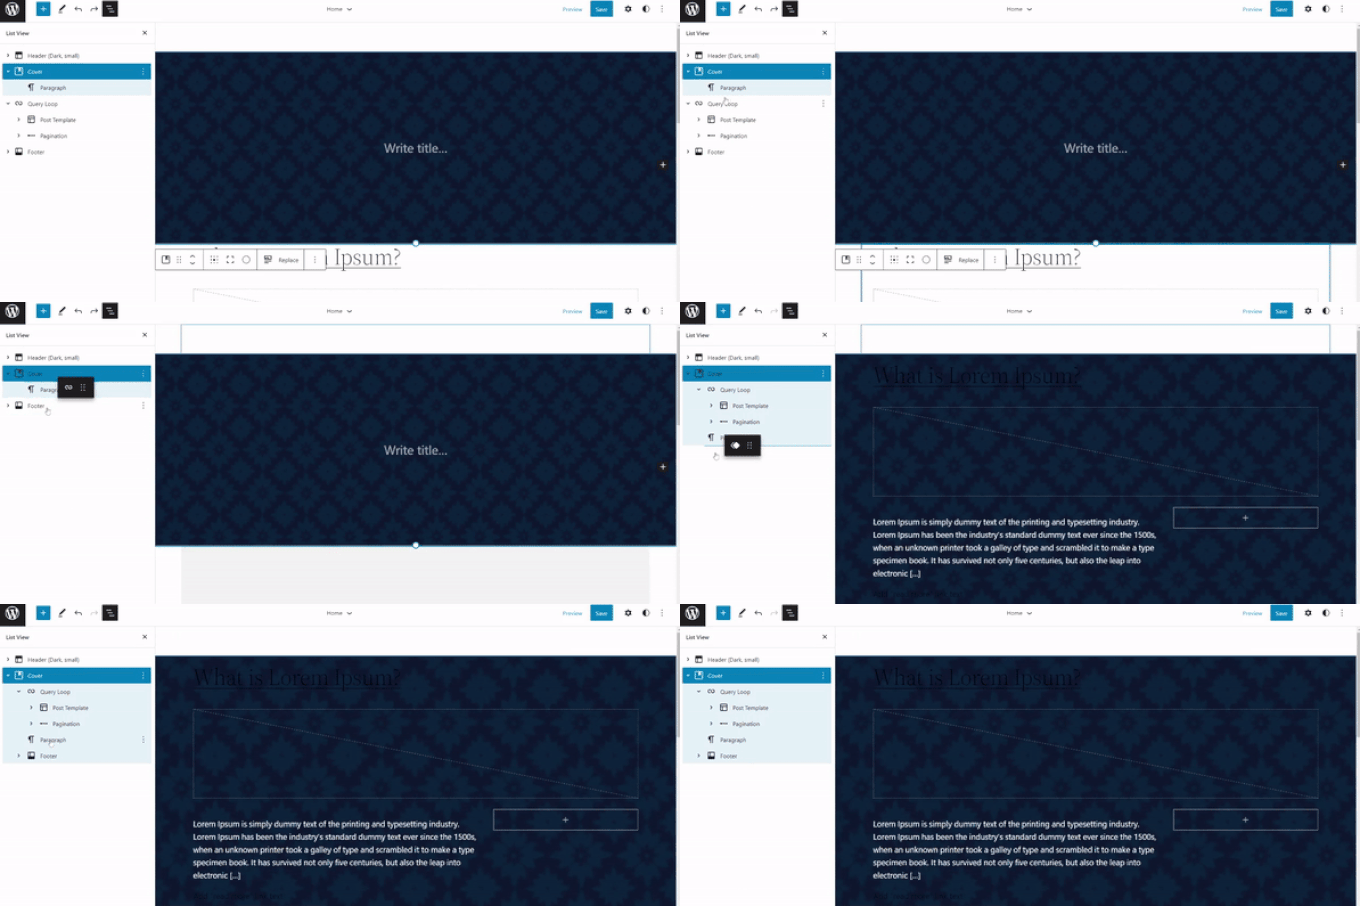
After that, simply drag and drop all the template elements under the Cover block in the list view.

When they are all under there, the Cover block’s image will show up as the site’s background.

Add theme parts to cover block

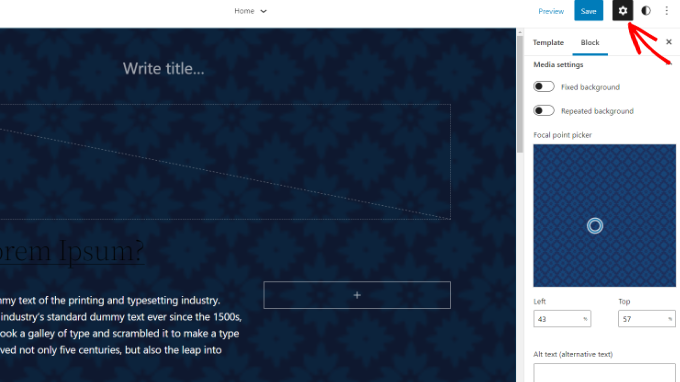
After that, you can adjust the background image by clicking into the Cover block and selecting the gear icon in the top right corner of the screen. This opens the Block settings panel.

You will find options to make the image a fixed background, repeated background, adjust its overlay, edit the color, and more.

Edit background image settings

When you’re done, don’t forget to click the ‘Save’ button.

That’s it! You’ve successfully added a background image using the full site editor.

Method 3. Add Background Image Using WordPress Theme Builder

Another way you can add custom background images to your website is by using a WordPress theme builder like SeedProd.

It is the best WordPress landing page plugin and website builder. You get drag and drop functionality to easily customize your website design without touching a single line of code.

For this tutorial, we’ll use the SeedProd Pro version because it includes the theme builder. There is also a SeedProd Lite version that you can try for free.

First, you’ll need to install and activate the SeedProd plugin. If you need help, then please see our guide on how to install a WordPress plugin.

Once the plugin is active, you’ll see the SeedProd welcome screen in your WordPress dashboard. Next, simply enter your license key and click the ‘Verify Key’ button. You can find the license key in your SeedProd account area.

SeedProd license key

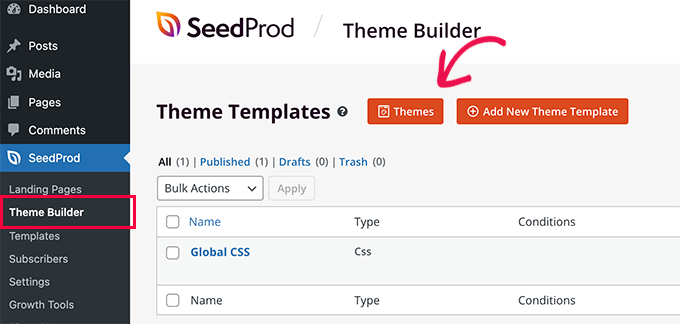
Next, you’ll need to head to SeedProd » Theme Builder in your WordPress admin panel.

Go ahead and click the ‘Themes’ button at the top.

Create your custom theme

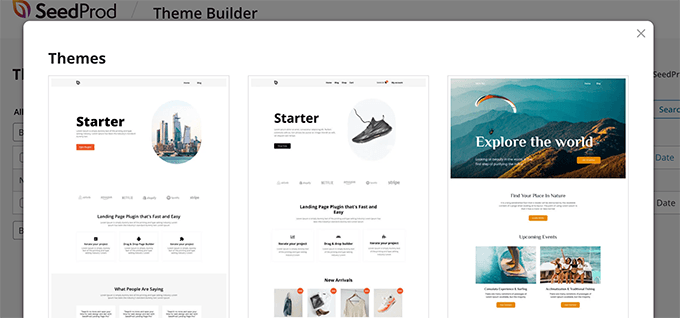
SeedProd will now offer multiple theme templates to choose from.

You can hover over any template that you’d like to use and click on it. Let’s use the ‘Starter’ theme template for this tutorial.

Choose a starter theme

From here, SeedProd will generate different templates such as the homepage, single post, single page, sidebar, header, and more.

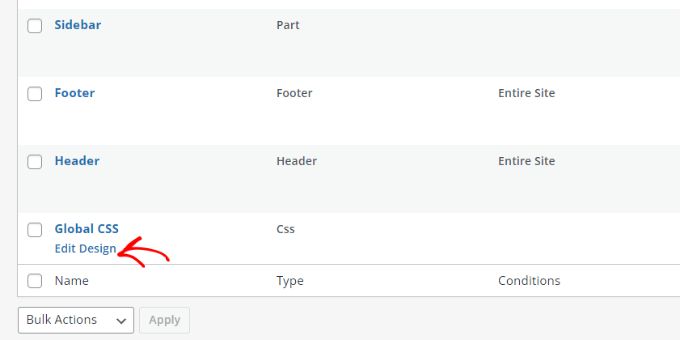
To add a background image that appears on the entire website and on all the theme templates, go ahead and click the ‘Edit Design’ option under Global CSS.

Edit global CSS

On the next screen, you’ll see global CSS settings you can change.

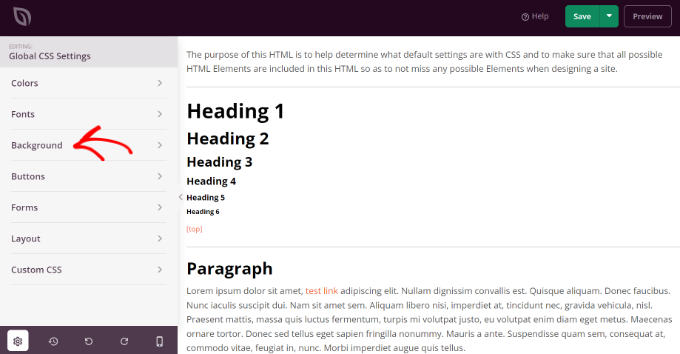
Simply click on the ‘Background’ option.

Open background settings in SeedProd

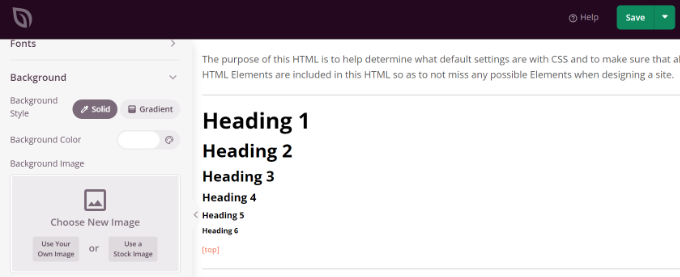
After that, you’ll see the Background Image options.

Go ahead and click the ‘Use Your Own Image’ button to upload your picture or click the ‘Use a Stock Image’ button to search for a stock image to use as your website background.

Add a background image in SeedProd

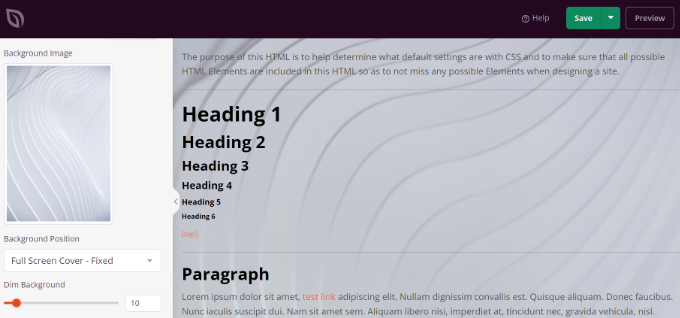
Once you’ve added a background image, the SeedProd builder will display a live preview.

The plugin also offers options to change the Background Position. You can choose whether you’d like to use the full screen cover, put it on repeat, and more.

Plus, you can edit how dark the background image should be by moving the ‘Dim Background’ slider. The higher the score, the darker the image will be.

Change image position and dim settings

When you’re done editing the background image, simply click the ‘Save’ button at the top and close the Global CSS Settings.

If you want to add a custom background image for different parts of your website, then you can edit those individual theme templates in SeedProd.

For more details, please see our guide on how to easily create a custom WordPress theme.

Method 4. Add a Custom Background Image in WordPress Using a Plugin

Using a WordPress plugin to add a background image is a lot more flexible than built-in WordPress options.

To begin, you need to install and activate the Full Screen Background Pro plugin. For more details, see our step-by-step guide on how to install a WordPress plugin.

This plugin will let you set a different background for any post, page, category, and more. Plus, they will automatically be full-screen and adjust themselves for mobile devices.

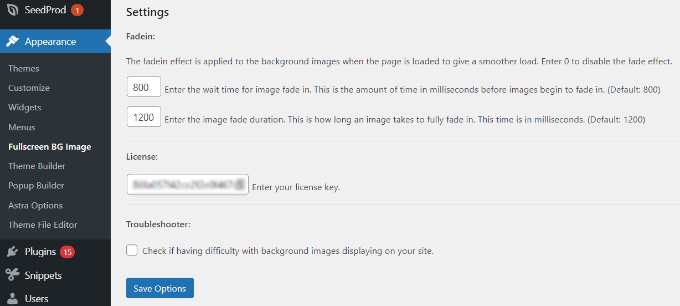
Upon activation, you need to visit Appearance » Fullscreen BG Image to configure the plugin settings.

Enter full screen background license

You will be asked to add your license key. You can get this information from the email you received after buying the plugin or from your account on the plugin’s website.

Next, you need to click on the ‘Save Options’ button to activate your key. You are now ready to start adding background images to your WordPress site.

Go ahead and click on the ‘Add New Image’ button on the plugin’s settings page.

Add a new image

You should now see the background image upload screen.

Click on the ‘Choose Image’ button to upload or select an image. As soon as you select the image, you will be able to see a live preview of the image on your screen.

Add background image

Next, you need to provide a name for this image. This name is just for you, so you can type anything here. Finally, you need to select where you want to use this as the background page.

Once you have chosen whether it will be the background for the whole site, for posts, categories, archives, or elsewhere, don’t forget to save your changes.

You can add as many images as you want to different areas of your site by visiting the Appearance » Fullscreen BG Image page and repeating this process.

If you set more than one image to be used globally or for posts, pages, and categories, then the plugin will automatically start displaying background images as a slideshow.

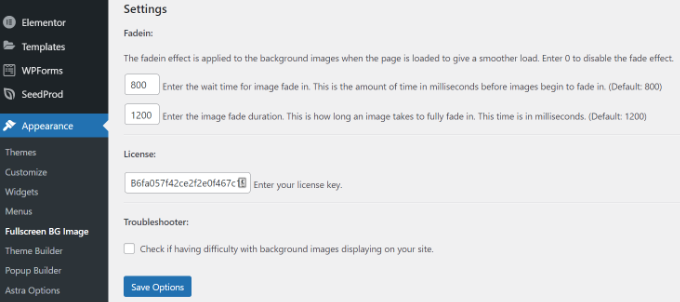
You can adjust the time it takes for an image to fade out and the time after which a new background image starts to fade in the plugin Settings.

Set fadein effect time

The time you enter here is in milliseconds. 1 second is 1000 milliseconds. If you want a background image to fade out after 20 seconds, then you will need to enter 20000.

Don’t forget to click on the ‘Save Options’ button to store your changes.

Background Images for Posts, Pages, and Categories

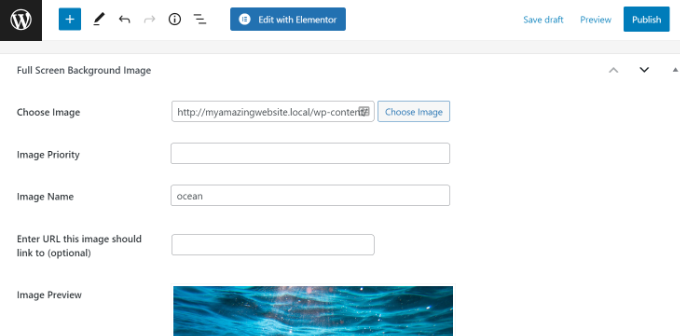
Full Screen Background Pro also allows you to set background images for single posts, pages, categories, tags, and more.

Just edit the post/page where you want to display a different background image. On the post edit screen, you will notice the new ‘Full Screen Background Image’ box below the post editor.

Full screen background image metabox

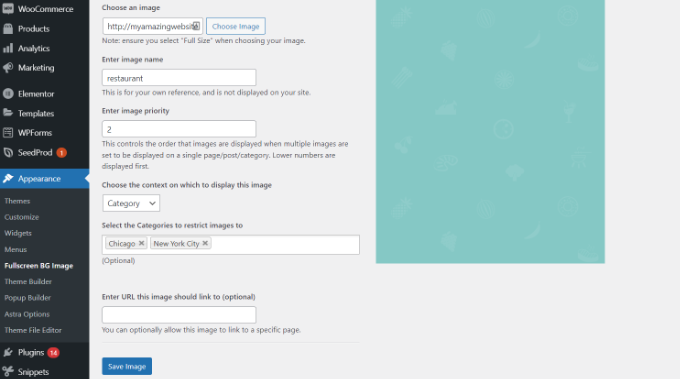
To use a background image for categories, posts, and pages, you need to visit the Appearance » Fullscreen BG Image page and then click on the ‘Add New Image’ button.

After uploading your image, you can select a category, posts, pages, archives, and other options from the ‘Choose the context on which to display this image’ dropdown menu.

Let’s say you want to show a background image for category pages. For this, simply select ‘Category’ from the dropdown menu.

Add background image to categories

The plugin also offers an option to restrict the background image to specific categories, posts, and pages.

For example, if you want to add a custom background image for specific categories, then simply enter the category names under the ‘Select the Categories to restrict images to’ field.

Don’t forget to save your image to store your settings.

You’ve now successfully added a background image for specific posts, pages, and categories.

Method 5. Add Background Images Using CSS Hero

CSS Hero is a WordPress plugin that allows you to make any changes to your theme without touching a single line of code.

You can add background images quickly in a few simple steps. First, you need to install and activate CSS Hero. For more details, please see our guide on how to install a WordPress plugin.

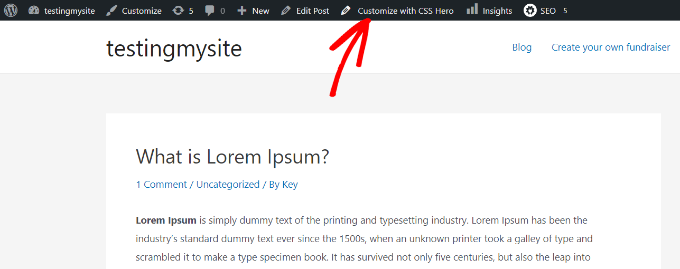
Once you’ve done that, it’s time to start customizing your website. Now open up your homepage in your browser. You’ll see the ‘Customize with CSS Hero’ link in your admin bar.

Customize with CSS hero

After you click that link, you’ll see the CSS Hero options open up. Hover your mouse over the area you want to add an image to.

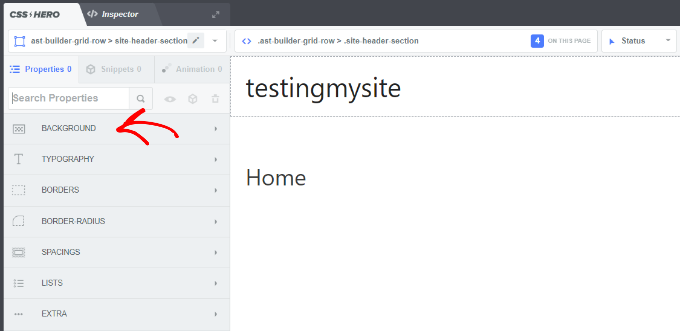
When you click the selected area, you can see the ‘Background’ option in the left sidebar.

Click the background option in CSS hero

Go ahead and click ‘Background’ to see the settings for adding an image.

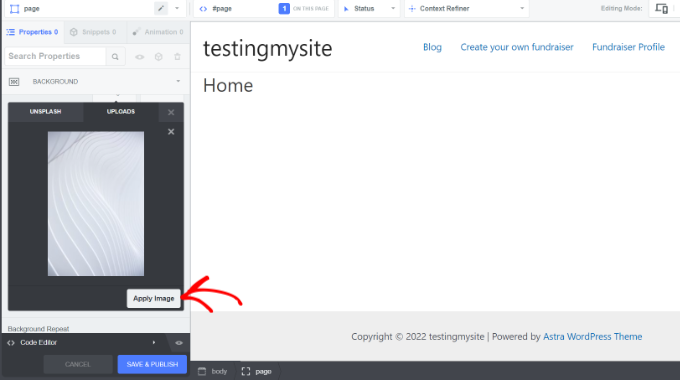
From there, you can click on ‘Image.’ Now, you can choose an image from Unsplash or upload your own to create your background.

Apply image and save

When you click on the image you want, you’ll see the ‘Apply Image’ button. Then you can choose what size you want your image to be. You can choose the large version so it will stretch across the page.

Hit ‘Save and Publish’ at the bottom to save the background image for your site.

Method 6. Add Custom Background Images Anywhere in WordPress Using CSS Code

By default, WordPress adds several CSS classes to different HTML elements throughout your WordPress site. You can easily add custom background images to individual posts, categories, authors, and other pages using these WordPress generated CSS classes.

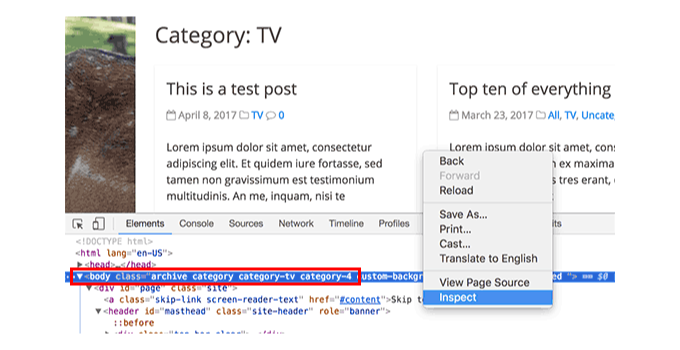
For example, If you have a category on your website called TV, then WordPress will automatically add these CSS classes to the body tag when someone views the TV category page.

 <body class="archive category category-tv category-4"> 

You can use the inspect tool to see exactly which CSS classes are added by WordPress to the body tag.

Inspect body classes

You can use either category-tv or category-4 CSS class to style just this category page differently.

Let’s add a custom background image to a category archive page. You will need to add this custom CSS to your theme.

 body.category-tv { background-image: url("http://example.com/wp-content/uploads/2017/03/your-background-image.jpg"); background-position: center center; background-size: cover; background-repeat: no-repeat; background-attachment: fixed; } 

Don’t forget to replace the background image URL and the category class with ones from your own site.

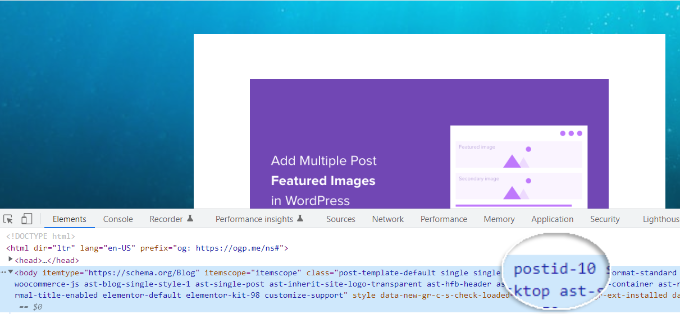
You can also add custom backgrounds to individual posts and pages. WordPress adds a CSS class with the post or page ID in the body tag. You can use the same CSS code, just replace .category-tv with the post-specific CSS class.

Inspect element to see post ID

We hope this article helped you learn how to add a background image in WordPress. You may also want to see our guide on how to start an online store and the best website design software.

If you liked this article, then please subscribe to our YouTube Channel for WordPress video tutorials. You can also find us on Twitter and Facebook.
How Much Does it Cost to Start a Membership Site? (2022 Edition)

Are you trying to figure out how much does it cost to start a membership site?

There are many different factors that will affect the cost of your membership website. You’ll need to break them down into all the different essentials to keep your budget under control.

In this article, we’ll show you how much does it cost to start a membership site.

Calculating the cost of building a membership website

How to Calculate the Cost of a Membership Website?

To calculate the cost of a membership website, you’ll need to break down your spending into components.

This includes choosing the right platform, subscription addon, payment processor, and other tools / services that you’ll need. All of them depend on your business requirements, budget, and growth strategy.

To keep this article focused, we will break down our membership site cost analysis into the following major expenses:

There are several great membership platforms that you can use to build a membership website. Three major players in the industry are MemberPress (WordPress), Shopify, and Teachable.

Shopify and Teachable are SaaS (Software as a Service) platforms. They offer an easier setup initially, but they have limited flexibility and higher costs. More importantly, they charge you based on transactions which will take away a big chunk of your revenue over time.

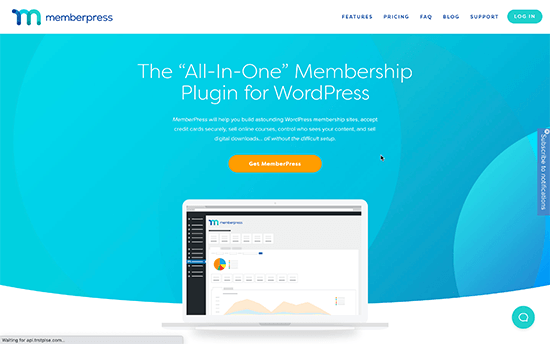
This is why we recommend using MemberPress, which is the best membership site plugin on the market. They allow you sell unlimited memberships with no extra transaction fees.

MemberPress

It runs on top of WordPress, which is already the best website builder in the world used by over 43% of all websites on the internet.

Plus, you get full control over your membership site with the flexibility to choose your own payment service, integrations, and add any feature that you want.

This lets you control the cost of your membership website and adjust it as your business grows. In the long run, you would be able to make a sustainable business while saving a ton of money.

MemberPress has built-in features to sell online courses, digital subscriptions, and even physical memberships like associations.

Business owners using MemberPress are projected to earn over $600 million in 2021.

Membership Website Hosting and Setup Costs

Just like any other type of website, you’ll need a domain name and web hosting account to start a membership website.

Typically, a domain name costs around $16.99 per year and web hosting plans start at $7.99 per month (paid annually).

This is not cheap, considering that you’ll need to spend money on other components as well.

Luckily, the team at Bluehost have agreed to offer WPBeginner readers a generous 60% discount on hosting with a free domain name + SSL certificate which you’ll need in order to accept payments. Basically, you can get started for as low as $2.75 per month.

→ Click Here to Claim This Exclusive Bluehost Offer ←

Bluehost is one of the best web hosting companies in the world and an officially recommended WordPress hosting service.

Alternative options: If you are looking for an alternative, then SiteGround is another excellent option. For more options, see our expert pick of the best WordPress hosting companies.

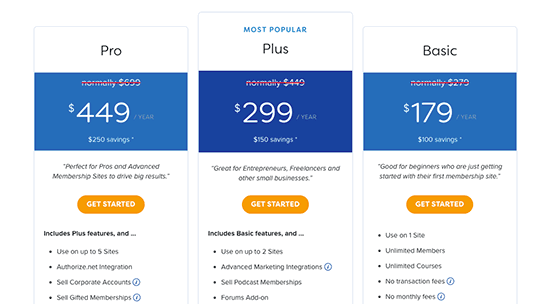
Next, you’ll need to get a MemberPress license which starts at $179 / year for a single site license.

This gives you all the features you need such as unlimited members, no transaction fees, ability to accept payments online, subscription management, email automation, easy course builder, marketing integrations, and more.

MemberPress pricing

After you download MemberPress, you can go ahead and follow our step-by-step instructions on how to make a membership website in WordPress.

Estimated costs of hosting and setup:

Domain and web hosting: Starting from $2.75 per month – $25 per month
MemberPress: $179 – $479 (depending on your licensing plan)

Payment Processing Costs for Membership Website

The recurring revenue model is what makes membership websites a lucrative online business idea.

MemberPress supports both Stripe and PayPal payment gateways that you can use to accept credit cards. You can also use Authorize.Net as a payment method with their Pro plan.

While MemberPress doesn’t charge any additional transactional fee, these payment service providers (merchant banks) do have a payment processing fee, and this is controlled by Visa, MasterCard, Amex, and other credit card companies.

You will have to pay these fees no matter which membership platform you use.

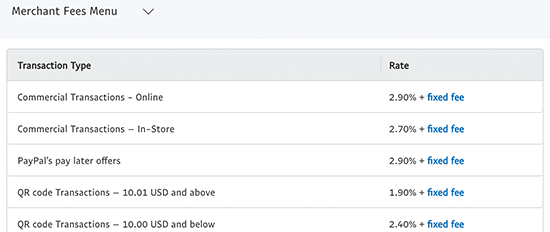
For example, PayPal may charge 2.90% of the transaction amount and a fixed rate of $0.30 USD for domestic transactions. It may also charge an additional 1.50% for international transactions.

PayPal payment processing fees

Similarly, Stripe would charge $2.9%, a $0.30 USD fixed rate fee, and an additional 1% for international transactions.

The benefit of MemberPress is that you don’t pay them any transaction fees for using the platform. Also your payment processing costs only gets lower as your business grows because Stripe offers lower rates for higher processing volumes.

Whereas other providers like Teachable charge you an additional 5% transaction fee for using their platform on top of the fee you pay for payment processing services.

Estimated costs of payment processing:

PayPal: 2.90% + 0.30 fixed rate. Additional 1.50% on international transactions.
Stripe: 2.90% + 0.30 fixed rate. Additional 1% on international transactions.

Design Costs for a Membership Website

Design and templates for membership websites

Next, you need to choose a design for your membership website. Luckily, there are hundreds of free and paid website templates that work beautifully with MemberPress.

However, you’ll want to stand out from the crowd with a stunning design that looks professional and well polished.

Not only will it create a good impression of your brand, but it’ll also help your customers easily navigate your website. This results in higher engagement and sales.

There are three design options you can choose from based on your budget. We’ll discuss them in low to high pricing order:

  • Free WordPress themes
  • Premium WordPress themes
  • Custom WordPress themes

Free WordPress themes:

Free WordPress themes come with the obvious benefit of saving money, but they often include limited support and customization options compared to paid or premium WordPress themes.

Premium WordPress themes:

Premium or paid WordPress themes come with a price tag, but include more customization options and priority support from developers.

Pricing for premium WordPress themes usually starts at $30 USD per year. Here are some of the most popular membership website themes:

  • Divi – One of the most versatile WordPress themes suitable to make any kind of website including membership sites.
  • Astra – Astra is a popular multipurpose WordPress theme that works beautifully with membership sites. It comes with dozens of starter website templates and a 1-click setup.
  • Ocean WP – Another flexible WordPress theme that comes with powerful customization options.

For more design inspiration, see our pick of the best WordPress membership website themes.

A custom WordPress theme:

A custom WordPress theme is when you hire a WordPress designer/developer to code a unique membership website theme for your website.

This allows you to add custom features to your website and have a unique design that stands out from other membership sites.

However, custom WordPress themes can be very expensive. The cost would depend on the features you want to add and the expertise of the developer.

A custom theme could cost between $1500 to $6000 for a medium-sized business. An enterprise-level design may cost even more than that.

Estimated costs of membership website design:

Free to $30 for a WordPress theme.

$1500 – $6000 for a custom design.

Essential Addons and Extensions Costs

WordPress plugins

MemberPress runs on top of WordPress, which means you can add more features to your website by using plugins.

A WordPress plugin is a piece of software that adds new functions to your website. For instance, there are contact form plugins, landing page builders, social media plugins, and more.

There are also plugins made specifically for MemberPress as well.

The majority of WordPress plugins are available for free. Even many paid plugins also have a lite or free version that you can use.

You can try to keep your membership website costs down by using free plugins whenever possible.

Here is quick list of essential WordPress plugins that you may need right away. All of them are available for free.

Must-Have Features

WPForms – Allows you to easily add a contact form to your membership website.

MonsterInsights – Connect your membership site to Google Analytics and see how users find and use your website. This helps you learn how to bring more users and make more sales.

WP Mail SMTP – Emails are crucial for running a membership website. WP Mail SMTP fixes WordPress email deliverability by issue by properly sending emails using an SMTP server.

Marketing and SEO

All in One SEO – Easily optimize your membership website SEO to get more free traffic from search engines.

PushEngage – Easily send push notifications to your users on mobile as well as desktop. It helps increase website traffic, improve conversions, and grow your business.

OptinMonster – helps you improve conversion rates by converting website visitors into subscribers and paying customers.

Bonus Tools

SeedProd – An intuitive drag and drop page builder that allows you to quickly create custom landing pages and design layouts.

Uncanny Automator – Create automated workflows to manage your membership website. This helps you save time and create better user experience for your customers.

RafflePress – Easily run giveaways and contests for your members to boost engagement and grow your traffic.

Need even more features? Here are some of the must have WordPress plugins that you may want to check out. Many of them are free or have a free version.

Estimated costs of addons and extensions:

Free to Unlimited.

We recommend starting out with free versions of plugins whenever possible. This keeps your costs down and you can choose to buy premium plugins later as your business grows.

Premium Tools and Addons for a Growth Membership Site

We recommend all users to start with shared hosting and use free plugins and theme to keep the costs down. This saves you money and allows you to focus on growing your business.

Once your business starts growing, then you can choose to invest some money on extra features and premium tools. Following are a few additional features that you can later add to your website when you can justify the cost.

Email Marketing – We recommend using Constant Contact which is the best email marketing service for small businesses. For advanced marketing automation, you can use either Drip, ConvertKit, or HubSpot.

Live Chat SupportLive chat software helps you convert more users into paying members. We recommend using LiveChat which is the best customer service platform on the market. (Cost: Starting from $16 per agent per month)

Business Phone Service – A business phone number allows you to easily manage business calls using one number. We recommend using Nextiva, which is the best phone company for small businesses. (Cost: $18.95 per month)

Note: All of these additional services are not necessary to build a membership website. You can choose to add them to your site as your business grows.

Total Cost of Building a Membership Website

Now that we have covered the main areas of spending, let’s take a look at the total cost to build a membership website.

Keep in mind that your costs would increase as your business grows or you are able to invest more into it. We have broken down the cost range into three categories.

  • Starter Membership Website (Recommended): $212 per year or $17.66 per month (Shared hosting $2.75 / month, MemberPress $179 / year, free plugins and theme).
  • Growth Membership Website: $300 – $1000 (WordPress hosting upgrade $4.99/mo, MemberPress Pro $299/yr, paid plugins and marketing services).

For enterprise level membership websites the costs could go higher. They can choose dedicated hosting server, custom design, and hire developers to write custom WordPress plugins.

The best part about using MemberPress to build your membership website is that you are in charge of controlling the cost.

This means you don’t pay for anything that you don’t need right away, and you can still build a powerful membership website.

Tips on Keeping The Costs Down on Your Membership Site

Keeping costs down

Building a membership website with WordPress and MemberPress allows you to choose how you spend money on your membership website.

We recommend all users to start small and scale their website as their business grows.

Now many users compare their website with already established websites in their industry. This isn’t a fair comparison as those businesses have been around longer and already have a revenue stream to justify spending more money.

As a starter membership community you don’t need flashy premium features right off the gate.

You can start with a shared hosting plan on Bluehost which gives you a free domain + SSL. Then, you can purchase MemberPress Basic license plan and start building your membership website.

For essential features, you can rely on free WordPress plugins and theme. You would be surprised with what you can do using only the free plugins.

As your business takes off, you can start investing on premium features. Even then, you can find excellent WordPress deals and coupons to get discounts on all the top tools and services.

We hope this article helped you learn how much does it cost to build a membership website. You may also want to see our complete guide on how to create an email newsletter, or our comparison of the best webinar software platforms.

If you liked this article, then please subscribe to our YouTube Channel for WordPress video tutorials. You can also find us on Twitter and Facebook.
How Much Does It Really Cost to Build a WordPress Website?

One of the questions we often get asked is: how much does it cost to build a WordPress website?

While the core WordPress software is free, the cost of a website depends entirely on your budget and goals.

In this article, we will break it all down to answer the ultimate question: How much does it really cost to build a WordPress website? We’ll also show you how to avoid overspending and minimize costs when building a website.

How much does it cost to build a WordPress website

This is a lengthy read and that’s why we have added a table of contents. Here is what we will cover in this article:

What Do You Need to Build a WordPress Website?

WordPress is free for anyone to download and use. It is open source software that gives you the freedom to install it on any kind of website.

So if WordPress is free, then where is the cost coming from?

The cost of a WordPress site can be broken down into the following categories:

  • WordPress hosting
  • Domain Name
  • Design
  • Plugins and Extensions (Apps)

To create a self-hosted WordPress site, you need web hosting to store your files. Every website on the internet needs hosting. This is your website’s home on the internet.

There are different hosting plans available for all kinds of websites. You need to pick one that suits your requirements and fits your budget.

Next, you will need a domain name. This will be your website’s address on the internet, and this is what your users will type in the browser to reach your website (example, wpbeginner.com or google.com).

With WordPress, there are tons of free website templates available that you can use. However, if you want something more advanced / custom, then you can purchase a premium template or have one custom made which will raise the cost.

There are 59,000+ free plugins for WordPress. These are apps and extensions for your websites. Think features like contact form, gallery, etc.

So while you can build a website with just the hosting and domain cost, based on your situation, you may end up paying for additional tools and services. That’s why it’s often confusing for people to find out the real cost of a WordPress website.

Let us walk you through the real cost of building a WordPress site.

Estimating The Real Cost of Building a WordPress Site

Calculating the cost of building a WordPress website

Depending on your needs, your cost to start a WordPress website can range from $100 to $500 to $3000, to even as high as $30,000 or more.

It’s important to know what type of website you are building, and what you’ll need for it because that will directly affect your cost.

But don’t worry, we’ll show you how to avoid a financial disaster and make the best decisions.

For the sake of this article, let’s break down websites into different budget categories:

  • Building a WordPress website (low budget)
  • Building a WordPress website (with more features)
  • Building a WordPress website for small business
  • Building a WordPress eCommerce website
  • Building a custom WordPress website

Now let’s see how much each of these projects costs and how you can avoid spending any more than necessary.

What’s the Cost of a WordPress Website (Low Budget)?

Building a low budget WordPress site

You can build a fully functional WordPress website for yourself and keep your costs under $100. Here is the cost breakdown of a WordPress website on a low budget.

First, you will need a domain name and web hosting.

A domain name typically costs $14.99 / year, and web hosting normally costs $7.99 / month.

Thankfully, Bluehost, an official WordPress recommended hosting provider, has agreed to offer our users a free domain name and over 60% off on web hosting.

→ Click here to Claim this Exclusive Bluehost offer ←

For more hosting recommendations check out our guide on how to choose the best WordPress hosting.

Next, you will need to install WordPress on your hosting account. See our step by step guide on how to start a WordPress blog for complete instructions.

Once you have installed WordPress, you can choose a design for your website using a free template.

These design templates are called WordPress themes, and they control the appearance of your website.

There are thousands of professionally designed free themes available for WordPress that you can install. See our expert pick of 43 beautiful free WordPress blog themes for some examples.

Once you have chosen a WordPress template, follow the instructions in our step by step guide on how to install a WordPress theme.

Next, you may want to add certain features to your website like adding a contact form, a photo gallery, a slider, etc. Don’t worry there are more than 59,000 WordPress plugins available that will help you do that.

Plugins are like apps or extensions for your WordPress site. See our step by step guide on how to install a WordPress plugin.

Below is our selection of the essential WordPress plugins that you should install on your website. All of them are available for free.

Features

Website Optimization

Website Security

There are many more free WordPress plugins to add different features and extend your WordPress site. See our best WordPress plugins category where we have reviewed hundreds of WordPress plugins.

Total Cost of website: $46 – $100 per year

What’s the Cost of a WordPress Site (with More Features)?

Cost of WordPress site with more features

We always recommend our users to start small and then add more features as their website grows. This way you will not be paying for anything that you don’t really need.

As you add more features to your website, your website cost will start to increase.

You can continue to use Bluehost for WordPress hosting to keep the cost low and get a free domain name.

However since you will be adding more features to your website, it may make sense to get a more powerful hosting configuration like SiteGround’s GoGeek plan. This will cost you a little more, but it comes with premium features like staging, faster performance, and can handle up to 100,000 visitors per month.

You can use our SiteGround coupon to get 60% off for the first year of your hosting.

You can also go for a premium WordPress template for your site. Unlike free WordPress templates, these templates come with extra features and priority support. See our expert selection of 40 best responsive WordPress themes for some great premium templates that you can use.

For more website features you need to use a combination of free + paid plugin addons.

Here are some essential premium WordPress plugins and extensions that you’ll need as your site grows:

Features

  • WPForms (Pro) – Adds a drag-and-drop form builder to your WordPress site.
  • WP Rocket – Premium WordPress caching plugin to speed up your site.
  • SeedProd Pro – Adds a drag-and-drop WordPress page builder.
  • WP Mail SMTP – Improves email deliverability and fixes WordPress not sending email issue.
  • Uncanny Automator – WordPress automation plugin that helps you connect your website with popular tools & services without any code.

Marketing

Security

There are many more WordPress plugins and services that you can add. Each paid service or addon that you add will increase the cost of your WordPress site.

Total cost of website: Depending on the premium WordPress plugins and services that you add, it can be anywhere between $500 and $1000 per year.

What’s the Cost of a Small Business Website with WordPress

A lot of people often ask us about how much does it cost to build a small business website with WordPress? The answer depends on your business needs, and the tools you’ll be using to grow your business online.

Basically, you can estimate the cost to be somewhere between a low-budget WordPress site and a WordPress site with more features.

Keep in mind that you don’t add a full-fledged eCommerce store to your business website. In that case, see the next section in this article for a more accurate estimate.

If you are just starting out and need a simple website showcasing your products and services, then we recommend starting with the Bluehost. Their starter plan will reduce the cost significantly and will leave you with money that you can spend on other premium tools if needed.

If you have a more flexible budget, then you can sign up for SiteGround’s GrowBig plan. They are known for their excellent support, which is a good thing to have for a small business owner with no technical background.

Next, you will need to pick up a design for your website. You can look for a WordPress theme for business websites or pick a responsive WordPress theme that matches your requirements.

You can choose a free WordPress theme. However, since it is a business website, we will recommend you purchase a premium theme that gives you access to support and updates.

Now let’s talk about plugins.

You will need to use a combination of free and premium plugins to control the cost. Following are some of the premium plugins that are absolutely essential for a small business website.

Features

  • WPForms (Pro) – The premium version will give you access to all the features you’ll need for lead generation. This includes PayPal and Stripe payments, conversational forms, email marketing integration, and more.
  • SeedProd Pro – Adds a drag-and-drop WordPress page builder.
  • WP Mail SMTP – Improves email deliverability and fixes WordPress not sending email issue.
  • Uncanny Automator – WordPress automation plugin that helps you connect your website with popular tools & services without any code.

Marketing

Security

  • UpdraftPlus (Pro) – The premium version of the plugin comes with incremental backups, automatic backups before updates, and several remote storage locations to keep your backups.
  • Sucuri Firewall – Website firewall and malware protection.

Now there are many more plugins and tools that you would want to use. We recommend you first try the free version and see if that does the job for you. Many premium tools are available with the free trials, take advantage of those to see if you really need that tool.

As a business website, you would want to spend money to grow your business. We are not advising you against spending money when it makes sense and you can afford it.

For more details see our step by step guide on how to make a small business website.

Total cost of website: Once again it depends on the premium tools and plugins you purchase. It can be anywhere between $300 and $700 per year but could go as high as $1000 per year.

What’s the Cost of a WordPress Ecommerce Website?

Cost of building a WordPress eCommerce website

WordPress powers millions of eCommerce websites around the world.

The cost of building a WordPress eCommerce website can be significantly higher, but we will show you how to build a WordPress eCommerce website while avoiding potential losses and overspending.

In addition to hosting and domain, your eCommerce site will also need an SSL certificate which costs around $69.99/year. SSL is required to securely transfer customer data such as credit card information, usernames, passwords, etc.

We recommend using Bluehost. It gives you a free domain and SSL certificate, plus a discount on hosting.

After that, you need to select a WordPress eCommerce plugin.

There are several eCommerce plugins for WordPress, but none comes even close to WooCommerce. It is the most popular WordPress eCommerce plugin that allows you to build robust online stores to sell your products/services.

Next, you will need to install WordPress and WooCommerce on your website. We have a step by step guide on how to start an online store.

While WooCommerce is free, you will need to use paid addons for additional features. The cost of your website will go up depending on how many addons you need to add to your website.

Once you are up and running, you will need to choose a WooCommerce WordPress theme for your site. There are several paid and free WordPress templates with full WooCommerce support. Choosing a premium or paid template gives you access to support and extra features.

We have a list of the best free WooCommerce addons, but depending on your needs, you may have to use some paid extensions as well.

Here are some other paid services that you’ll need on your eCommerce website.

Features

  • WPForms – To add customer inquiries and feedback forms
  • SeedProd Pro – Adds a drag-and-drop WordPress page builder.
  • WP Mail SMTP – Improves email deliverability and fixes WordPress not sending email issue.
  • Uncanny Automator – WordPress automation plugin that helps you connect your website with popular tools & services without any code.
  • Soliloquy – Create beautiful product sliders with their WooCommerce addon.

Marketing

  • OptinMonster – Convert visitors into customers with this powerful lead generation tool.
  • Constant Contact – Powerful email marketing service.
  • MonsterInsights – Ecommerce tracking with real-time stats using Google Analytics.
  • All in One SEO Pro – Improve your WooCommerce SEO ranking.
  • HubSpot – All-in-one CRM, live chat, email marketing, and sales tools.

Security

  • BackupBuddy – Automatic WordPress backups
  • Sucuri – Website firewall and malware scanner

Remember the best way to keep your costs down is by starting small and adding extensions and services as your business grows.

Total cost of building a WordPress eCommerce website: $1000 – $3000. It could be higher depending on how many paid addons and services you add to your site.

What’s the Cost of a Custom WordPress Site?

Cost of a custom WordPress website

A custom WordPress site is when you hire a WordPress developer to create a unique design and build specific features for it.

Usually well established, large to medium-sized businesses choose this route.

To support a custom WordPress site, you may also want to go for a managed WordPress hosting provider. This is a WordPress-centric hosting environment, with managed updates, premium support, strict security, and developer-friendly tools.

In addition to your hosting and domain name, you will also be paying the web developer that’s building your website. Depending on your need, you may want to get quotes from several theme developers, web designers, and agencies.

The cost of a custom website depends on your requirements, budget, and the rates of the developer or agency you hire.

A standard custom WordPress theme alone can cost you up to $5,000. More robust WordPress sites with specific custom features can cost up to $15,000 or even higher.

Update: Since several of you asked for more details on this section, we have created a comprehensive guide on how much does a custom WordPress theme cost and tips on how you can save money.

Aside from that, we have created a beginner’s guide on how much does it cost to start a membership site in WordPress.

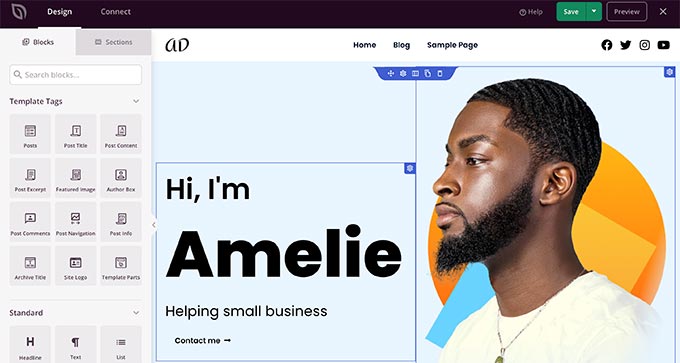
Regardless of the type of custom website you want to create, one effective way to reduce custom WordPress site costs is by using the SeedProd plugin. SeedProd is a drag-and-drop website builder that allows you to create custom themes and page layouts without editing any code.

SeedProd drag and drop WordPress theme builder

You can use SeedProd to reduce your custom WordPress site costs by as much as 90%.

For more details, see our tutorial on how to easily create a custom WordPress theme with SeedProd.

How to Avoid Overpaying and Cut Down Spending?

We always recommend our users to start small and then scale their WordPress site as it grows. In many cases, you don’t need all the premium features that you see on many well-established websites in your industry.

Keep in mind that those websites had a head start, and it likely took them some time to figure out how to manage costs and grow their business.

You can start with a budget website using free plugins and templates. Once you start getting visitors, you can consider adding premium features like a premium template, email marketing, paid backup plugin, website firewall, business email address, business phone services, live chat, and so on.

The same goes for your eCommerce website. Start with the bare minimum and then as you start selling, you will find out exactly the tools that will help you and your customers.

Look for the best WordPress deals and coupons to get additional discounts whenever you can.

Even for robust WordPress sites, you don’t always need to hire a developer. We have step by step tutorials on how to create different types of WordPress websites such as:

We hope this article answered your questions about how much does a website cost to build. You may also want to see our list of 30 legit ways to make money online with WordPress, and our AI-powered business name generator tool to come up with company name ideas.

If you liked this article, then please subscribe to our YouTube Channel for WordPress video tutorials. You can also find us on Twitter and Facebook.
How Much Does a Domain Name Really Cost? (Expert Answer)

If you have ever tried to register a domain name before, then you have likely seen a wide-variety of prices ranging from $9 to several thousand dollars.

The cost of a domain name varies based on the domain extension (such as .com, .org, .net), domain registrar, availability, and few other factors.

Apart from new domain names, you can also buy premium domain names from someone else who has registered it before you. Domain name investors often register premium domain names that are shorter, brandable, and easy to remember for the sole purpose of reselling.

In this article, we’ll explain how much does a domain name really cost. We’ll also show you different ways to buy a domain name, including a way to get one for free.

How much does a domain name really cost

Since this is a comprehensive guide on domain name costs, we have broken it down into few sections:

How Much Does a New Domain Name Cost?

Buying a new domain name would typically cost you anywhere between $9 and $14.99 per year. However, these prices may differ based on the domain extension or the domain registrar you choose.

If you are starting a new website, then we recommend using Bluehost. They are one of the top web hosting companies in the world.

They are offering WPBeginner users a free domain name + free SSL certificate on top of the 60% discount on their web hosting plans.

Since you need both a domain name and web hosting to make a website, this is the most affordable option to get started.

If you just want to purchase a domain name, then we recommend using Domain.com as your registrar. You can use our Domain.com coupon code to get 25% off your purchase.

Here is how much a new domain registration costs with different registrars.

These prices are for new .com domain names only. The pricing of other extensions such as .net, .org, .info, .blog, etc. will vary based on the domain registrar you use.

When it comes to domain extensions, we always recommend users to use .com because it’s the most popular one.

Tip: The easiest way to search for a domain name is by using our Business Name Generator tool or Nameboy domain name generator.

Hidden Costs of a Domain Name

Aside from the domain registration cost, there are few hidden domain costs and upsells that you should be aware of, so you can make the most educated decision.

Yearly Renewals

Domain name registration is done on a yearly basis. You can maintain control over your domain name as long as you continue to renew your registration each year.

Some domain registrars offer domain name discounts on first year purchase, but their renewal costs are much higher. If you see a promotion where you can pay $0.99 for a domain name, then please know that it’s usually for first year only. Your annual renewals will be at a much higher price.

WHOIS and Domain Privacy

ICANN is the not-for-profit public-benefit corporation that is responsible for coordinating the assignment and maintenance of domain names. They require each domain registrar to collect contact information for the website owner.

This information can be publicly accessed using WHOIS data. Other businesses and companies can use this information to contact you about a potential business partnership.

Having the WHOIS data publicly available can result in unwanted emails and phone calls. This is why many domain registrars sell an add-on called Domain Privacy.

This addon typically costs an additional $9.99, and it’s completely optional. The problem is that often registrars automatically add it to the cart, and you have to manually remove it if you don’t want to pay for it.

Some registrars like DreamHost offer free domain privacy with their domains.

Business Email Accounts (Email Domains)

When buying a domain name, you will likely see an addon for email domains for setting up a professional business email address.

You do not need to buy this because you can get a free business email address with most web hosting companies.

If you want a more professional option, then we recommend buying this directly from G Suite or Microsoft Office365, so you’re not locked into a registrar.

Pro Tip: Secure Domain Discounts for Multiple Years

Some registrars like Domain.com allows you to pre-pay for multiple years upfront. This is a great way to get the introductory discount offer for multiple years.

Since you have to pay for domain renewals every year, pre-paying for multiple years can be a significant saving. Not to mention, it saves you from future price increases.

But these hidden fees and domain cost explanation is primarily for new domains that are available to register.

What about premium domains or domains that you buy from other people? Let’s take a look at the premium domain costs in details.

How Much Does a Premium Domain Name Cost?

Premium domain names are pre-registered domain names that are often shorter, brandable, and more memorable. Often domain investors register these premium domain names to sell later at a higher price for profit.

Cost of premium domain names can range anywhere from a few hundred dollars to thousands of dollars. It all depends on the uniqueness of the name, domain length, and its overall brand potential.

Some premium domains may even cost hundreds of thousands to millions of dollars. Here are some of the most expensive domains sold in history:

  • Insurance.com – $35.6 million
  • PrivateJet.com – $30.18 million
  • Hotels.com – $11 million
  • Fb.com – $8.5 million
  • Business.com – $7.5 million

You can find premium domain names listed for sale by private sellers on various websites.

We recommend buying domain names from reputable websites to ensure a safe transfer of the domain name. See our guide on the best places to buy a premium domain name.

How to Estimate The Value of a Premium Domain Name?

Many beginners ask us about how to find the right offer to make for a premium domain or a pre-registered domain name?

Domain names that are already taken are often sold at a higher price. However, most of the time the asking price is outrageously high which discourages many inexperienced domain buyers from making an offer.

We recommend users to do some research and make a reasonable counter offer. Remember, the domain investor only makes money when they sell the domain.

Like most trades, the value of a premium domain largely depends on the maximum you’re willing to pay and the lowest the seller is willing to accept.

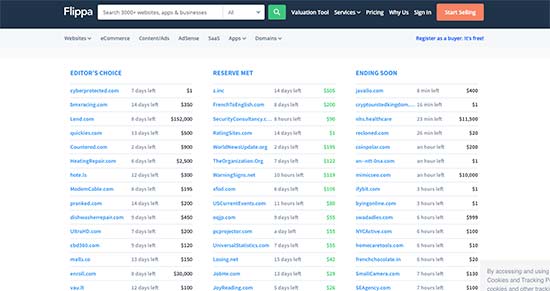
However, you can look at domain marketplaces like BuyDomains, Sedo, or Flippa to better understand the market rates, so you can make a respectable offer for a particular niche.

Flippa domains

If the domain you are looking for already has a listed price, then you can start by offering 50-75% of the listed price.

Note: Most domain value estimation tools are completely useless, so it’s best to avoid using them as a reference.

We recommend caution when buying a registered domain name. If you are unsure about the domain’s potential worth to your business, then simply walk away.

How Much Does an Expired Domain Names Cost?

Each day thousands of domain names expire. These are the domain names where the owner decided not to renew their registration, or they simply forgot about these domain names.

Expired domains provide an excellent opportunity to find great brandable domain name. The following are a few places where you can look for recently expired domain names.

1. FreshDrop

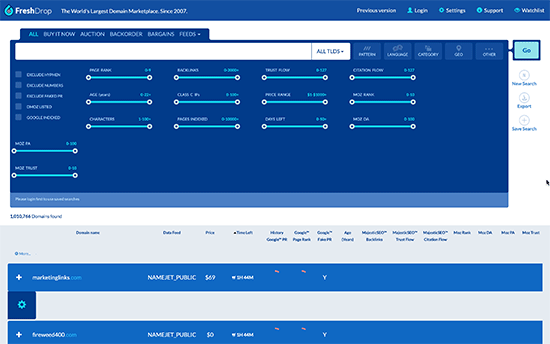
FreshDrop

FreshDrop is a domain marketplace that allows you to follow expired and soon to be expired domain names. It comes with an advanced search tool that you can use to narrow down your search.

2. ExpiredDomains

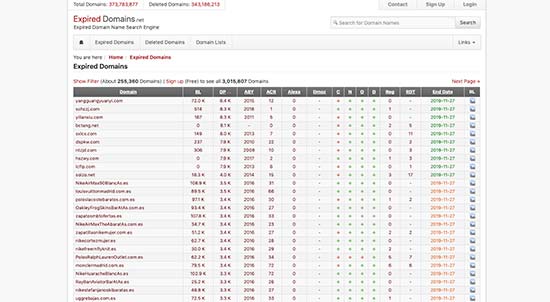
ExpiredDomains

ExpiredDomains is a search engine dedicated to expired domain names. It may not look as easy to use as other domain search tools but it has a large and constantly updated index of domain names.

Note: You need to check for domain abuse and other problems before buying a used, pre-registered, or expired domain names (more on this later).

Cost of Expired Domain Names

Normally, you can register an expired domain name at the usual yearly rates of your domain registrar company.

However if a domain name is soon to be expired, then you can use a domain backorder service. This allows you to place an advance order for the domain name.

If there is no other advance order for that domain name, then your order will become successful. Most domain name companies charge a small one-time fee ($25 – $99) to provide this service.

How to Buy a Domain Name Not Listed for Sale?

So far we have talked about the cost of domain names that are available for registration or sold by third-parties. What if you have your eye on a domain name that is already taken but not listed for sale?

There is a good chance that you can still get your hands on that particular domain name.

You see, many users register domain names to start a new online business idea. A lot of them end up never using that domain name or abandon the idea.

Since they’re not using the domain name, you can directly contact the domain owner to make an offer.

If the domain name has a website, then you can use the contact form on their website to reach out.

Alternatively, you can use the Whois search to find contact information of the domain owner and send them a message to show your interest.

Sometimes people register domain names for future ideas, so even if they’re not using it, they still wouldn’t want to sell it. Some folks get greedy and will ask for a premium to part ways with their domain.

Remember, you’re buying someone’s “dream idea”, so you need to be respectful but also realistic about the value.

Pro tip: If you have a business idea, then it’s better to register a domain name even if you’re not 100% sure. You don’t want to risk someone else registering it before you get around to it. We think of it as an insurance policy because a domain costs only $9.99.

Doing Your Homework Before Buying a Domain Name

If you are buying a domain name that has never been used before, then you are good to go.

However, if you are buying a domain name that was previously owned by someone else, then you need to do some basic due diligence.

These domain names could be violating copyright or trademark, used to distribute malware or spam, or misused in other malicious activities.

Don’t worry, there are plenty of tools that you can use to do your homework.
1. Check For Trademark

First, you would want to make sure that the domain name is not a registered trademark of an existing business.

According to ICANN rules, if a domain name violates a company’s registered trademark, then that company can claim the domain name or ask you to take it down.

You can check the United States Patent and Trademark Office’s database to do a quick trademark search. Simply enter your domain name in the search box to see if it returns any matches.

Trademark search

2. Check Past Domain Name Usage

Next, you would want to see how the domain name has been used in the past. What kind of websites were made using that particular domain name?

The easiest way to do this is by using the Wayback Machine. It is a massive historical archive of the internet with snapshots of websites archived on a regular basis.

Wayback Machine

3. Check Historical Whois Records

Whois tools provides you historical whois records for a domain name. This helps you see when a domain name was created, last renewed, DNS changes, and other historical data.

Whois

4. Run a Domain Health Check Test

Finally, you need to make sure that the domain is not used to send spam, launch DDoS attacks, or spread malware. You can use MxToolBox’s domain health tool to see if raises any red flags.

Check domain health check

Frequently Asked Questions About Domain Name Costs

Having helped thousands of users start a blog and website, we have answered a lot of questions related to domain names. Below are some of the most common ones:

Can I get a domain name for free?

While domain name typically costs $14.99 / year, you can get a domain name for free as a bundled offer with various web hosting companies.

Hosting companies like Bluehost, HostGator, Dreamhost, GreenGeeks, and others offer free domains with their web hosting packages.

Which is the best domain name registrar?

We believe that Domain.com is the best registrar right now because they have the features you need, and they’re offering a 25% off discount.

However it’s a smarter money decision to get a free domain with web hosting like Bluehost because it saves you time and money.

You can always transfer your domain name to another popular domain name registrar if you’re not happy with your existing provider.

Do I need both domain name and web hosting to build a website?

Yes, you need both the domain name and web hosting to build a website. Domain name is your website’s address on the internet whereas web hosting is where your website files are stored. For more details, see our guide on difference between domain name vs web hosting (explained).

Can I buy a domain name forever (permanently)?

No, you cannot buy a domain name permanently. Domain name registration is done on a yearly basis. However, you can pre-pay for up to 10 years which guarantees that you will have a domain name for 10 years.

How much does a domain name cost on Wix vs WordPress?

When using a hosted website builder platform, the cost of your domain name will vary. It’s important to remember that website builder platforms offer a combination of hosting + domain.

For example, Wix domains cost $14.95 / year, but they are free if you choose the annual plan which costs $13 / month.

WordPress.com domains cost $18 / year, but they are included for free with the annual Personal plan which costs $8 / month.

But if you use a self-hosted WordPress platform, then you can start a website with Bluehost for $2.75 per month, and it comes with a free domain name. For more details, see the difference between WordPress.com vs self-hosted WordPress.org.

We hope this article helped you learn how much does a domain name really cost. You may also want to see our guide on how much does it really cost to build a WordPress website.

If you liked this article, then please subscribe to our YouTube Channel for WordPress video tutorials. You can also find us on Twitter and Facebook.