Do you want to create 301 redirects on your WordPress website?
When someone visits your site using an old link to a page that has moved, a 301 redirect will automatically take them to the new page so they do not see a 404 ‘page not found’ error. This provides a better user experience and will also improve your keyword rankings.
In this article, we’ll show you how to create 301 redirects in WordPress.

What Is a Redirect in WordPress?
A redirect is a way for your WordPress website to automatically send users to a new address when the page they wish to visit has been moved or replaced. This is similar to the way a post office will redirect your mail when you move house.
There are various types of redirects that are identified with numbers such as 301, 302, and 307. They automatically point your user’s web browser to a different URL when trying to visit a page that doesn’t exist.
In this beginner’s guide, we will focus on 301 redirects since they are the most important type. They tell the browser that the page has been permanently moved to the new location and that you don’t intend to move it back.
That said, let’s take a look at when you should use a 301 redirect.
When Do You Need a 301 Redirect in WordPress?
The primary reason to use a 301 redirect is when your site or a page on your site has been moved, and you want to point the user to a new page instead.
It is also needed when you plan on changing the permalink of a post or page.
If you don’t set up redirection, then it will cause your users to see a 404 error when the page is not found. This provides a bad user experience and can impact your WordPress SEO.

You can also lose valuable backlinks if there are a lot of broken links on your site. This will result in a significant drop in your domain authority and keyword rankings.
That’s why 301 redirects are very important. They allow you to tell search engines and your users that the page they are trying to reach has been permanently moved to a new location.
This way, all your old page’s traffic and backlinks are transferred to the new page.
Now, let’s take a look at how you can create 301 redirects in WordPress. We’ll show you how to do that easily with several WordPress redirect plugins, and manually using code.
- Method 1: Creating 301 Redirects with AIOSEO Plugin
- Method 2: Creating 301 Redirects With Redirection Plugin
- Method 3: Creating 301 Redirects With Simple 301 Redirects Plugin
- Method 4: Redirecting Existing Pages With Page Links To Plugin
- Method 5: Creating 301 Redirects Manually Using .htaccess
Video Tutorial
If you’d prefer written instructions, just keep reading.
Method 1: Creating 301 Redirects With AIOSEO Plugin
The simplest way to manage and create 301 redirects is through the All in One SEO (AIOSEO) WordPress plugin. It’s the best SEO plugin for WordPress and is used by over 2 million professionals to improve their site’s SEO.
AIOSEO offers a powerful redirection manager addon that makes it very easy to find broken links on your website and set up 301 redirections to fix them.
Note: You’ll need AIOSEO Pro to use the redirection manager. There is also a free version of AIOSEO, but it doesn’t include 301 redirects.
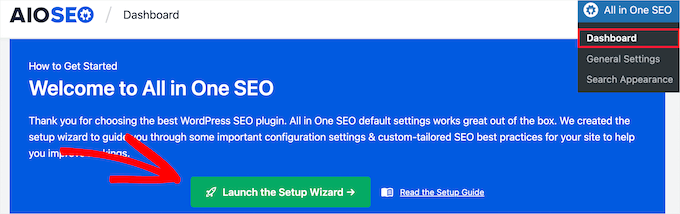
First, you need to install and configure the AIOSEO Pro plugin on your website. For more information, please refer to our step-by-step guide on how to set up All in One SEO correctly.
Once the plugin is active, you’ll need to go to All in One SEO » Redirects on your WordPress dashboard and then click the ‘Activate Redirects’ button.

Next, you can click the ‘Settings’ tab and select ‘PHP’ as the Redirect Method.
This is the simplest method for creating redirects and doesn’t require any server-side configuration.

AIOSEO also lets you select the Web Server redirect method. However, it requires configuring Apache or NGINX on your web server. This requires technical knowledge and is not recommended for beginners.
Creating 301 Redirects
Now you’re ready to create 301 redirections. To get started, head over to the ‘Redirect’ tab.
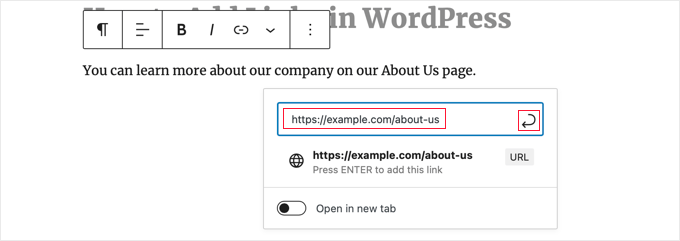
First, you need to enter the link you’d like to redirect in the Source URL field. After that, you should enter the new destination for the link in the Target URL field.

Now make sure that the Redirect Type is ‘301 Moved Permanently,’ and then click the ‘Add Redirect’ button.
If you want to redirect multiple URLs to a new location, then simply click the ‘Add URL’ button under the Source URLs field.
Next, you can scroll down to view the logs of the redirects you’ve created. It shows the number of people who visited the redirected link under the ‘Hits’ column and a toggle option to enable or disable individual 301 redirects.

Adding 301 Redirects to Fix 404 Errors
AIOSEO can also help you track 404 error pages and fix them.
To turn this option on, you have to scroll down to the ‘Redirect Logs’ section of the Settings tab. Then enable the options for ‘404 Logs’ and ‘Redirect Logs.’
You can also select the time period to keep the logs. We recommend keeping them for a maximum of one month for smooth and fast server performance.

After enabling these options, make sure to click the ‘Save Changes’ button.
You should now see a new ‘404 Logs’ tab appear in the Redirects section. This is where AIOSEO will track and show your broken links and allow you to set up redirections. You’ll also see the number of visits to the link under ‘Hits’ and the last accessed date and time.

Note: You won’t find any data when you first enable the 404 logs. The plugin only starts to record 404 error pages after the setting is enabled.
Next, click the ‘Add Redirect’ link next to 404 error URL you’d like to redirect. This is not the button at the bottom.
You’ll now see options to enter a Target URL and select the Redirect Type from the dropdown menu.
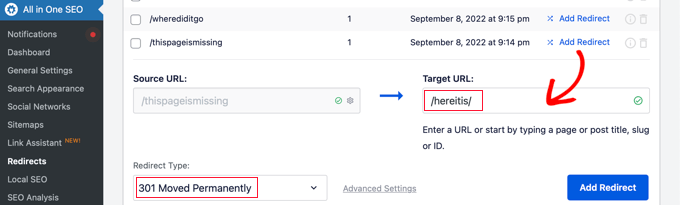
Go ahead and enter your new URL and choose ‘301 Moved Permanently’ as your redirection type. Now you should click the ‘Add Redirect’ button.
AIOSEO will now create a 301 redirect for your broken link. To see if the redirection is working properly, simply visit the old URL to check if you’re taken to the new target destination.
Adding 301 Redirects Directly From a Post or Page
AIOSEO also lets you redirect a published post or page while you are editing it.
If you scroll to the bottom of the page in the WordPress editor, you will find an AIOSEO Settings section. You need to click on the ‘Redirects’ tab.
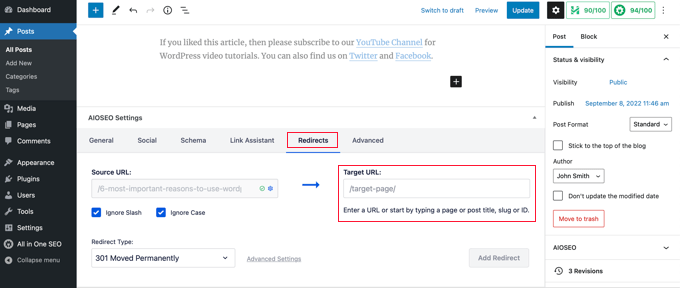
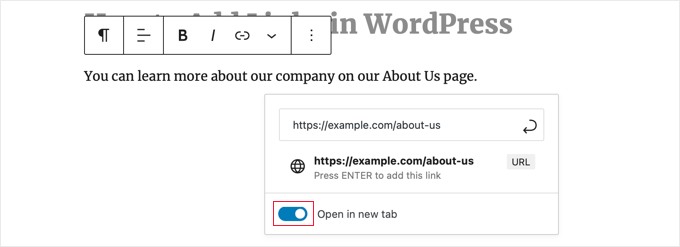
The source URL has been filled in for you. Simply enter the new URL in the ‘Target URL’ field, and select ‘301 Moved Permanently’ from the Redirect Type drop down menu.
Also, if you change the permalink of a post while editing, AIOSEO will offer to redirect the old URL to the new one.
Either way, click the ‘Add Redirect’ button and you’re done.
Redirecting Full Websites
If you move your website to a new domain name, then your visitors may encounter broken links and your site SEO may suffer.
You can use AIOSEO to move your entire website to a new location without losing traffic or search engine rankings. This is a full site 301 redirect.

It’s important that you do this the right way, so we have created a step-by-step beginner’s guide on how to do a full site redirect with WordPress.
Method 2: Creating 301 Redirects With Redirection Plugin
Another way to add and manage redirects in WordPress is with the Redirection plugin.
First, you need to install and activate the plugin. You can follow our detailed guide on how to install a WordPress plugin.
Note: While setting up 301 redirects using a WordPress plugin is easy, it has some minor performance setbacks. Depending on your WordPress hosting provider, your redirects may be a few microseconds slower than other methods.
If you want to make your redirects as fast as possible, then you can do so by editing your .htaccess file using Method 5 below.
Once activated, visit Tools » Redirection and then click the ‘Start Setup’ button.

Next, you can select options to monitor permalink changes in WordPress and keep a log of all your redirects and 404 errors.
You can simply enable these options and click the ‘Continue Setup’ button.

The plugin will now automatically test the Rest API.
When the status comes back as Good, go ahead and click the ‘Finish Setup’ button.

The redirection plugin will perform a few more tasks to complete its setup. When the progress bar reaches 100% you can click the ‘Continue’ button and then the ‘Ready to Begin’ button.
The plugin is now ready for you to create your 301 redirects. To get started, navigate to the Tools » Redirection section of your WordPress panel. You should look at the ‘Add new redirection’ section at the bottom of the screen.
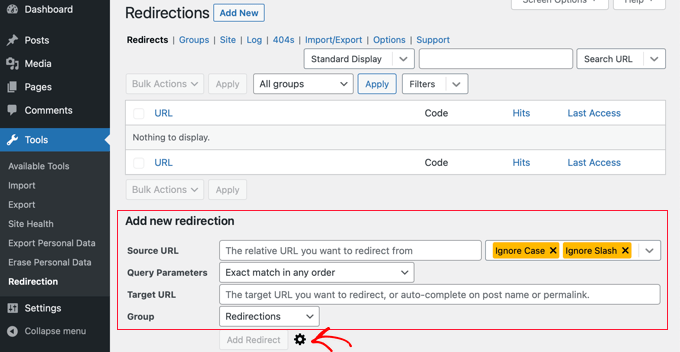
You’ll see the basic settings to add a redirection. However, if you click the gear icon, you’ll see more options to choose your redirection type.
Simply enter the Source URL of your old page and add the ‘Target URL’ you want to redirect to. You should also make sure the HTTP code option is set to ‘301 – Moved Permanently.’

Once you’ve entered all the details, go ahead and click the ‘Add Redirect’ button.
Method 3: Creating 301 Redirects With Simple 301 Redirects Plugin
One of the easiest ways to create 301 redirects is with the Simple 301 Redirects plugin. As the name suggests, it makes 301 redirects really simple.
To start, you’ll have to install and activate the plugin on your website.
After that, you need to visit Settings » 301 Redirects. Here you can enter the old URL in the ‘Request’ field and your target URL in the ‘Destination’ field.

Once you’ve done that, click the ‘Add New’ button to create the 301 redirect. That’s it.
Simple 301 Redirects will begin working immediately.
Method 4: Redirecting Existing Pages With Page Links To Plugin
Sometimes you may want to keep a post in your site’s feed or a page listed a certain way on your site, but have the content hosted elsewhere. This is where the Page Links To plugin comes in handy.
Once you install and activate the plugin, it adds a meta box to your WordPress editor. Here you can enter the address of the new location where you want to send your users.

When you press ‘Update’ or ‘Publish,’ WordPress will treat the post or page as normal, but when someone visits it, they will instead be redirected to the custom URL you chose.
For example, you might have a blog where you occasionally create downloadable content, but you want users on your online store site to see certain posts as products. You can use this plugin to do that without risking duplicate content penalties from Google or splitting your user base.
Method 5: Creating 301 Redirects Manually Using .htaccess
WordPress users can also set up 301 redirects by editing the .htaccess web server configuration file.
Please keep in mind that a small mistake in your .htaccess code can make your WordPress site inaccessible, and it may start showing the Internal Server Error.
That’s why it is important that you back up your .htaccess file before making any changes.
Edit Your .htaccess File Using the All in One SEO Plugin
If you have the All in One SEO plugin installed, then it offers an easy way to edit your .htaccess file.
Note: You will need All in One SEO Pro to use the .htaccess editor.
Simply visit the All in One SEO » Tools page and switch to the .htaccess Editor tab.

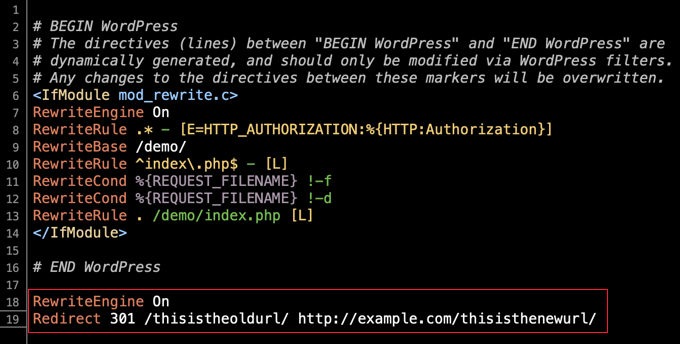
From here, you’ll see the contents of your .htaccess file in the editor. You can simply place any redirect code that you want to add at the bottom, after the ‘# END WordPress’ line.
Here is a simple redirect where we are trying to send a user visiting an old post to a new post.
RewriteEngine On Redirect 301 /a-very-old-post/ http://yoursite.com/a-very-new-post/
Don’t forget to change the old post and new post URLs. When you’re done, click the ‘Save Changes’ button to store your settings and All in One SEO will update your .htaccess file.
Directly Edit Your WordPress .htaccess file
You can also edit your WordPress .htaccess file directly to set up any redirects.
To edit your .htaccess file, you’ll need to connect to your website using an FTP client. The .htaccess file resides in your WordPress site’s root directory.
If you can’t see your .htaccess file, then see our guide on why you can’t find .htaccess file on your WordPress site.
You can download .htaccess to your computer and edit it using a text editor like Notepad.
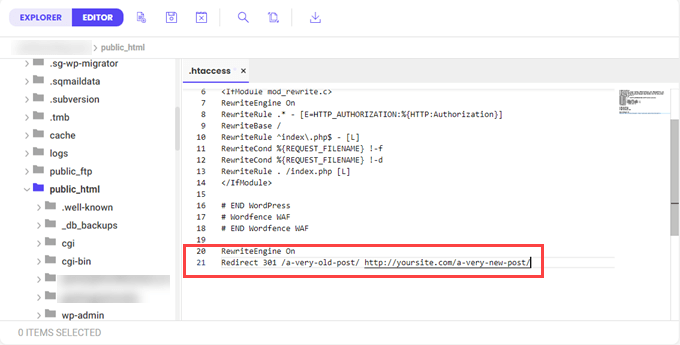
You can use this redirect code below to send a user visiting an old post to a new post. You should paste the code at the end of your .htaccess file, after the ‘# END WordPress’ line.
RewriteEngine On Redirect 301 /a-very-old-post/ http://yoursite.com/a-very-new-post/
Make sure you change the old post and new post URLs. After that, you can save your changes and upload the .htaccess file back to the server.
Now you can test your redirect to make sure it is redirecting properly as you intended.
In addition, you can also access and edit your .htaccess file through your hosting provider’s dashboard and built-in file manager.
For example, you can find your .htaccess in SiteGround‘s file manager by going to Site Tools » Site » File Manager and navigating to your site’s /public_html/ folder.
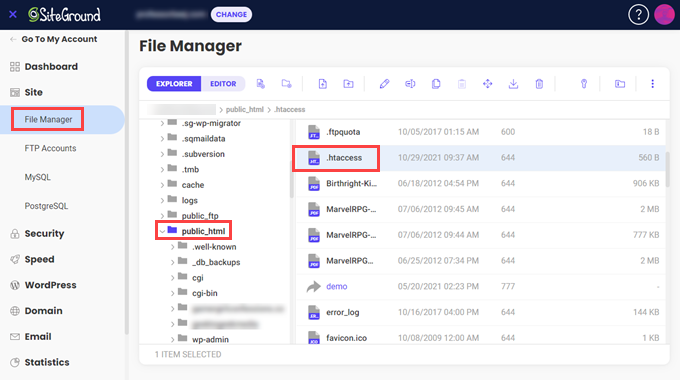
Then, you can right-click the .htaccess file and select ‘Edit.’
Just add the 301 redirect code directly and save the file. Again, be sure to download the original .htaccess file for backup to be safe.
We hope this beginner’s guide to creating WordPress redirects helped you set up redirects on your site. You may also want to check out our guide on how to start a WordPress blog the right way, or see our list of the best email marketing services for small business.
If you liked this article, then please subscribe to our YouTube Channel for WordPress video tutorials. You can also find us on Twitter and Facebook.