4 Ways to Prevent Image Theft in WordPress

Are you looking for a way to prevent image theft in WordPress?

Image theft is a common problem that photographers deal with on a regular basis. It’s very easy for anyone to copy images and text on the internet. That’s why it’s important to protect your original work.

In this article, we will share 4 ways to prevent image theft in WordPress websites.
Simple ways to prevent image theft in WordPress

About Image Theft and Copyright

Copyright laws are universal and applicable around the world. The original creator automatically becomes the copyright owner of their creative work.

Even if they don’t mention it on their WordPress website, one should still assume that the content they are viewing is protected by copyright. This includes images, text, videos, logos, or any other form of content that you see on the web.

The problem is that images and text can be easily copied. Many people think that no one would notice if they stole an image and used it on their own website.

It is not only illegal but also unethical to steal other people’s work. There are many places where you can easily find royalty free and public domain images.

While it is flattering to see other people use your work in their own projects, sometimes it can be very frustrating to see a blatant disregard for your rights.

There is no way to completely stop people from stealing your images, but there are plenty of ways to discourage and prevent image theft on a WordPress website.

Here are the 4 most common ways to protect your images in WordPress.

1. Disable Right Click

Stealing images from your website is easy because a user can simply right-click and select ‘save image as’ to download them. You can disable right-click on your website and make it more difficult for an average user to steal your image.

Here are two plugins that you can use to disable right-click on images in WordPress.

Envira Gallery

Envira Gallery is the best WordPress gallery plugin in the market. Apart from helping you create beautiful image galleries, Envira comes with tons of other features as well. One of these features is image protection.

Simply go to Envira Gallery » Addons from your WordPress admin panel. Next, navigate to the ‘Protection’ addon and then install and activate it.
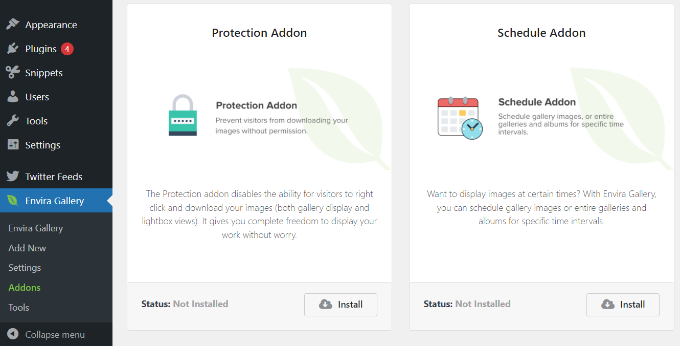
Install the protection addon

Now create a new image gallery with Envira Gallery. If this is your first time, then take a look at how to easily create responsive image galleries in WordPress with Envira Gallery.

When creating your gallery, click on the ‘Misc’ tab and scroll down to the Image Protection Settings. You will find the option to Enable Image Protection. Go ahead and check this option and save your gallery.
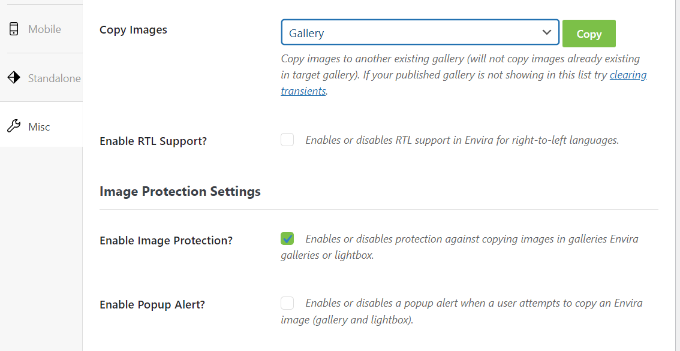
Enable image protection option

There is also an option to enable a popup alert that will appear when a user attempts to copy the image.

You can now add this image gallery anywhere on your WordPress site. It will automatically disable right-click on images.

WP Content Copy Protection

WP Content Copy Protection is a free WordPress and it allows you to disable right-click on your WordPress site.

By default, the plugin will disable right-click on your entire website. However, you can disable protection on selected pages, posts, and categories.
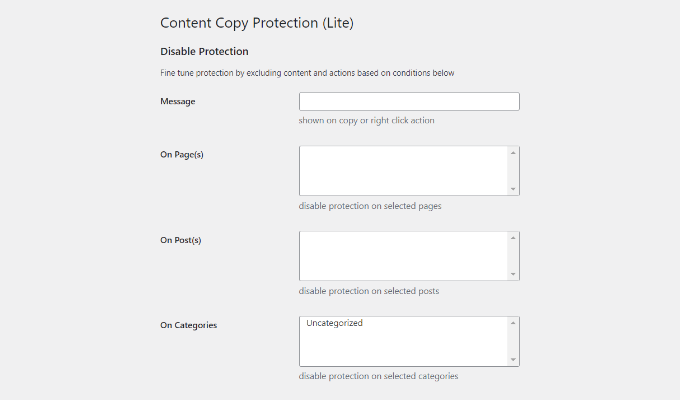
WP content protection settings

You can also control protection settings for registered users and admin users. There is also an option to show a message when a user tries to right-click an image.

2. Use Watermark on Your WordPress Images

Watermarks seem to be working great for many stock photography websites. The obvious downside is that your photographs or images might not look the best.

However, you can add watermarks tastefully. The goal is to keep the aesthetic appeal of your images while still discouraging people from stealing them.

Method 1: Using Envira Gallery

Envira Gallery comes with a Watermarking addon. You will need at least a Plus license of Envira Gallery to use this addon.

Simply install and activate the Envira Gallery plugin. Upon activation, you need to visit Envira Gallery » Addons and then navigate to the Watermarking addon. Next, install and activate it.
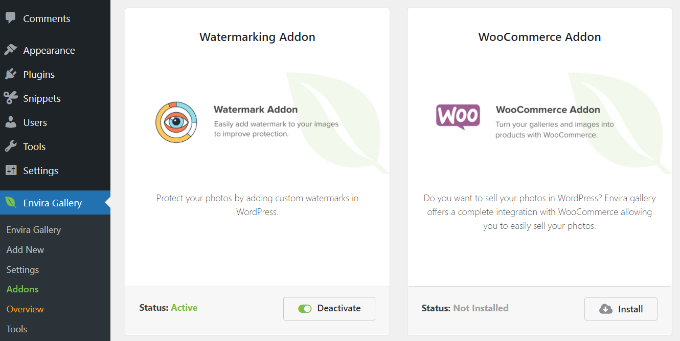
Watermarking addon

When creating a gallery or editing an existing gallery, you will notice the new ‘Watermarking’ tab in gallery settings.

You can click the checkbox for the ‘Enabled Watermarking’ option and more options will appear. Next, upload a watermark for your images, select its position, margin, and choose whether to apply the watermark to existing images.
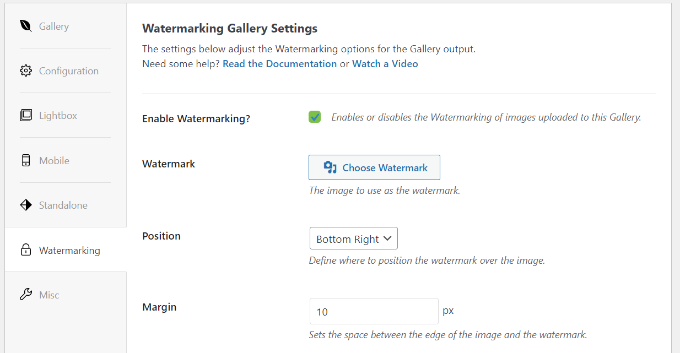
Watermarking settings

Method 2: Using Easy Watermark Plugin

The other option is to use the Easy Watermark plugin. Simply install and activate the Easy Watermark plugin. If you need help, then please see our guide on how to install a WordPress plugin.

Upon activation, you can go to Tools &rquo; Easy Watermark page to configure the plugin settings.
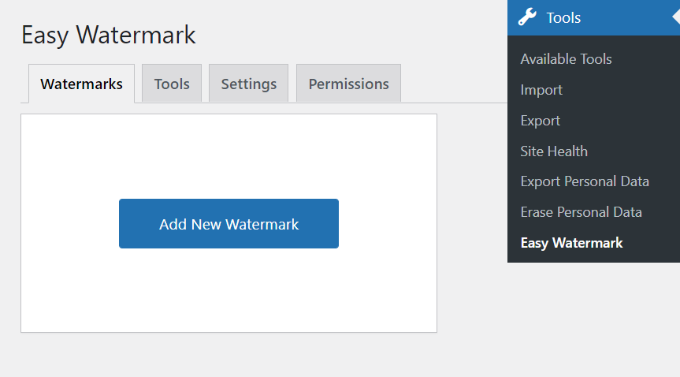
Add new watermark in easy watermark

Next, go ahead and click the ‘Add New Watermark’ button and then enter the title for your watermark. After that, you can click the ‘Text’ tab and the text under the ‘Watermark’ field.
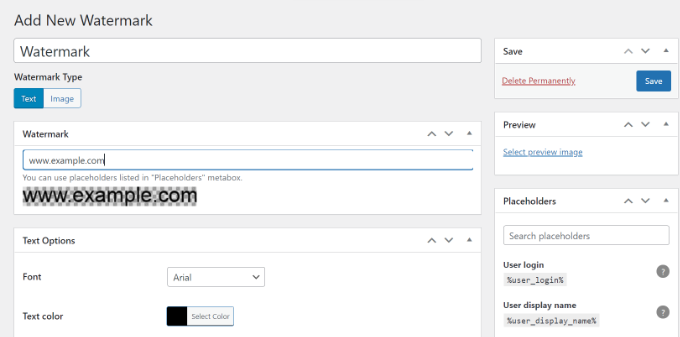
Enter text for watermark

There are also options to change the text font, size, color, angle, and opacity. Besides that, you can also edit the text’s alignment and set up applying rules.

If you click the ‘Image’ tab, then you can upload an image for your watermark. When you’re done, simply click the ‘Save’ button and your watermark will appear on your images.
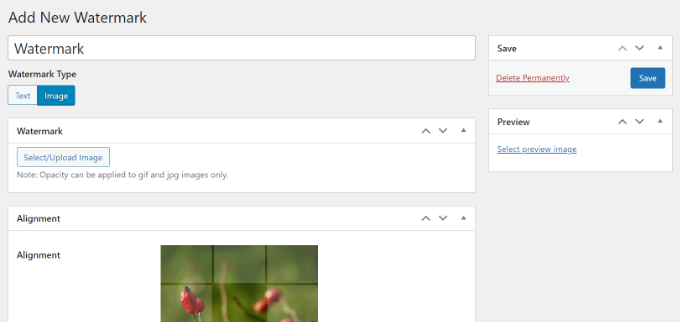
Add image as watermark

For detailed instructions, take a look at our guide on how to automatically add watermark to images in WordPress.

3. Disable Hotlinking of Images in WordPress

Another common way to steal images from websites is by loading them from the original source. The image will load from your servers and will be displayed on third-party websites without your permission.

This also increases your server load and bandwidth usage.

Here is how you can disable the hotlinking of images from your WordPress site.

Simply add this code to the .htaccess file in your WordPress site’s root directory.

 #disable hotlinking of images with forbidden or custom image option RewriteEngine on RewriteCond %{HTTP_REFERER} !^$ RewriteCond %{HTTP_REFERER} !^http(s)?://(www.)?wpbeginner.com [NC] RewriteCond %{HTTP_REFERER} !^http(s)?://(www.)?google.com [NC] RewriteRule .(jpg|jpeg|png|gif)$ – [NC,F,L] 

Don’t forget to replace wpbeginner.com with your own domain name.

This code blocks hotlinking while still allowing images to be viewed in search results and on your website.

Can’t find the .htaccess file? Refer to our tutorial on how to find the .htaccess file in WordPress.

4. Add Copyright Notices on Your WordPress Site

Adding a copyright notice to your website can also discourage people from stealing images. You can simply add a copyright notice to your theme’s footer file in plain text or HTML like this:

 <p>&copy; 2009-2016 WPbeginner.com</p> 

The downside of this is that you will have to edit this code each year. A better approach is to add a dynamic copyright notice in WordPress. Simply add this code to your theme’s functions.php file or a site-specific plugin.

 function wpb_copyright() { global $wpdb; $copyright_dates = $wpdb->get_results(" SELECT YEAR(min(post_date_gmt)) AS firstdate, YEAR(max(post_date_gmt)) AS lastdate FROM $wpdb->posts WHERE post_status = 'publish' "); $output = ''; if($copyright_dates) { $copyright = "&copy; " . $copyright_dates[0]->firstdate; if($copyright_dates[0]->firstdate != $copyright_dates[0]->lastdate) { $copyright .= '-' . $copyright_dates[0]->lastdate; } $output = $copyright; } return $output; }   add_shortcode('copyright','wpb_copyright'); add_filter('widget_text', 'do_shortcode'); 

This code finds the date of the first post you published on your blog and the last date you published anything. After that, it outputs a dynamic copyright notice.

You will need to add the shortcode [copyright] to any post, page, or text widget on your site to display a copyright notice. You can also use this code in your theme’s footer.

 <?php echo wpb_copyright(); ?> 
Copyright notice in theme footer

Now, if you’re not sure whether your pictures are stolen, then here’s how you can find out.

How to Check if a Photo is Stolen

The easiest way to see if a picture is stolen is by using Google Images. There are many other premium tools that you can use, but Google is free to use and quickly shows if someone else is using your images.

To start, simply visit the Google Images website and then click the camera icon.

Google images search

After that, you can upload your image or paste the image URL in Google Images.

Upload or paste image URL

Google will now show details about the image, possible related searches, and some visually similar images.

However, if you scroll down, you’ll see the ‘Pages that include matching images’ section. This is where you can see any website that might be using your photo without your consent.
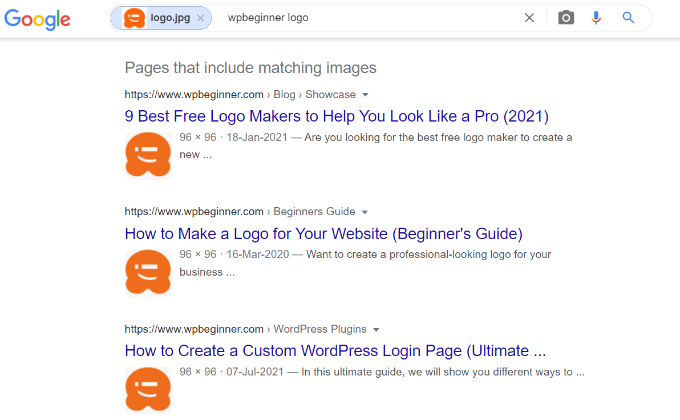
Pages that include matching images

Once you’ve figured out who has stolen your images, you can reach out to them and request them to give you proper mention for your work. You can also contact Google directly and submit a takedown notice.

We hope this article helped you protect your images and prevent image theft in WordPress. You may also want to see our guide on how to fix most common image issues in WordPress.

If you liked this article, then please subscribe to our YouTube Channel for WordPress video tutorials. You can also find us on Twitter and Facebook.

16 Tips for Mastering the WordPress Content Editor

Majority of WordPress users spend most of their time using the content editor to write posts and create pages. WordPress comes with an intuitive Gutenberg block editor that is very easy to use.

However, as a power user, you can significantly increase your productivity by learning some of the lesser-known tricks. This would allow you to create highly engaging content in less time.

In this article, we will share our expert-tips for mastering the WordPress content editor. These tips will teach you how to use the WordPress content editor like a pro.

Expert tips on using the WordPress content editor

1. Learning The Basic Blocks

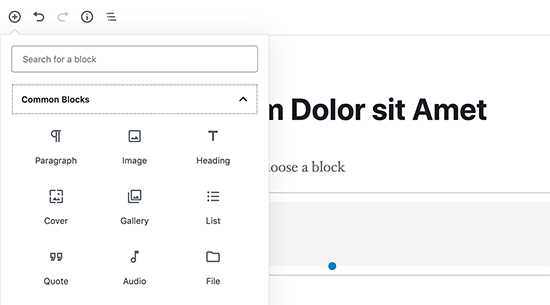
Blocks are the main building elements of the WordPress content editor, which is why it is sometimes referred to as the block editor.

Using blocks in WordPress content editor

Each element inside your content is made up of blocks. By default, WordPress comes with plenty of commonly used blocks such as paragraph, lists, images, galleries, and more.

You can use these blocks to create beautiful content layouts. This makes it important to explore different blocks and learn how you can use them in your content. We will mention some of the blocks later in this article as well.

2. Start Using Keyboard Shortcuts

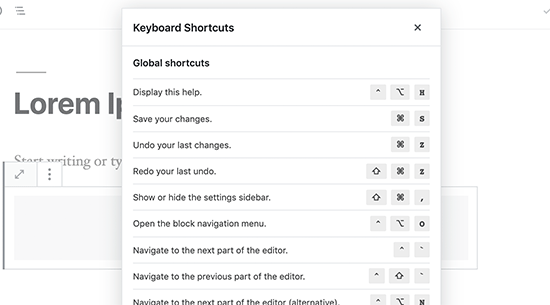
Using keyboard shortcuts

It is inefficient to move the mouse just to make some text bold or add a link. The content editor comes with several useful keyboard shortcuts that helps you accomplish common formatting tasks without using the mouse.

Using keyboard shortcuts help you save time and make you a faster writer. Check out our guide on the most time-saving keyboard shortcuts in WordPress.

3. Single and Double Line Spacing

Many beginner level users find it difficult to figure out how to create paragraphs and line breaks in WordPress.

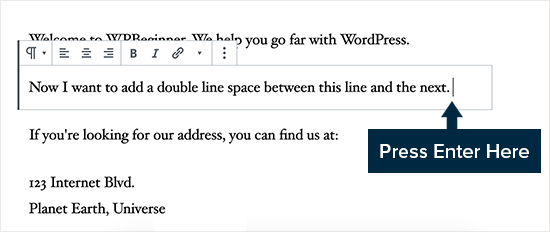
To add a new paragraph in the content editor, you simply need to press the Enter key. WordPress will add a new paragraph with double line spacing.

Adding double line spacing in WordPress

However if you only want a single line break, then you need to press Shift + Enter keys together.

Check out our guide on how to add single/double line spacing in WordPress.

4. Rearranging The Edit Screen

The content editor is basically a clean canvas with a top bar and a column on the right. This gives you a clean user interface to create your posts.

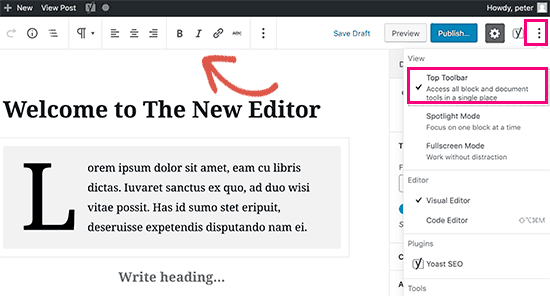
The editor displays a toolbar on top of the block that you are editing. You can move the toolbar by clicking on the three-dot menu in the top right corner of the screen.

Top toolbar

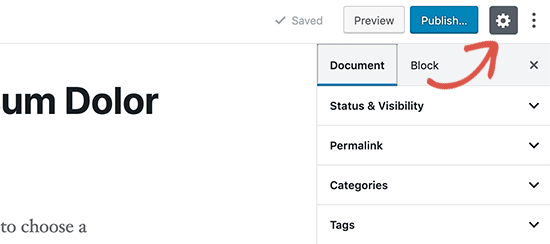
You can also show and hide the settings column by clicking on the gear icon at the top.

Hide settings column

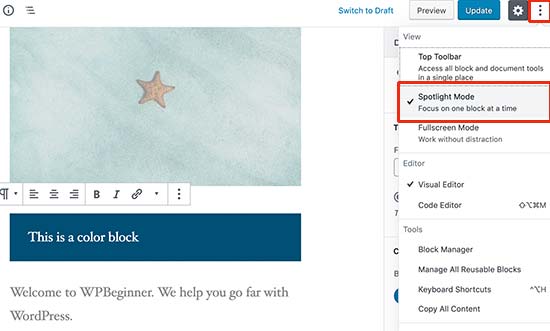
WordPress also makes it easy to switch to the Spotlight mode which makes the block you are in more noticeable by dimming rest of the content.

Spotlight mode

Need more white space on the screen? Switch to the fullscreen mode which gives you a clean canvas with just the toolbar at the top.

fullscreen mode

5. Changing Font Size in WordPress Visual Editor

We understand that typography plays a very important role in web content. You may want to use different font sizes to grab your audience’s attention or highlight different sections in a lengthy article.

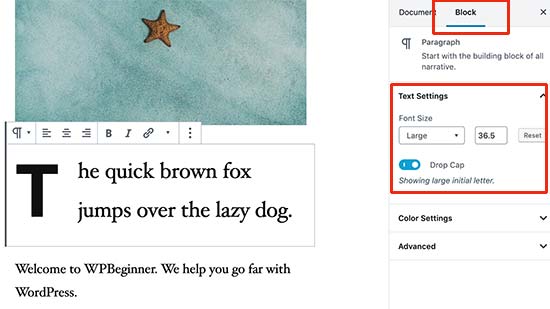
Change font size in WordPress content editor

Simply select the block where you want to change the font size, and you will see the font size option in the block settings on the right.

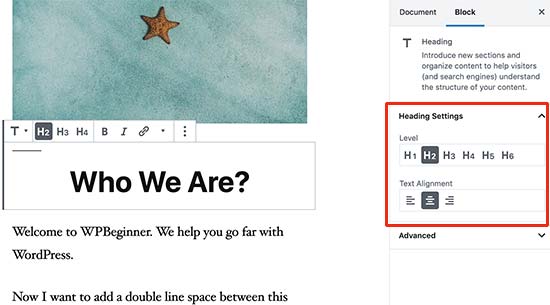
6. Add Headings into Your Articles

Headings play an important role in improving readability. This is why search engines like Google also consider headings to be important for SEO. Using your focus keywords (words that users will use to search) in headings helps search engines understand the importance of those keywords.

The content editor makes it easy to add headings to your articles. Simply select a heading block and then select a heading size and text alignment from the block settings.

Adding headings to your articles in WordPress content editor

You can also add a link to your heading, make it bold, or italicize it.

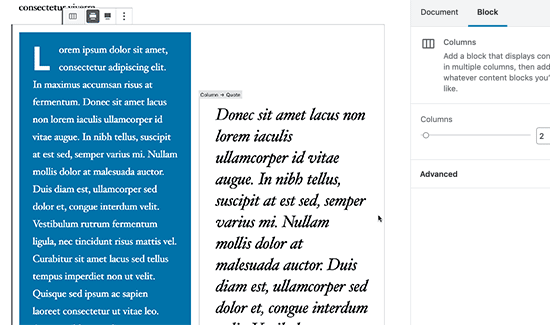
7. Adding Columns to Your Posts

WordPress content editor comes with a built-in column block, which allows you to add content into columns. This makes it easy to give your text a magazine like look.

Simply select and add a columns block to your editor. You can select the number of columns you want to add from the block settings.

Adding columns to your posts

Each column will automatically contain a paragraph block. You can easily add any other blocks that you want inside each column. For example, blockquotes, images, paragraphs, and more.

However, if you want to add an image next to some text, then you’d want to check the next tip.

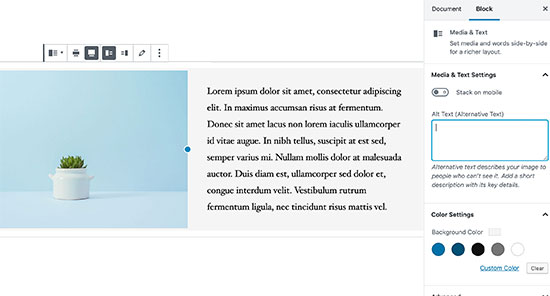
8. Adding Image Next to Text

In older versions of WordPress, it was quite challenging to add an image right next to some text with proper alignment. This problem was fixed with the Media & Text block.

Media and text block in WordPress content editor

It allows you to add an image next to the text block. It automatically adjusts the width and spacing between the two blocks.

You can make the block full-width and use the formatting options for the text block.

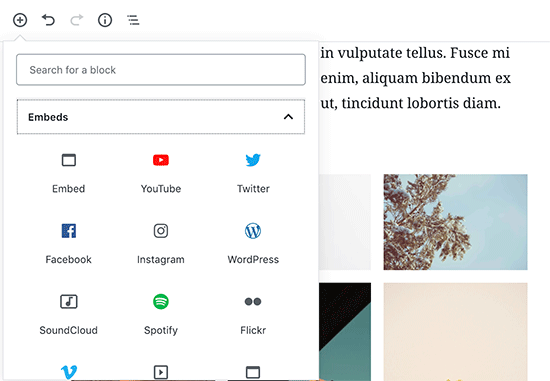
9. Adding YouTube Videos in WordPress

You can upload videos to your WordPress site. However, WordPress is not made to be used as a streaming platform and most WordPress hosting companies cannot serve large files adequately.

To learn more about this, see our article about why you should never upload videos to your WordPress site.

Instead, we recommend uploading your videos to YouTube or other stream sites and then embed them into your WordPress posts and pages.

Adding YouTube block in WordPress content editor

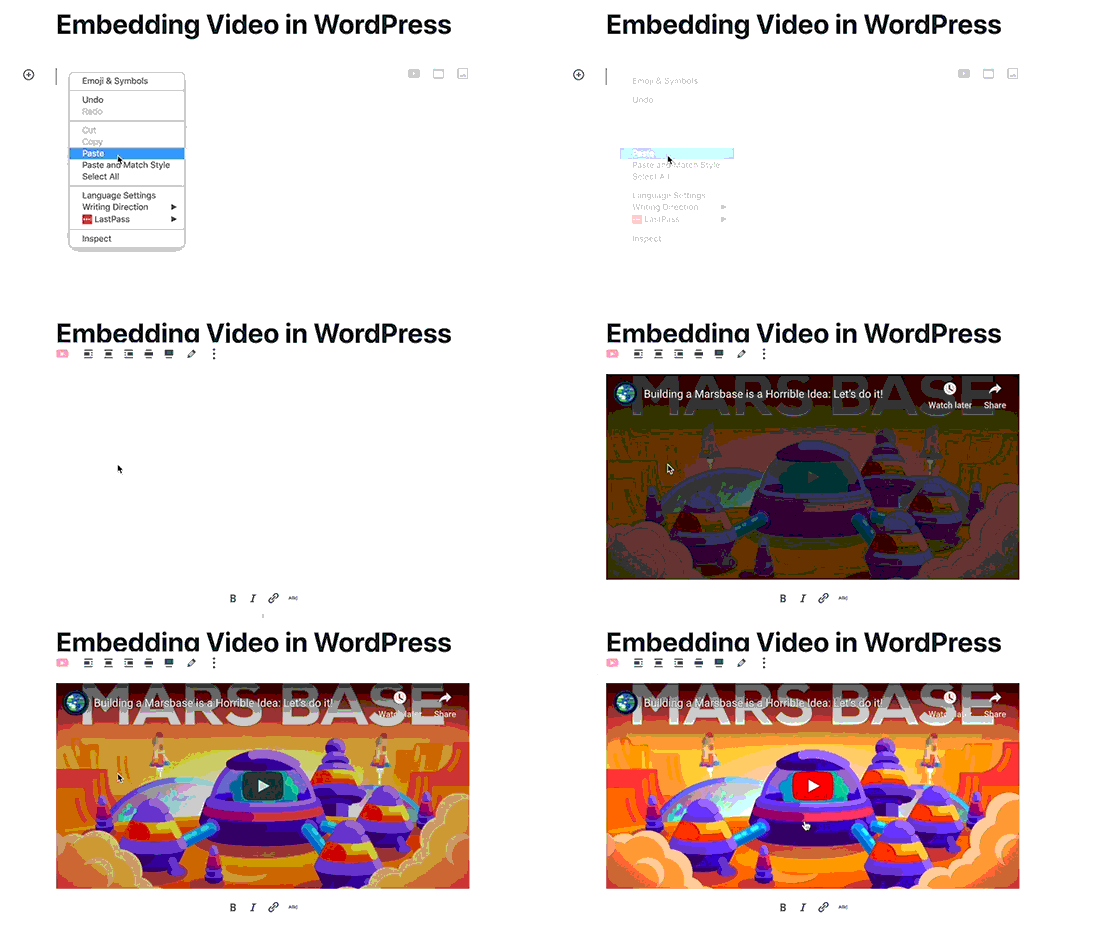
You can use the YouTube block to simply paste the URL of the video you want to add, and WordPress will automatically embed it for you.

You can also paste the video URL inside a paragraph or any text block, and WordPress will automatically convert it into the YouTube block.

Auto embed YouTube videos in WordPress

10. Creating Tables in WordPress Posts

The post editor also comes with a block to easily add tables into your WordPress posts and pages.

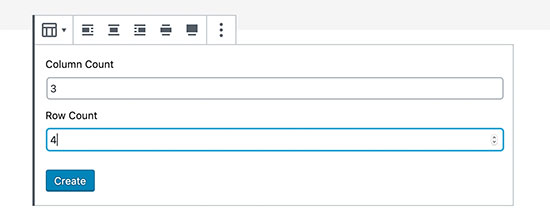
Simply add the table block and then select the number of columns and rows you want to add. Don’t worry you would always be able to add more columns and rows later as needed.

Enter the rows and columns for your table

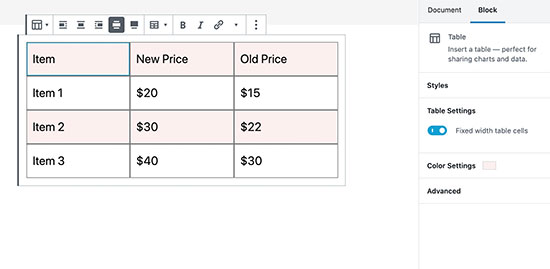
After that, you’ll see a plain table. You can add content to table cells and choose table colors / style from the block settings.

Table block preview

The WordPress table block is good for basic tables, but it lacks many features. For example, you cannot select the header row, make columns sortable, highlight rows, and more.

This is why we recommend using TablePress. It’s a free plugin that allows you to create beautiful tables and add them to your WordPress posts and pages.

To learn more, see our guide on how to easily add tables in WordPress posts.

11. Adding Buttons in WordPress Posts and Pages

Buttons play an important role when you want to add a call to action into your WordPress posts or pages.

The content editor comes with a basic button block that lets you quickly add a button into your content.

The default Button block in WordPress

The button comes with three styles: squared, rounded, and with a border. You can also select the background, text color and align the button to center, left, or right.

12. Add Cover Images in WordPress Posts

You may have seen cover images used in the middle of an article on popular publications like the New York Times. A cover image is simply an image placed in the middle of an article, sometimes with an overlaying text.

The purpose of the cover image is to make your content more engaging. It also provides your users with a break from reading the text and look at an image to capture their attention.

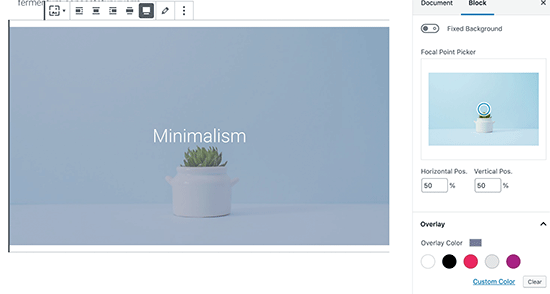
The content editor makes it easy to add cover images into your posts. Simply add a Cover Image block and then upload the image you want to use. Ideally, it should be a larger image file that looks good in the wide format.

Cover image block

For more details, see our article on cover image vs featured image and how to use them on your blog.

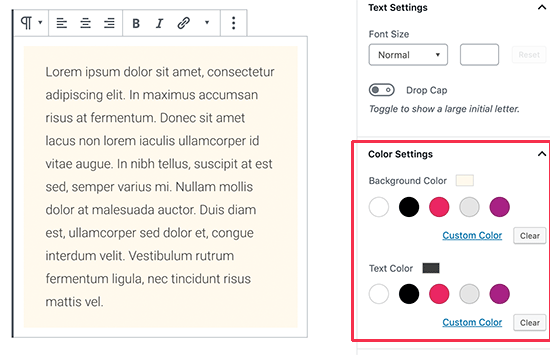
13. Change Paragraph Colors

Another neat trick that often goes unnoticed, is the ability to change the colors. Most folks want to keep their text consistent throughout the article.

However, occasionally using colors can help you redirect user attention and highlight important parts of an article.

The content editor shows you color options in the right column, you can choose any colors you want. Just make sure the background and text color combination you choose is easy to read.

Change background and text color in content editor

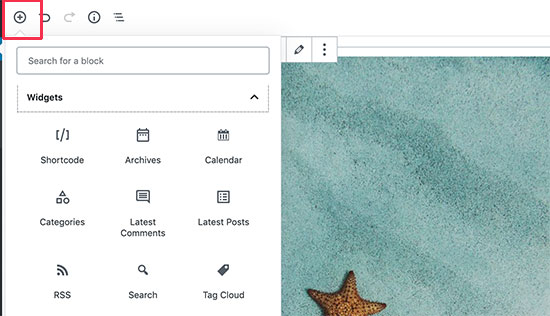
14. Add Widgets into Your Posts

Widgets are quite similar to the blocks. They allow you to add web elements to your WordPress site without adding code.

Typically widgets are commonly used in sidebars or footer area of a website. However, you can also add some widgets to the content area such as contact forms.

Simply look for the Widgets section under the add blocks button. From here, you can use the commonly used widgets in your posts and pages.

Adding widgets in WordPress posts and pages

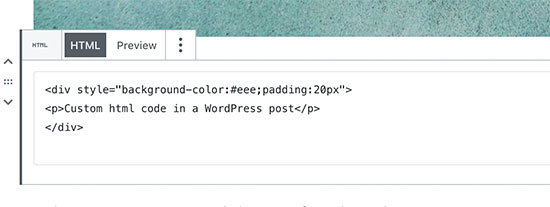
15. Adding Custom HTML in WordPress Posts

The content editor in WordPress is a fully visual WYSIWYG editor. However you can still add HTML code if you need to.

The easiest way to do this is by adding the Custom HTML block to your post. After that, you can simply paste the HTML that you want to add.

Adding custom HTML in WordPress post

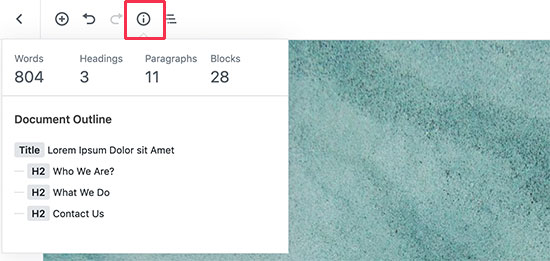
16. Get The Word Count and Other Stats for Your Posts

When working on a lengthy article, you may want to see the quick outline of the article, how many words it has, and how everything is placed.

The content editor toolbar has two buttons for that on the top. First, the info button which shows you the word count, paragraphs, blocks, and article outline based on headings you have used.

Article stats

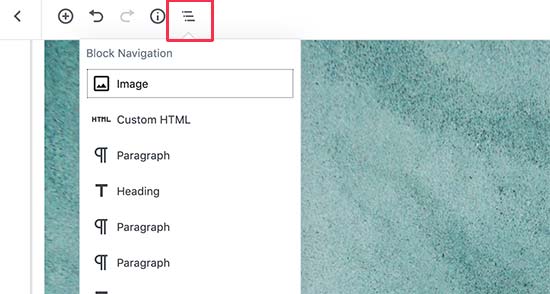
Right next to it is the block navigation button. It shows you all the blocks you have used in your article, and you can click on a block to directly jump to it.

Jump to a block in your post

To get more detailed data, you can see our guide on how to get word count stats in WordPress.

We hope this article helped you discover new tips for mastering the WordPress content editor. You may also want to see our guide on how to create an email newsletter and get more blog traffic.

If you liked this article, then please subscribe to our YouTube Channel for WordPress video tutorials. You can also find us on Twitter and Facebook.
17 Tested and Easy Ways to Grow Your Email List Faster

Are you looking for proven ways to grow your list of email subscribers?

Often bloggers who are starting out simply install a sidebar optin form on their website and wait for users to subscribe. This results in slow subscriber conversion rates.

For faster growth, you need to clearly communicate the value and offer your users multiple opportunities to join your email newsletter before they leave your site.

In this article, we will share our tested and proven ways to grow your email list fast that are easy to implement and drive huge results.

17 Tested and Easy Ways to Grow Your Email List Faster

Getting Started

Before you start list building, let’s talk about a few tools you’ll need to add new subscribers to your email newsletter.

First, you need to make sure that you are using a professional email marketing service.

Using the best email marketing company ensures that your emails don’t end up in the spam folder. It also provides you with the right set of tools to build and grow your email list.

We recommend Constant Contact. It is one of the largest and most popular email marketing service providers in the world.

For complete step by step instructions, see our guide on how to start an email newsletter the right way.

Next, you will need OptinMonster. It is the best lead generation software in the world. It helps you convert abandoning website visitors into email subscribers.

Now that you have the best tools, let’s take a look at some of the most effective list building strategies.

Here are the topics we’ll cover in this guide:

  1. Use Multiple Signup Forms
  2. Use an Exit-Intent Popup
  3. Offer Content Upgrades
  4. Add Fully or Partially Gated Content in WordPress
  5. Run Giveaways and Contests
  6. Create Multiple Lead Magnet Pages
  7. Use Discounts and Deals
  8. Use Contact Form to Grow Your Email List
  9. Add Sign Up Call to Action on Your Facebook Page
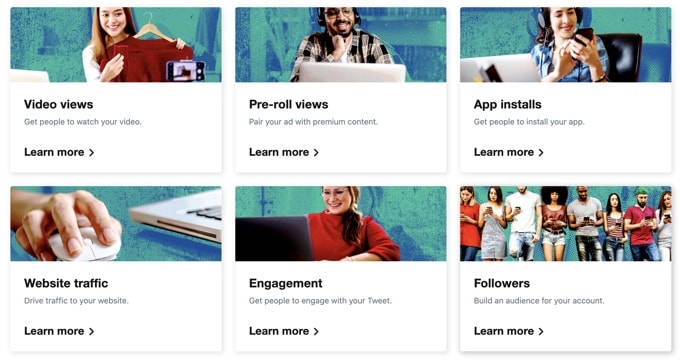
  10. Use Twitter Lead Generation Cards
  11. Use YouTube Call to Action Cards
  12. Use After Post and In-Line Optin Forms
  13. Add Polite Slide-in Scroll Forms
  14. Use Prominent Headers With Call to Action
  15. Use Social Proof to Encourage More Sign Ups
  16. Use Gamified Campaigns
  17. A/B Test Your Optin Forms

1. Use Multiple Signup Forms

Use Multiple Optins

We mentioned earlier that many beginners start with a simple newsletter signup form in their sidebar.

But if you want to get more email subscribers, then you need multiple signup forms. This gives your users more opportunities to join your email list.

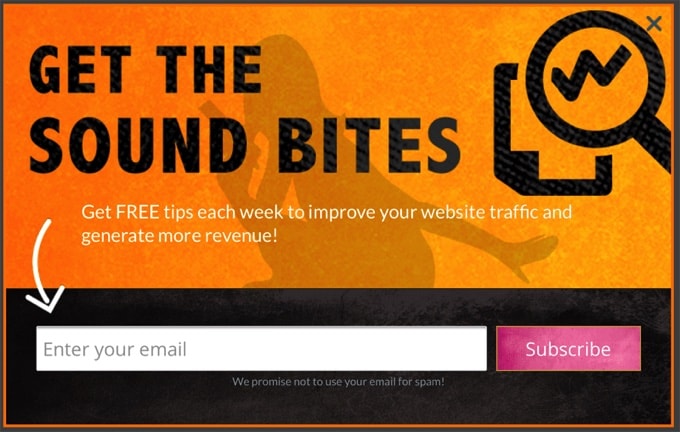
We recommend combining your sidebar signup form with a sticky floating bar or a lightbox popup. These highly effective campaign types make your signup forms more noticeable.

Using OptinMonster’s Display Rules, you can set time and action based triggers, so your users don’t see all the optins at once.

For example, you can set a display rule to only show the floating footer bar optin once the user has scrolled past the sidebar optin, and show a lightbox popup only when they’re about to leave your WordPress website.

2. Use an Exit-Intent Popup

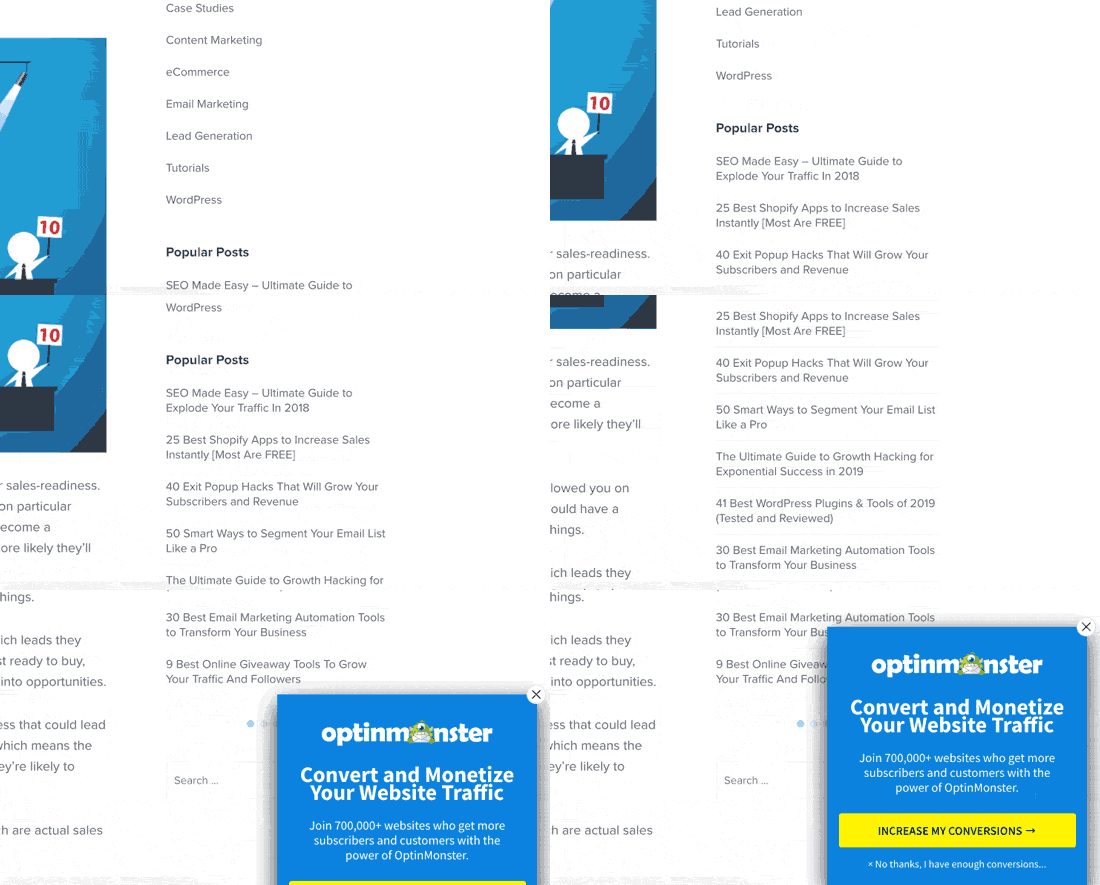
Using an Exit-Intent popup

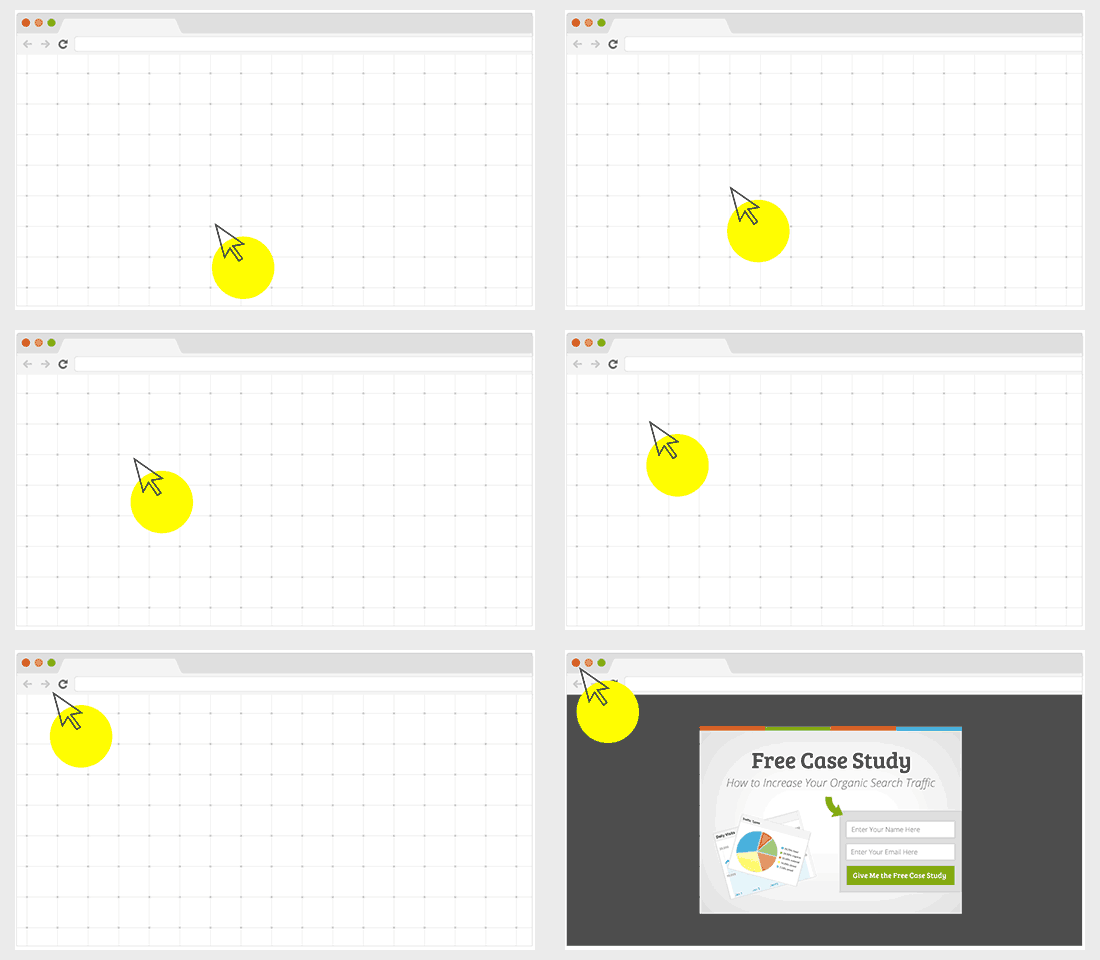
Exit-Intent® is an advanced technology built by OptinMonster that tracks your user’s mouse behavior and shows them a targeted email signup form at the precise moment they are about to leave your website.

Think of it as ‘Onsite Retargeting’.

You can use this technology in combination with full-screen welcome gates, lightbox popups, or other optin types to convert abandoning visitors into new email subscriptions.

We use an exit-intent popup on WPBeginner, and it helped increase our subscribers by 600%.

Michael Stelzner from Social Media Examiner used it to add over 250,000 new email subscribers.

3. Offer Content Upgrades

Offering Content Upgrades

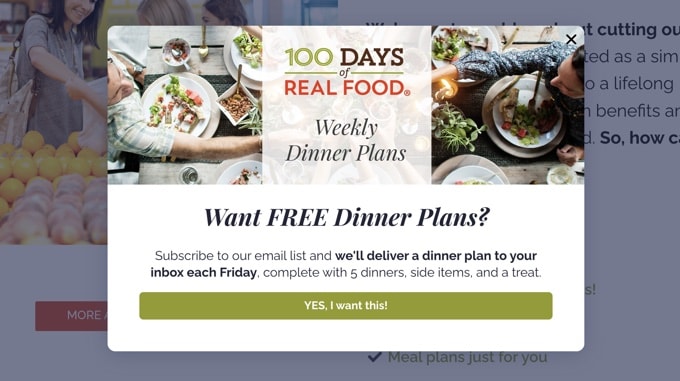
A content upgrade is a marketing technique where you offer users a chance to get exclusive bonus content by signing up to your email list.

For example:

  • If you run a podcast, then you can offer show notes + transcription as a content upgrade.
  • If you have a long form blog post, then you can offer a PDF downloadable version as a content upgrade
  • You can turn your blog posts into a checklist or cheat sheet and offer it as a content upgrade

Here are 30 other content upgrade ideas that you can use.

Human psychology plays an important role in the effectiveness of content upgrades. The psychology principle known as ‘Zeigarnik Effect’ states that people are most likely to complete a task if they initiate it themselves.

This means that when the user takes initiative to click on the content upgrade, they are more likely to complete the task by subscribing to your list.

To learn more, see our step by step guide on how to add content upgrades in WordPress to grow your email list.

4. Add Fully or Partially Gated Content in WordPress

Gated Content to Boost Email Sign Ups

Gated content is the content on your website that can’t be accessed until the visitor enters their email address. You can use plugins to hide some of your content or hide the entire blog post until the user enters their email address.

In the old days, this used to have a negative impact on your SEO rankings. However, with modern JavaScript based technology, this does not impact your SEO rankings.

Here’s a step by step tutorial on how to add content locking in WordPress.

5. Run Giveaways and Contests

Run Giveaways and Contests

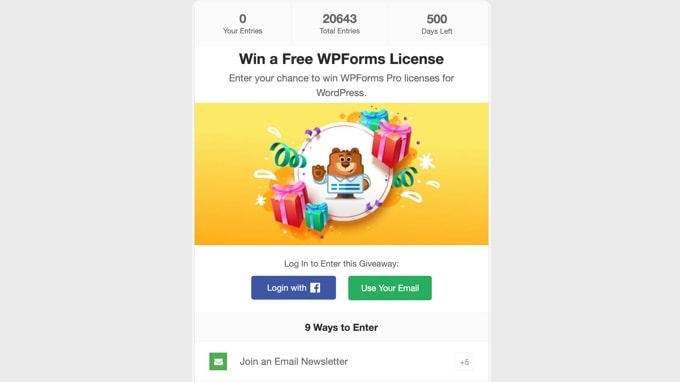
An easy way to quickly get a lot of new followers and subscribers is by running a viral giveaway or contest. You don’t need an expensive prize to launch a successful giveaway.

Users can join your contest by providing their email address, social sharing, or following you on social media. This creates a snowball effect and helps you reach many new users.

We recommend using RafflePress, which is the best WordPress giveaway plugin on the market. It comes with a drag and drop giveaway builder with tons of social actions to make your campaign a success.

For details, see our guide on how to run a successful giveaway/contest in WordPress.

6. Create Multiple Lead Magnet Pages

Lead Magnet

A lead magnet (also known as an optin bribe) is an incentive you offer to potential buyers in exchange for their contact information, such as their name, email, and phone number.

Your blog posts with locked content, content upgrades, and premium content all fall into the lead magnet category.

Lead magnets must offer additional value to your target audience, such as checklists, case studies, and high quality infographics. You could also offer a free ebook, webinar, resources newsletter, or workbook.

See these 69 highly effective lead magnet ideas for inspiration.

7. Use Discounts and Deals

Discounts and Deals

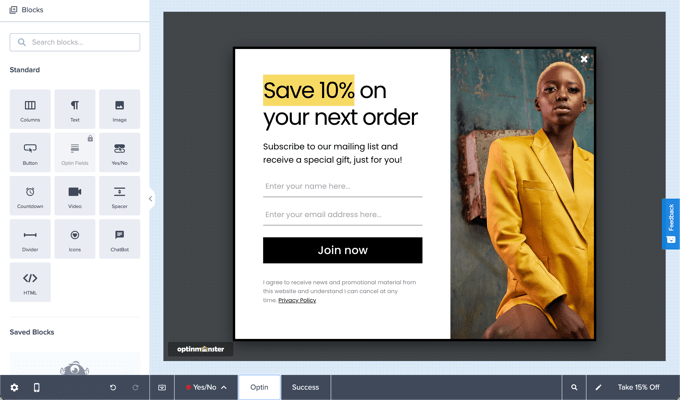
Sometimes a discount or exclusive coupon is what encourages a potential customer to finally make a decision. Why not use this opportunity to nudge them into joining your email list?

If you are using WooCommerce, then you can simply go to the Marketing » Coupons page to create a coupon.

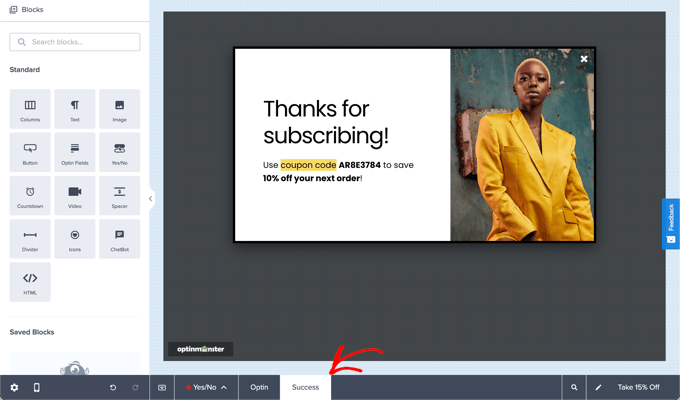
Success View to Reveal Discount Code

After that, you can use OptinMonster’s ‘Success’ view to reveal the discount code after users enter their email address.

8. Use Contact Form to Grow Your Email List

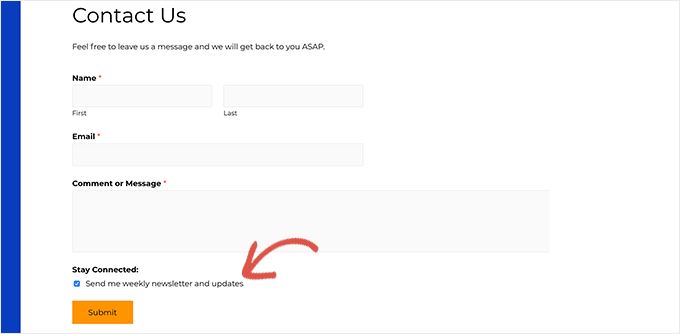
Contact Form Optin

Contact forms offer another great opportunity to ask for a user’s email address. Users already need to enter their email address on the form, and you can add a tiny checkbox to allow them to subscribe without having to enter it again.

We recommend using WPForms, which is the best WordPress form builder on the market. It allows you to connect your forms with top email marketing services and helps you easily build forms with a simple drag and drop tool.

To learn how to optimize your contact list for email subscriptions, see our article on how to use the contact form to grow your email list in WordPress.

9. Add Sign Up Call to Action on Your Facebook Page

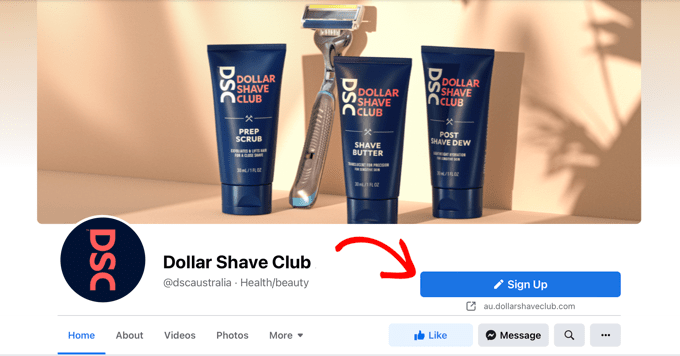
Call to Action Button on a Facebook Business Page

Facebook has introduced call to action (CTA) buttons for business pages. These buttons are prominently displayed on top of your cover image and are visible without scrolling.

Here is how to add a signup button as a call to action on your Facebook page and speed up the process of list building.

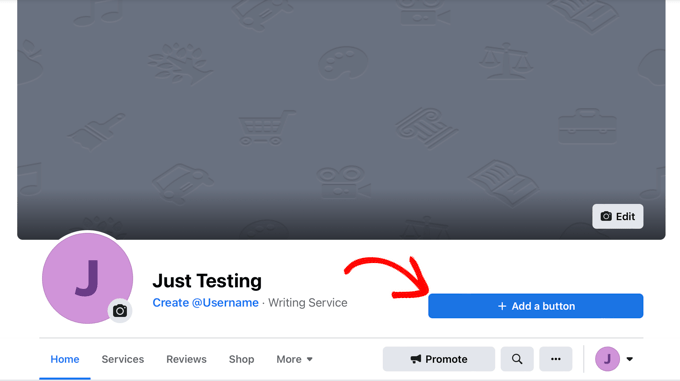
You need to visit your Facebook page, and you will notice a blue button labeled ‘Add a button’.

Add a Button

This will bring up a popup with multiple choices.

You need to click ‘Sign Up’, and then provide a link to your website where users will be taken when they click signup.

Don’t forget to click ‘Save’ to add the CTA button to your page.

10. Use Twitter Lead Generation Cards

Twitter Ads

Twitter Ads offer another social platform you can use to boost your lead generation efforts.

In fact, Twitter even allows you to run lead generation directly from Twitter. This way users can sign up for your email list without leaving Twitter.

You can also drive traffic to your website and use the email signup forms as a conversion. You can create special offers for Twitter users and tweet the links to your followers.

11. Use YouTube Call to Action Cards

YouTube action cards

YouTube is one of the largest social media platforms and the second most popular search engine in the world. If you are using YouTube videos as part of your marketing strategy, then you can utilize your YouTube channel for email list building.

YouTube action cards allow you to add interactive information cards to your videos. You can use them to add calls to action and link them to lead magnets on your website.

Here is how to add YouTube action cards to your videos.

YouTube gives you plenty of opportunities to promote your email list. For more ideas see this tutorial on how to build your email list using YouTube videos.

Bonus: Check out WPBeginner’s YouTube channel to see how we use call to action cards.

12. Use After Post and In-Line Optin Forms

After Post and Inline Optin Forms

After post optin forms appear when a user has already scrolled down an entire article. This means that they are already interested in your content and are much more likely to sign up.

You can also use in-line optin forms within your blog posts. Users are most engaged with your long-form content when they’ve reached the middle.

Reminding them to sign up at that point, works like a charm.

13. Add Polite Slide-in Scroll Box Forms

Slide in forms

We mentioned earlier that users simply ignore most static signup forms. The goal is to divert the user’s attention to your offer and signup form.

Slide-in scroll box forms do that beautifully.

They stay out of the way so that users can look at the content, and then slide in from the bottom right corner of the web page when users scroll down. This slide in animation will grab your readers’ attention and encourage them to sign up.

14. Use Prominent Headers With Call to Action

Prominent Call-to-Action in Header

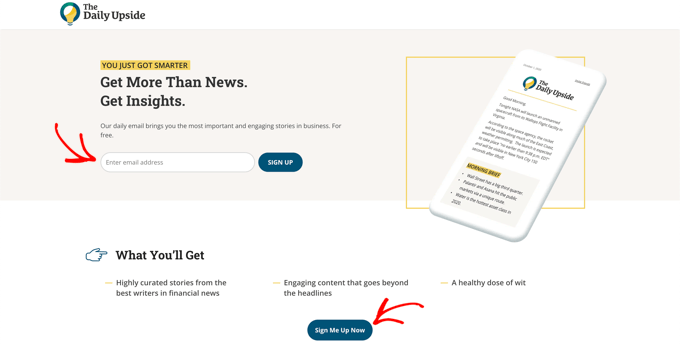
The header area of your website is most prominently visible to visitors when they first arrive on your homepage. This makes it the most effective spot to place your call to action.

You will need a WordPress theme that comes with a large or full screen header.

You can also use a page builder plugin like SeedProd to create custom pages from a template, and even create custom WordPress themes without any code.

15. Use Social Proof to Encourage More Sign Ups

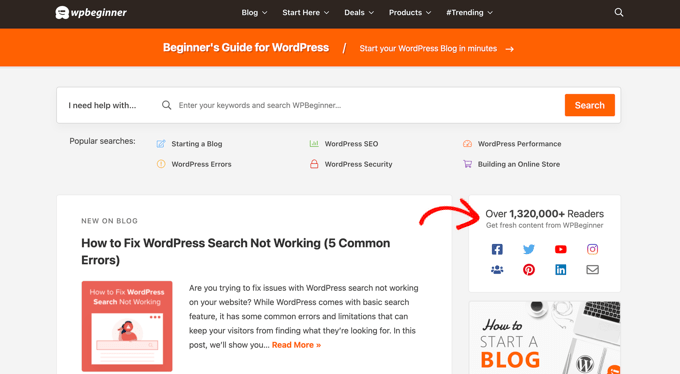
Add Social Proof to Get More Subscribers

Social Proof is a psychological effect used to describe a social behavior where people feel more comfortable following other people. Marketers use social proof as a tactic for easing the minds of worried customers and increasing conversion rates.

There are many ways you can use social proof to get more subscribers. You can use testimonials on your landing pages, add reviews, and show the number of registered users.

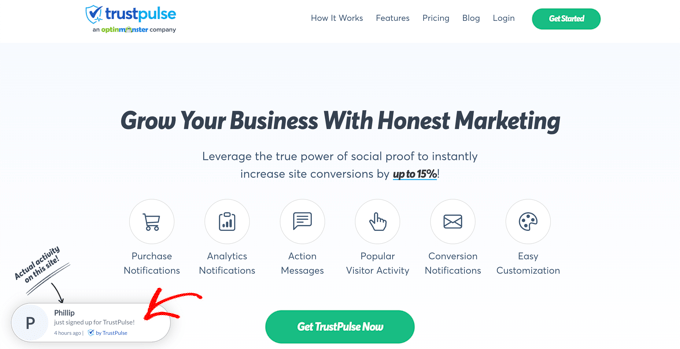
TrustPulse Social Proof Bubble

You can also use bubble notifications like TrustPulse to increase newsletter signups and eCommerce conversions.

Learn more in our guide on how to use FOMO on your WordPress site to increase conversions.

16. Use Gamified Campaigns

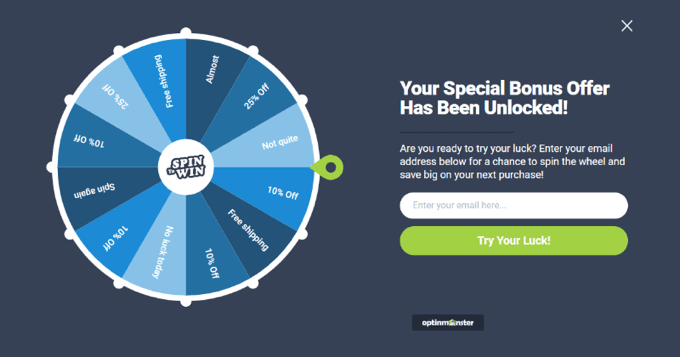
Gamified Spin a Wheel Campaign

Experts agree that gamification helps boost user engagement. Did you know that you can use gamified campaigns to boost newsletter conversions as well?

We use a ‘Spin a Wheel’ gamified campaign on our MonsterInsights blog to grow our email list as well as boost eCommerce conversions.

To learn how to create a similar email marketing campaign, simply follow the coupon wheel guide on the OptinMonster website.

17. A/B Test Your Optin Forms

Run A/B Tests to Find Best Performing Optin Forms

Many beginners continue to rely on guesswork to understand what works on their website. You need to understand how your audience reacts to different calls to action, optin placements, colors, design, and copy.

With A/B testing, you can find out which optins work better on your website. You can use these A/B testing tips to continuously test and improve your email optins.

We hope this article helped you find the best ways to grow your email list. You may also want to see our list of the best SEO tools and plugins as well as proven tips on how to increase your website traffic.

If you liked this article, then please subscribe to our YouTube Channel for WordPress video tutorials. You can also find us on Twitter and Facebook.
11 Ways to Get More Comments on Your WordPress Blog Posts

Do you want to get more comments on your WordPress blog posts?

Comments are an easy way to build user engagement, get more pageviews, and build a community around your website.

In this article, we’ll share proven and tested tips to easily get more comments on your WordPress blog posts.

Ways to Get More Comments on Your WordPress Blog Posts

1. Allow Users to Subscribe to Comments

By default when a user leaves a comment on your website, they will have to bookmark the link to come back and see if there is a new comment on the article.

If they forget to bookmark or can’t remember the name of your blog, then they will probably never come back again.

You can provide users a chance to subscribe to comments on your WordPress posts. This way they can get immediate notifications when there is a new comment.

This will significantly increase your pageviews and the number of comments on your website. Your users will find discussions on your site to be more engaging.

Subscribe to comments

Take a look at our guide on how to allow users to subscribe to comments in WordPress.

2. Notify Users on Replies to Their Own Comments

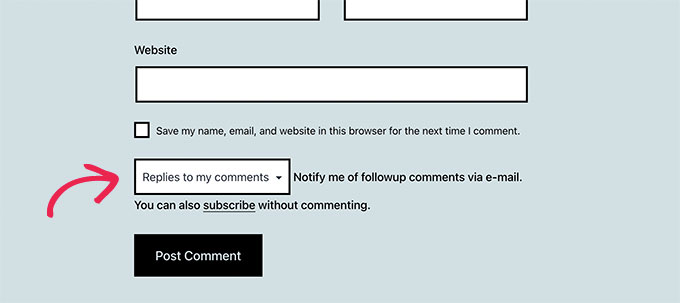
When a user leaves a comment on your site, there is no way for them to find out if anyone has replied to their comment. They will have to bookmark the page and visit it later. Most users will not do that.

You can easily allow users to subscribe to their own comments. This way they will ONLY receive a notification email when someone replies to their comment.

Subscribe to replies

If you make it a habit to reply to most user comments on your site, then this could develop a highly engaging community around your blog.

For detailed instructions check out our tutorial on how to notify users on replies to their own comments in WordPress.

3. Keep Discussing Quality High with Comment Moderation

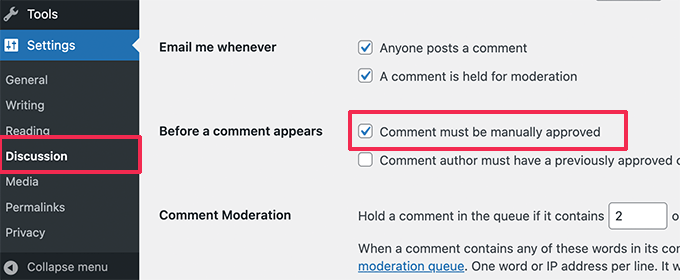
The best way to ensure there’s high quality conversations happening in comment is to enable comment moderation in WordPress.

You can turn this on by going to Settings » Discussion in your admin area.

Require all comments to be manually approved

Comment moderation will not only allow you to block spam, but it will also provide you a chance to interact with your users more often.

When you reply and engage with your readers, they’re more likely to comment more often.

See our beginner’s guide on how to moderate comments in WordPress for detailed instructions.

Note: Some website owners use CAPTCHA to block comment spam, but this is not user friendly and it often discourages regular users from commenting.

This is why we recommend enabling comment moderation on your site and manually approve each and every comment (if you have to).

4. Show Newest Comments First

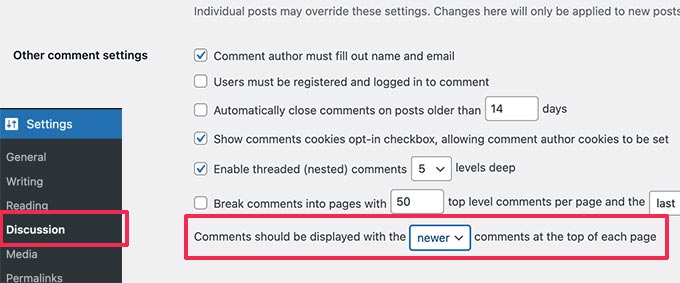
By default WordPress shows the newest comment at the bottom of the comments list. Now if you have lots of comments on a post, then users will be seeing the oldest comments on top.

This can be easily changed in WordPress.

Simply go to Settings » Discussion and scroll down to other comments settings section. You need to select newer from the drop down menu.

Newer comments first

For more details, take a look at our tutorial on how to rearrange comments in WordPress – Display the most recent one on top.

5. Turn on Comments for Old Posts

Most bloggers turn off comments on older posts to reduce comment spam. However, there will be lots of users who might want to comment on these posts.

Since you are already using comment moderation, you can safely turn on comments on old posts.

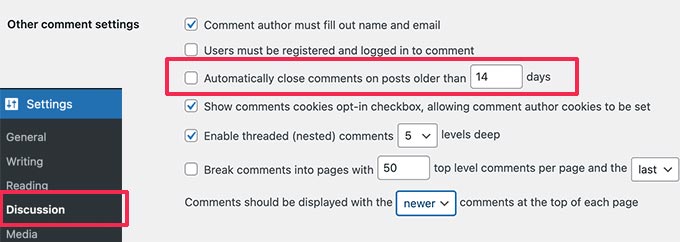
Simply go to Settings » Discussion and scroll down to other comments settings section. Uncheck the box next to ‘Automatically close comments on articles older than X days’.

Open comments for older post

Don’t forget to click on the Save Changes button to store your settings.

6. Showcase Your Top Commenters

A good way to encourage and appreciate your most loyal users is by highlighting your top commenters. This shows users that they are part of your blog’s community, and you appreciate their effort to bring life into your comments.

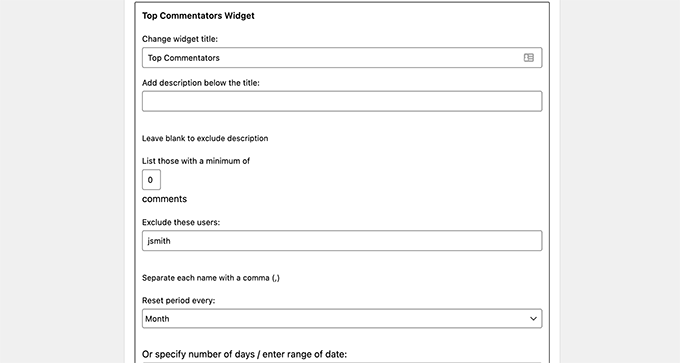
Top commenters widget

Simply install and activate the Top Commenters Widget plugin. Upon activation, go to Appearance » Widgets page and add Top Commenters Widget to a sidebar.

For more detailed instructions, please see our guide on how to display your top commenters in WordPress sidebar.

7. Display Recent Comments

When users are looking at your homepage, they have no idea what’s happening in your blog’s comments section. For example, there may be a heated debate going on a new post where a user may want to chime in.

You can provide users a chance to look at current discussions by showing recent comments on your site.

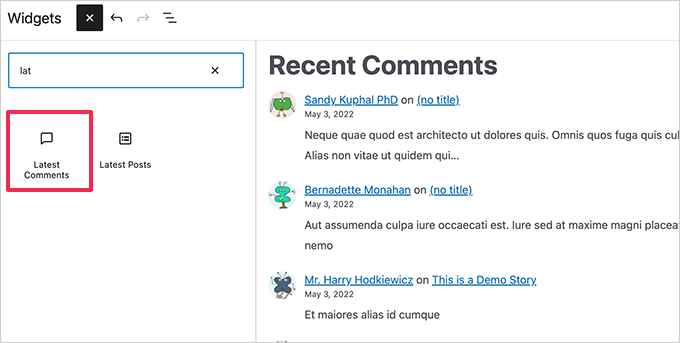
Simply go to Appearance » Widgets and add Recent Comments widget to a sidebar.

Recent comments

8. Allow Users to Rate and Share Comments

The default WordPress commenting system is plain and simple. It does not have the social, gamification, and user engagement elements of a modern discussion platform. However, you can easily add these features in WordPress using plugins.

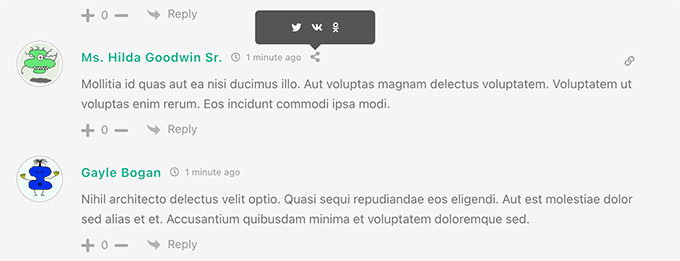
Simply install and activate the wpDiscuz plugin. Upon activation the plugin will beautifully transform your WordPress commenting system into a highly engaging discussion platform.

Rate and share comments

wpDiscuz comes with features like voting, social sharing, comment bubble, and many more. For details, see our article on how to improve WordPress comments with wpDiscuz.

9. Notify Users When Their Comment is Approved

When a user submits a comment on your blog, WordPress shows them that their comment is awaiting moderation. The users have no idea when you approve their comment or delete it.

You can increase your pageviews as well as user engagement by simply notifying users when their comment is approved.

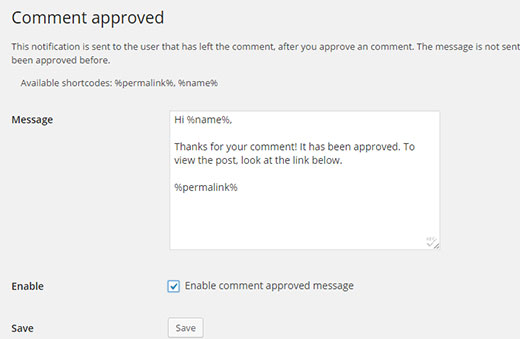
Simply install and activate the Comment Approved plugin. Upon activation, go to Settings » Comment Approved page to configure the plugin.

Comment Approved Settings

For detailed instructions see our tutorial on how to notify users when their comment is approved in WordPress.

10. Allow Users to Edit Comments in WordPress

By default, users cannot edit their comments once they have submitted them. This can be frustrating for users as they may want to correct a typo or grammar mistake.

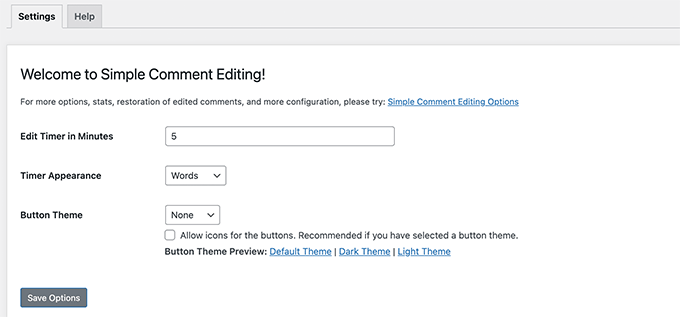
Simply install and activate Simple Comment Editing plugin, which allows users to easily edit their own comments on your site. You can set a time limit to editing permission.

Simple comment editing

For details, see our article on how to allow users to edit comments in WordPress.

11. Get Better WordPress Hosting

Comments consume resources on your web hosting server which may affect overall WordPress speed and performance.

Each time a user submits a comment on your WordPress site, your server runs a PHP script. If multiple users are submitting comments at the same time, this could slow down your site or even crash your site.

So to get more comments on your site, you first need to make sure your website can handle more comments.

The easy way to deal with this is by using a WordPress caching plugin. This should work for most websites on shared WordPress hosting provider.

However, for busier websites, this may not be enough. If you have a larger site, then try a managed WordPress hosting provider like WP Engine or SiteGround for better speed.

We hope this article helped you learn some new ways to get more comments on your WordPress blog posts. You may also want to see our guide on how to style WordPress comments and improve WordPress SEO on your website.

If you liked this article, then please subscribe to our YouTube Channel for WordPress video tutorials. You can also find us on Twitter and Facebook.
10 Important Metrics to Measure on Your WordPress Site

Are you wondering how is your WordPress website performing?

Measuring important website metrics can help you find out what’s working and not working in your business. You can then tweak your content strategy, try new ways to increase website traffic, and optimize your site for higher conversions.

In this article, we’ll show you important metrics to measure on your WordPress site.

Important Metrics to Measure on Your WordPress Site

How to Measure Important Metrics in WordPress

When running a successful business, it’s essential to know your WordPress website’s performance. However, many business owners use their ‘best guesses’ to make decisions instead of working with data.

This is where tracking important web metrics can help you make informed decisions and grow your website with confidence.

You can see which strategies are working, which content your visitors like, where they are from, and how you can improve your traffic and WordPress conversions.

The easiest way to measure important metrics in WordPress is using MonsterInsights. It’s the best WordPress analytics plugin and is used by over 3 million websites.

MonsterInsights makes it super easy to properly setup Google Analytics in WordPress, bring important stats inside your WordPress dashboard, display popular posts, and offers advanced tracking features.

MonsterInsights

To start, you’ll first need to install and activate the MonsterInsights plugin. If you need help, then please see our guide on how to install a WordPress plugin.

Editor’s Note: if you want to unlock advanced tracking features like eCommerce tracking and more dashboard reports, then you’ll need the MonsterInsights Pro version. There is also a free version of MonsterInsights that you can use to get started.

Upon activation, you’ll be taken to MonsterInsights welcome screen in WordPress. Go ahead and click the ‘Launch the Wizard’ button.

You can now follow the steps to configure the plugin and connect Google Analytics to your WordPress site.

Set up MonsterInsights

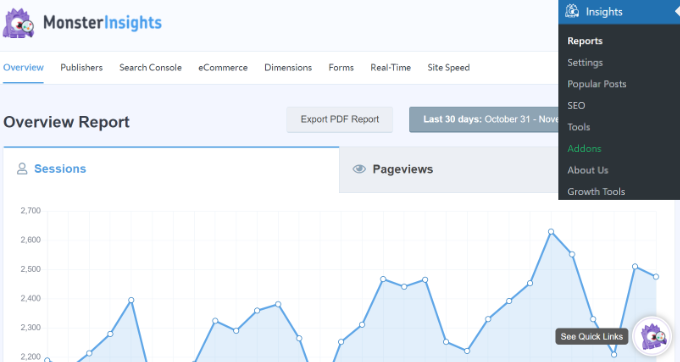
After that, simply head over to Insights » Reports from your WordPress admin panel to view metrics and get insights to grow your business.

MonsterInsights dashboard reports

That being said, let’s look at some of the most important website metrics to measure on your website.

1. Sessions

The first thing you should measure is your website traffic. To do that, you can look at the number of sessions. A session represents a single visit to your site, and it can include many pageviews.

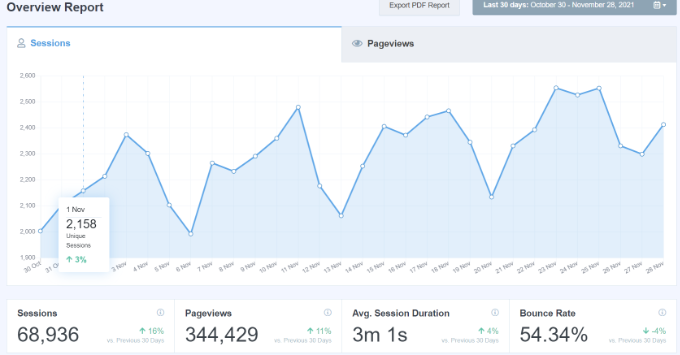
In MonsterInsights, you can easily view the number of sessions by navigating to Insights » Reports and see the ‘Overview’ report.

See the number of sessions

The graph shows a trend from the last 30 days. Simply hover over the graph to see the Unique Sessions on a particular day. You can use this website metric to see how many people visit your site and if your traffic is increasing or decreasing.

For example, if you have a WordPress blog, then looking at sessions can show whether the number of readers is rising. If it’s not, then you need to find more ways to increase your blog traffic.

Besides that, you can also look at the average session duration and bounce rate to get more insights into user engagement.

Having a high session duration means people enjoy reading your content and spend more time on your website. Whereas a high bounce rate means users didn’t find what they were looking for and left your site.

2. Top Referrals

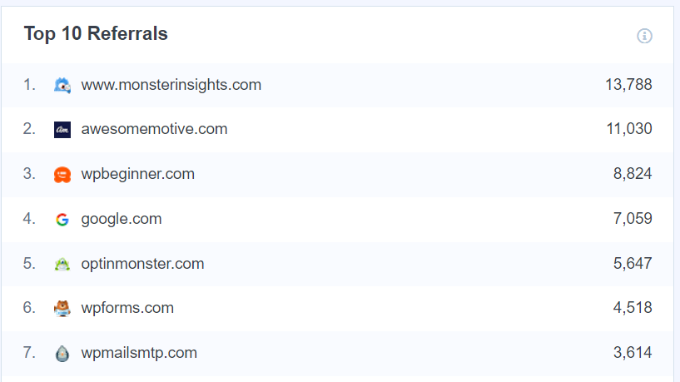
The next metric you should be measuring is Referrals. These are websites that link to your content and send traffic to your site, also known as referral traffic.

Top referrals

Since these websites are linking to your articles, it means they’re providing a backlink. Backlinks are an important Google ranking factor, and they give a vote of confidence for your content.

Having backlinks from high authority sites means your content is excellent, and you can see a positive impact on your keyword rankings.

Using the top referrals metric, you get to see which websites are sending visitors to your website. This helps in finding similar sites to get more backlinks and boost your WordPress SEO.

Similarly, you can also uncover which guest post is driving a lot of referral traffic. It helps in choosing the type of content and topic to cover for future guest posts.

3. Top Countries

Ever wonder which country your visitors are from? In MonsterInsights, you get to see which region drives the most traffic to your site by looking at the Top Countries metric.

Top countries

Using the data from the top countries report, you can uncover new content ideas.

Let’s say one region that’s sending the most traffic is India. You can write about the best web hosting services in India if you have tech website or 5 places to visit in India if you have a travel blog.

Besides that, you can also create personalized marketing campaigns and provide a custom user experience for people from different regions. For instance, you can offer free shipping or discount offers to people for a particular location.

You can also check out our ultimate guide to geolocation targeting in WordPress.

4. Top Posts and Pages

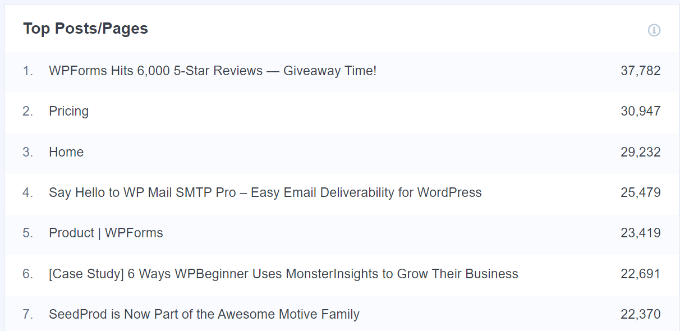
Do you know which landing pages and blog posts drive a lot of traffic, engagement, and conversions on your site? A simple way to find out is by measuring the top posts and pages metric.

In MonsterInsights, you can uncover your most viewed pages and posts in the Overview report.

Most viewed pages and posts

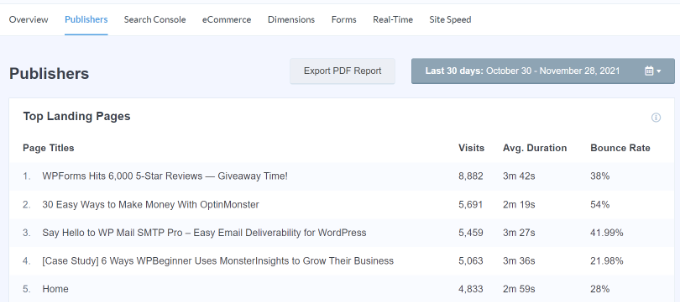
If you’re using the MonsterInsights Pro version, then you can unlock the Publishers report and get more insights about how people interact with your most important pages.

Simply head over to Insights » Reports and click on the ‘Publishers’ tab. Next, you can see the Top Landing Pages report and how many visits your pages get along with visit duration and bounce rate.

Top landing pages

Once you know which articles are performing the best, you can create more content on similar topics and grow your traffic. You should also check keyword rankings for these top pages and see if you can improve their rankings to reach the #1 spot in Google.

On these top pages, you can also place your newsletter subscription form and convert visitors into email subscribers to build an email list. If you’re selling products or services, then you can optimize your high-traffic pages to boost sales and conversions.

5. Outbound Links

The next site metrics you should measure is the outbound link clicks. These are links in your content that are from other websites. When a user clicks on an outbound or external link, they’re taken to another site.

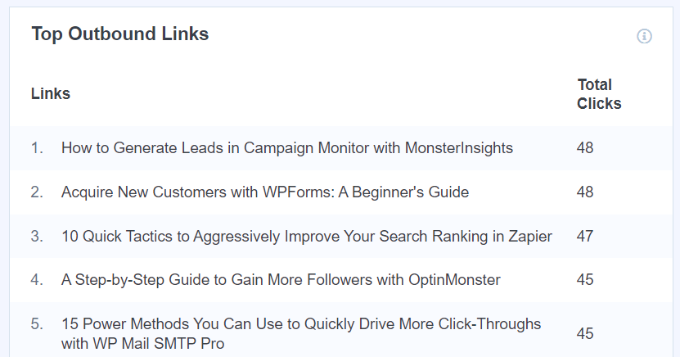
In MonsterInsights Publisher’s report, you can see the Top Outbound Links. Do note that Google Analytics doesn’t track external link clicks by default. However, with MonsterInsights, you get link tracking out of the box.

Outbound links report

Measuring which outbound link is getting the most clicks can help you create new partnership opportunities.

For instance, you can reach out to the sites that you’re sending traffic to and ask for a backlink for your blog as well. You can also build partnerships and join their affiliate marketing program to earn more money.

Aside from that, tracking outbound links can also help you better understand your user’s behavior and come up with new content ideas. Since people are clicking a link to view content on another site, you can create a better version of that article on your own website.

6. Demographics

Another important web metric to measure is user demographics. It helps you better understand your audience. You could then offer products that they’d prefer or write content based on their interests.

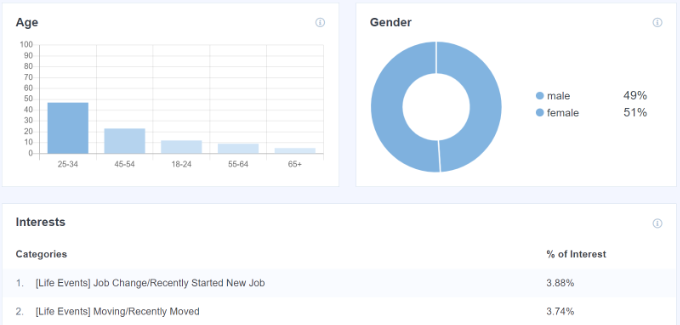
With MonsterInsights, it’s straightforward to track and measure demographic information. You get to see the age, gender, and interests of your visitors in WordPress.

Demographic reports

Demographics help you find hidden WordPress user data that you can use to make business decisions.

For example, let’s say you have an eCommerce store that sells shoes. If your audience is primarily females, then you can add more women’s shoes to your store compared to men.

Similarly, if you’re writing blogs about the latest tech and one of the top audience interests is smartphones, then you can create more content on smartphones compared to other categories.

7. Top Google Search Terms

Do you want to know which keywords your users use to find your website? You can quickly uncover this insight by measuring the top Google search terms for your website.

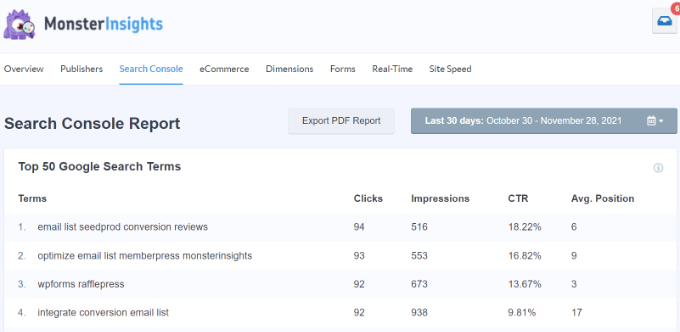
MonsterInsights brings your Search Console report inside your WordPress admin area and allows you to see the top 50 keywords people use to look up your site on Google.

You can see our guide on how to add your WordPress site to Google Search Console.

Search console report

By measuring the Google Search Terms metric, you can see which keywords drive traffic to your site. The report shows clicks, impressions, CTR, and average position for each search term.

From the report, you can select keywords that are close to reaching the #1 position in Google and optimize them.

The report also helps identify low-hanging fruits, which are keywords that can easily reach the first page on Google with a little tweak in meta title, internal linking, and keyword optimization.

Besides that, you can also find new keyword ideas to target on your website. For instance, look for similar search terms that are already performing well and optimize them in your content. As a result, you’ll grab keyword rankings for different search terms and grow your organic traffic.

8. Form Conversions

Forms play an important role in running a successful business, whether you’re running a WooCommerce store, a blog, a membership website, or a company website.

Forms help you keep in touch with your visitors. You can easily get feedback from your customers and resolve their queries through contact forms.

However, simply adding a form to your WordPress site isn’t enough. You should track their performance and see how well they’re converting. This is where measuring the form conversion metrics comes in handy.

With MonsterInsights Forms addon, you can easily track form conversions in Google Analytics. It works smoothly with WPForms, Formidable Forms, and any WordPress form plugin.

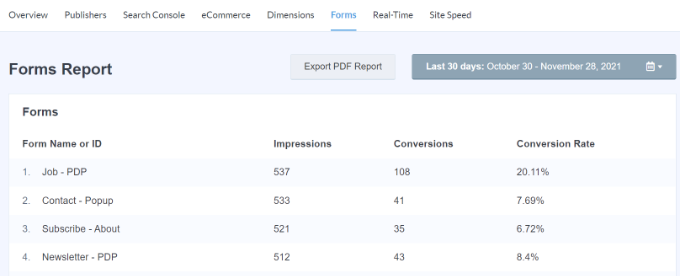
The best part is that you get to see the report inside your WordPress dashboard. Simply head over to Insights » Reports » Forms to view the report.

Forms report

The report will show the total number of impressions, conversions, and conversion rate for each form.

Using the information from the report, you get to see which forms get the most conversions and which don’t. You can change the low-performing forms’ design, layout, questions, and other elements to improve their conversions.

On the other hand, placing your highly converting forms on the most important pages or in the sidebar can further boost their conversions.

9. Site Speed

Site Speed is another metric you should be tracking in your WordPress website. That’s because Google now considers your site’s loading speed as a ranking factor.

If your website is slow to load and doesn’t provide a great user experience, then Google will not rank your content higher and instead prefer other sites that are faster.

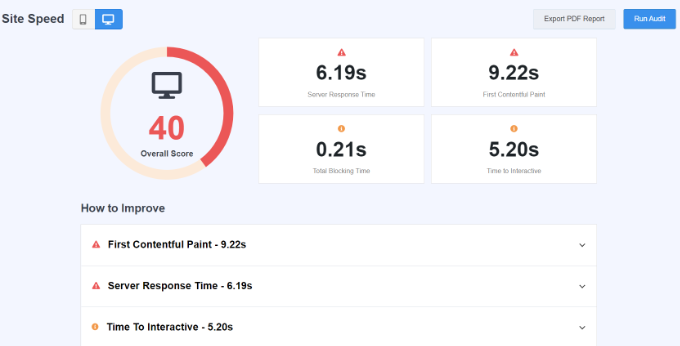
A simple way to measure load time is by using the MonsterInsights Site Speed report.

Site speed report

The report shows an overall site speed score for desktop and mobile along with other web metrics to measure page speed. You also get recommendations on how to improve your site’s load time.

You can go through our detailed guide to boost WordPress speed and performance.

10. Custom Dimensions

Custom dimensions are additional pieces of information that you can use to understand how people use your website. They help uncover things like content types, SEO performance, user engagement, and more.

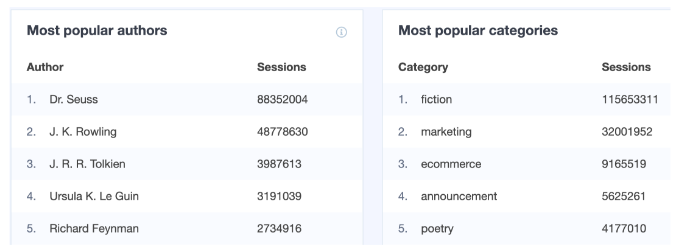
Using MonsterInsights Dimensions addon, it’s very easy to set up custom dimensions in WordPress. You can track popular authors, post type, top categories and tags, and more.

Popular authors dimension

For example, if you’re running a multi-author website, then you can track your most popular authors using custom dimensions. You can also uncover which post category gets the most traffic, so you can optimize it for conversions and find new content ideas to cover.

There are more custom dimensions you can set up with MonsterInsights. The plugin lets you track logged-in users and see which post type your audience likes. For instance, if your readers prefer guides and tutorials, then you can create similar content to get more traffic.

Logged in user and post type

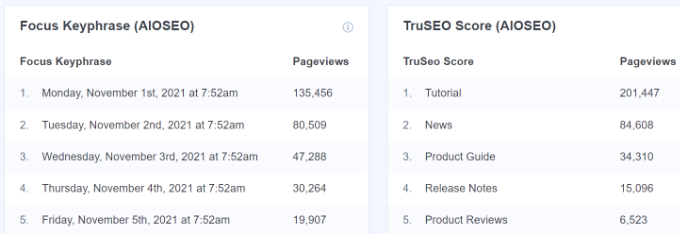
If you’re using the All in One SEO (AIOSEO) plugin, then you can track the TruSEO score of your posts and pages using custom dimensions. Similarly, it also lets you track Focus Keyphrases that you’ve set for each post and find out which keyword gets the most traffic.

Focus keyphrase and TruSEO score

We hope this article helped you find important metrics to measure on your WordPress site. You may also want to see our guide on how to get a free SSL certificate for your WordPress site and the best email marketing services for small businesses.

If you liked this article, then please subscribe to our YouTube Channel for WordPress video tutorials. You can also find us on Twitter and Facebook.